- LevelIntermediate
- Time4-6 hours
- Hook3.0 mm
- YarnBulky
About This Pattern
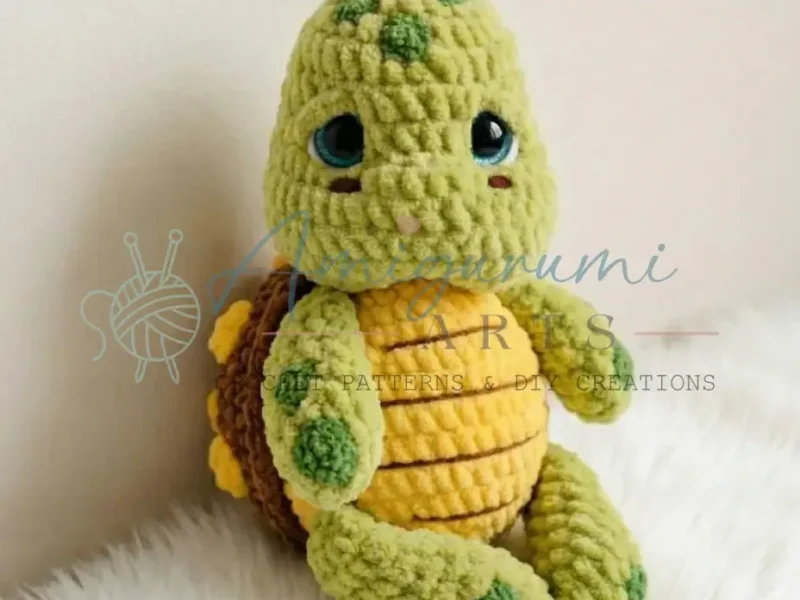
There is something calm about this one. The green body and that warm brown-and-yellow shell feel like a slow afternoon rather than a race to the finish, the kind of make you pick up when you want your hands busy and your mind quiet. I think of it as a porch project, unhurried and a little sunny.
Finished, this turtle sits low and round, a good size for a shelf or a kid's room windowsill. The spotted shell gives it a bit of personality against plain green, so it reads as a character rather than just a shape. It is the sort of thing that gets picked up and turned over before it gets set back down.
I like that nothing about it feels rushed. The fins come first, worked flat and set aside, so by the time you reach the body you already have pieces waiting to be folded in. It keeps the whole project moving in a steady, satisfying line.
Gauge is not critical for this project; consistent, firm tension is more important to prevent gaps in the fabric.
- Crochet both upper fins and both lower fins first so they are ready to tuck into the body later.
- Work the head and body in one continuous spiral, tracking the start of each round with a stitch marker.
- Make the small and large spots separately so they are ready to decorate the finished shell.
- Stuff the head and body firmly with fiberfill as you close up the spiral shape.
- Sew the fins onto the body with a tapestry needle, positioning them before anything is tacked down permanently.
- Attach the shell over the body using a sharp needle and doubled thread matching the shell color.
- Sculpt the face in three thread-cinching stages, then embroider the nose and belly stripes with dark brown thread.
On the desk
Yarn
- Bulky-weight yarn (approx. 100 m / 120 g per skein) in three colors:
- Green (head and body)
- Yellow (body accent and shell detail)
- Brown (shell base)
Hook
- E-4 / 3.0 mm (or size appropriate for your yarn and tension)
Safety eyes
- 18 mm × 2
Stuffing
- Polyester fiberfill
- Stitch markers
- Tapestry needle / yarn needle (wide-eye for sewing parts)
- Sharp sewing needle + thread (matching the shell color, doubled, for attaching the shell)
- Dark brown embroidery thread or fine yarn (for nose and belly stripes)
- Strong thread matching the turtle’s body color (for face sculpting / cinching)
- Scissors
Stitch shorthand
- ch — Chain
- dc — Double Crochet
- dec — Invisible Decrease (insert hook through front loops of next 2 sts, draw up loop, yarn over, pull through all 3 loops)
- FLO — Front Loop Only
- inc — Increase (2 sc in the same stitch)
- MR — Magic Ring
- ps — Puff Stitch (3 unfinished dc worked under one stitch top, pulled through together — see Pattern Notes)
- sc — Single Crochet
- sl st — Slip Stitch
- SM — Stitch Marker
- st / sts — Stitch / Stitches
Crochet sea turtle amigurumi for confident beginners
Upper Fins (make 2)
Begin with green yarn. These fins are worked first so they’re ready to be incorporated into the body.
- Round 1
6 sc in MR. (6)
- Round 2
inc in each st around. (12)
- Rounds 3–4
sc in each st around. (12)
- Round 5
(2 sc, dec) × 3. (9)
- Rounds 6–7
sc in each st around. (9)Do not stuff. Fold the piece in half and sc through both layers across — working 4 sc to close the edge. Fasten off, trim yarn, and tuck the tail inside the fin.
Lower Fins (make 2)
Begin with green yarn.
- Round 1
6 sc in MR. (6)
- Round 2
inc in each st around. (12)
- Round 3
(1 sc, inc) × 6. (18)
- Rounds 4–5
sc in each st around. (18)
- Round 6
(7 sc, dec) × 2. (16)
- Round 7
(6 sc, dec) × 2. (14)
- Round 8
sc in each st around. (14)
- Round 9
(5 sc, dec) × 2. (12)
- Round 10
(4 sc, dec) × 2. (10)
- Round 11
sc in each st around. (10)Do not stuff. Fold in half and sc through both layers to work 4 sc across, closing the edge. Fasten off, trim yarn, and tuck the tail inside the fin.
Head and Body
Begin with green yarn.
- Round 1
6 sc in MR. (6)
- Round 2
inc in each st around. (12)
- Round 3
(1 sc, inc) × 6. (18)
- Round 4
(2 sc, inc) × 6. (24)
- Round 5
(3 sc, inc) × 6. (30)
- Rounds 6–7
sc in each st around. (30)
- Round 8
10 sc, (1 sc, inc) × 5, 9 sc, inc. (36)
- Round 9
6 sc, (1 sc, inc) × 3, 12 sc, (1 sc, inc) × 3, 6 sc. (42)
- Rounds 10–11
sc in each st around. (42)After completing Round 11, insert 18 mm safety eyes between Rounds 7 and 8 — place each eye directly above the first and last increase made in Round 8.
- Round 12
(5 sc, dec) × 6. (36)
- Round 13
(4 sc, dec) × 6. (30)
- Round 14
(1 sc, dec) × 10. (20)Stuff the head firmly now, before the opening becomes too small.
Switch to yellow yarn to begin the body. - Round 15
(1 sc, inc) × 10. (30)
- Round 16
Upper Fin Attachment 8 sc, then work 4 sc simultaneously through the next 4 sts of the body AND through the 4 closed sts of the first upper fin, 9 sc, then work 4 sc simultaneously through the next 4 sts of the body AND through the 4 closed sts of the second upper fin, 5 sc. (30)Check that both upper fins sit symmetrically relative to the eyes. If the placement feels off, adjust by working a slip stitch or two before attaching to shift the position.
- Round 17
(2 sc, inc) × 10. (40)
- Rounds 18–22(40)
sc in each st around. (40) (5 rounds)
- Round 23
Lower Fin Attachment 13 sc, then work 4 sc simultaneously through the next 4 sts of the body AND through the 4 closed sts of the first lower fin, 13 sc, then work 4 sc simultaneously through the next 4 sts of the body AND through the 4 closed sts of the second lower fin, 6 sc. (40)Check that the lower fins are symmetrically placed relative to the upper fins.
- Round 24
(2 sc, dec) × 10. (30)
- Round 25
(3 sc, dec) × 6. (24)Stuff the body firmly before continuing.
- Round 26
(2 sc, dec) × 6. (18)
- Round 27
(1 sc, dec) × 6. (12)
- Round 28
dec × 6. (6)Pull the remaining opening closed. Fasten off and weave the tail inside the body.
Shell
The shell is worked in joined rounds: sl st to join at the end of each round, ch 1 at the beginning of the next. Work in two colors — brown and yellow. Change colors one stitch before the switch point for clean transitions.
Begin with brown yarn.
- Round 1
6 sc in MR. (6)
- Round 2
inc in each st around. (12)
- Round 3
(ps in yellow, inc) × 6. (18)
- Round 4
sc in each st around. (18)
- Round 5
(2 sc, ps in yellow, inc) × 6. (24)
- Round 6
sc in each st around. (24)Finish the final round by working a sl st edging along the outer edge in FLO all the way around. Fasten off and weave in ends.
Stuff the shell lightly to give it a gentle dome shape. Sew the shell to the turtle’s back using a sewing needle and doubled thread matched to the shell color. Pin or use knitting needles to hold it in position before sewing.
Spots — Small (make 7)
Work in green or contrasting color as desired.
- Round 1
10 sc in MR, sl st to join. (10)Fasten off, leaving a tail for sewing.
Spots — Large (make 4)
- Round 1
6 sc in MR. (6)
- Round 2
inc in each st around, sl st to join. (12)Fasten off, leaving a tail for sewing.
Where it goes
- Set it on a bookshelf or windowsill as a quiet, low-profile accent that does not compete with other decor.
- Give it to a child as a soft first toy, paired with other amigurumi sea creatures for a little collection.
- Use it as a nursery or playroom companion piece alongside crocheted plants or other green-toned amigurumi.
- Bring it along as a desk or car buddy, small enough to travel but substantial enough to notice.
Color ideas
- Classic sea turtle Green for the head and body and both sets of fins, brown for the shell base, yellow for the shell accent rounds and the small and large spots.
Care
Hand wash the turtle gently in cool water since bulky-weight yarn and polyester fiberfill can hold water longer than you expect.
Reshape the body and fins while damp and let it air dry fully before handling, so the spiral and joined-round shaping settles evenly.
Store it somewhere dry and out of direct sun so the brown, yellow, and green colors stay true over time.
Assembly
- Step 1 Face sculpting (cinching): Using a length of strong thread matched to the turtle’s body color, sculpt the face in 3 stages.
- Step 2 Stage 1: Enter at point 1, pass through points 2 → 3 → 1 to sculpt around the first eye; then 1 → 4 → 5 → 1 for the second eye. Pull snug and knot securely.
- Step 3 Stage 2: Pass the thread 1 → 2 → 3 → 4 → 5 → 1 in one continuous pass. Knot again.
- Step 4 Stage 3 (muzzle lift): Pass the thread from below one eye to below the other, bringing it out at point 1. Pull firmly upward so the muzzle lifts slightly. Knot and bury the thread end inside the head.
- Step 5 Embroider the face: Using white thread or yarn, embroider the whites of the eyes. Add green eyelids in green yarn. Embroider the nose using dark brown thread.
- Step 6 Attach the shell: Pin the shell dome-side up onto the turtle’s back. Sew securely around the entire edge using doubled sewing thread matched to the shell color.
- Step 7 Attach the spots: Sew 3 small spots onto the head. Sew 2 small spots onto each upper fin (4 total). Sew the 4 large spots onto the body or shell as desired.
- Step 8 Embroider belly stripes: Using dark brown yarn or thread, embroider 4 horizontal stripes across the turtle’s belly.
- Step 9 Weave in all remaining ends.
Easy to get wrong
Losing track of the spiral
The head and body are worked in a continuous spiral with no joining rounds, so it is easy to drift off your round count. Keep a stitch marker in the first stitch of every round and move it up each time.
Rushing the face sculpting stages
The face is cinched in three separate passes through specific points, and skipping the knot between stages lets tension slip. Knot securely after each stage before starting the next so the expression holds.
Listener questions
Do I need to know how to join rounds for this pattern?
Yes, the shell specifically uses joined rounds with a slip stitch and a chain 1 to start the next round. The head and body, by contrast, are worked in a plain continuous spiral, so you will use both methods in one project.
Can I make the fins and spots before the body?
Yes, the pattern is written with the upper fins, lower fins, and spots as separate pieces you make ahead of time. Having them finished before you start the head and body makes assembly much smoother.
What is the face sculpting step actually for?
It is a thread-cinching technique done in three stages after the head is stuffed, pulling strong thread through specific points around the eyes and muzzle. It shapes a flat amigurumi face into something with real dimension and expression.
How do I attach the shell neatly?
Use a sharp sewing needle with doubled thread that matches the shell color, as listed in the materials. Sewing with matching thread keeps the stitches from standing out against the shell's brown and yellow rounds.
What yarn weight does this pattern call for?
It uses bulky-weight yarn at roughly 100 meters per 120 gram skein, worked with an E-4 or 3.0 mm hook. That combination keeps the stitches large and the whole project quick to work up.
Original pattern: https://amigurumiarts.com/crochet-sea-turtle-amigurumi/
About the Author

Marisol QuinteroWho runs Crochet Obsessed, why a stitch count sits at the end of every round, how a pattern gets written here, and the things this site will never do.
More Patterns
- IntermediateNo. 01

Rose Granny Square Tote Crochet Pattern
Rose granny square tote crochet pattern made from 18 dimensional rose squares for a sturdy, romantic everyday bag.
- IntermediateNo. 02
Tropical octopus baby blanket crochet pattern with appliqués
Tropical octopus baby blanket crochet pattern: a cream filet base with coral and turquoise octopus appliqués, leaves, and…
- IntermediateNo. 03
Sunny lemon couple amigurumi crochet pattern
Sunny lemon couple amigurumi crochet pattern with embroidered slices and safety eyes for a cheerful handmade shelf pair.


