- LevelIntermediate
- Time4-6 hours
- Hook4.0 mm
- YarnWorsted
About This Pattern
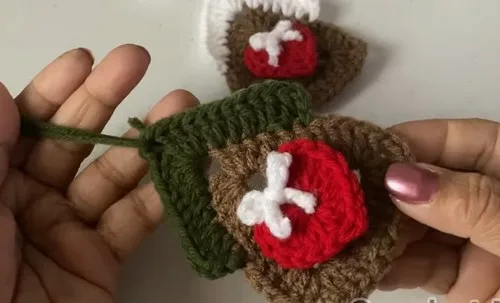
This little house has a cheerful, tidy energy, like something you'd find tucked on a shelf between books. It is small enough to finish in a sitting but detailed enough to feel like a real project. The heart and bow give it a soft, handmade sweetness without being fussy.
Your hands will spend most of the time building corners and chain spaces, which keeps you paying attention round by round. There's a satisfying rhythm to increasing into the peak and then leveling back out across the roofline. The bow and heart are quick side makes that reward you fast after the slower house body.
Set on a windowsill or clipped onto a strand with its hanging loop, the house reads as a tiny architectural object, not just a trinket. Group a few in different colorways along a mantel or shelf edge and they start to look like a little street. On its own, it's a nice size for a bag charm or a gift topper.
You can customize this pattern with different yarn colors to suit your style, so no two houses need to match.
- Start the house body with a magic ring and build the first round using double crochet and chain spaces for the corners.
- Work the second round of the house body, increasing at the chain spaces to shape the roof peak.
- Make the heart separately with a magic ring, working half double and double crochet stitches around to form the curves.
- Chain a short length for the bow, then shape and sew it onto the heart.
- Sew the finished heart and bow onto the front of the house.
- Chain a loop at the top of the house and slip stitch it closed to create a hanger.
- If joining multiple houses, chain a length between each one and attach them in a row.
On the desk
- 3 colors of yarn
- 4.0mm crochet hook
- Needle
- Scissors
Stitch shorthand
- dc — double crochet
- half dc — half double crochet
Crochet little house ornament with heart and bow
House Pattern
- Round 1
Make a magic ring, then chain 3. Do 4 double crochet (dc) stitches, chain 3, 5 dc, chain 3, 5 dc, chain 3.Finish by slip stitching into the 3rd chain.
- Round 2
Chain 3, then do 1 dc into the next 4 stitches. Do 3 dc into the chain space, chain 1, and 1 dc into the next 5 stitches.Repeat this pattern, then slip stitch into the 3rd chain before cutting the yarn.
Roof Pattern
- Round 6
Use a new color of yarn. Join the new color, chain 3, and do 1 dc into the next stitch.Do 2 dc into the next stitch, 1 dc into the next stitch, and 2 dc into the next two stitches.
In the chain space, do 3 dc, chain 3, and 3 dc.Continue with 2 dc into the next stitch, 1 dc into the next two stitches, 2 dc into the next stitches, 1 dc into the next stitches, and chain 2.Slip stitch into the next stitch and cut the yarn.
Heart Pattern
- Round 1
Make a magic ring with the 3rd color of yarn. Chain 2, then do 3 dc, 3 half dc, 1 dc, 3 half dc, 3 dc, and chain 3.Slip stitch into the magic ring and cut the yarn.
Where it goes
- Clip it onto a scarf zipper pull or tote bag strap as a small charm that pairs well with plain canvas or wool bags.
- String several together using the chain joins to make a short garland for a shelf edge or window frame.
- Attach the hanging loop to a bit of ribbon and use it as a gift topper on a wrapped box.
- Set a single house on a windowsill or desk alongside small plants or candles as a tiny tabletop accent.
Care
Hand wash the finished piece in cool water with a mild soap, since most worsted-weight yarns hold shape better without a machine wash.
Lay it flat on a towel to dry and gently reshape the roofline and heart while damp so the corners stay crisp.
Store it flat or loosely boxed rather than hanging for long periods, which helps the chain loop keep its shape over time.
Assembly
- Step 1 Sew the heart onto the house.
- Step 2 To make the bow, create a loop, chain 17, and cut the yarn.
- Step 3 Make a bow shape and sew it onto the heart.
- Step 4 For the hanging loop, chain 12 and slip stitch into the first chain.
- Step 5 Then, chain 20 and join the loop to the first house.
- Step 6 Chain 20 and join the loop to the next house.
- Step 7 Repeat this process for as many houses as you want to join together.
Easy to get wrong
Losing the chain-3 corners
Count your stitches before each chain space so the corners stay symmetrical across both rounds. If one corner looks smaller, check that you worked the full stitch count into that chain space.
Uneven color join at the roof
Join the new color with a firm knot right at the base of the stitch before chaining 3. A loose join at this seam will show along the roofline once the piece is finished.
Listener questions
Can I make the house in just one color?
Yes, you can skip the color change between the two main rounds and work the whole body in one yarn. The shaping will still work the same way since the increases do the job, not the color change.
Do I need to block the heart separately?
I like to lightly steam or finger-press the heart before sewing it on, since it holds the curve better once attached. It is not required, but it makes the final placement on the house look neater.
How do I join multiple houses together?
Chain a length between each house's hanging loop and slip stitch it to the next one, repeating for as many houses as you want in the row. This turns a single ornament into a short strand you can drape anywhere.
What hook size does this pattern use?
A 4.0mm crochet hook is used throughout for the house, heart, and bow. Keeping the same hook size helps all three pieces match in scale.
Is this a good pattern for a first amigurumi-style project?
It leans intermediate because of the chain-space shaping and the mixed stitch heights in the heart, but it is still a small, fast make. If you've worked magic rings and basic increases before, you'll pick up the rest quickly.
Original pattern: https://crocheteverything.com/crochet-gingerbread-house-decoration-pattern-with-heart-and-bow/
About the Author

Marisol QuinteroWho runs Crochet Obsessed, why a stitch count sits at the end of every round, how a pattern gets written here, and the things this site will never do.
More Patterns
- IntermediateNo. 01

Rose Granny Square Tote Crochet Pattern
Rose granny square tote crochet pattern made from 18 dimensional rose squares for a sturdy, romantic everyday bag.
- IntermediateNo. 02
Tropical octopus baby blanket crochet pattern with appliqués
Tropical octopus baby blanket crochet pattern: a cream filet base with coral and turquoise octopus appliqués, leaves, and…
- IntermediateNo. 03
Sunny lemon couple amigurumi crochet pattern
Sunny lemon couple amigurumi crochet pattern with embroidered slices and safety eyes for a cheerful handmade shelf pair.


