- LevelIntermediate
- Time4-6 hours
- Hook4.0 mm
- YarnBulky
About This Pattern
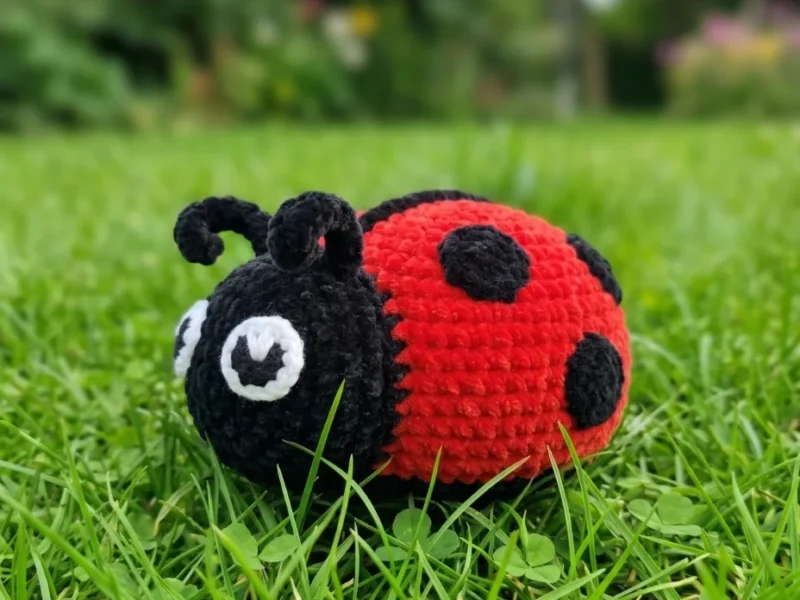
There's something cheerful about a ladybug the moment you pick up red plush yarn. This one keeps things simple and sweet, no fussy shaping, just round after round building toward a shape everyone recognizes on sight. It's the kind of project that makes you smile before you've even finished the Body.
Set this ladybug on a shelf, a windowsill, or tucked among other amigurumi and it holds its own without needing anything else nearby. The plush red and black finish catches light in a way plain worsted yarn doesn't. It reads as a handmade little creature, not a decoration trying too hard.
This pattern uses US crochet terms throughout, and stitch counts appear in parentheses at the end of each round so you can check your work as you go. Gauge isn't critical here, but keep your fabric firm enough that stuffing doesn't peek through the stitches — size your hook down if your fabric feels too loose.
- Build the Head separately in black plush yarn, following the same spiral increase structure as the Body.
- Crochet six or seven small Spots in black plush yarn, keeping them quick and repetitive once you find the rhythm.
- Stuff the Body and Head firmly with fiberfill before closing, so the plush fabric holds its shape.
- Whipstitch the Head onto the top of the Body using the long tail left for sewing.
- Arrange and stitch the Spots evenly across the red upper half of the Body.
- Finish by sewing the Eyes side by side onto the front of the Head.
On the desk
- Yarn (main): Bulky-weight plush or velour yarn — such as Himalaya Dolphin Baby, YarnArt Dolce, Wolans Bunny Baby, or LaVita Velur — in red (50 g) and black (50 g)
- Yarn (detail): Sport-weight cotton yarn — such as YarnArt Jeans — in black (small amount) and white (small amount)
Hook
- US G-6 / 4.0 mm
Stuffing
- Fiberfill / polyfill, approximately 100 g
- Stitch marker
- Scissors
- Lighter (for sealing plush yarn ends, if needed)
- Plastic tapestry needle with wide eye
Stitch shorthand
- ch — Chain
- dec — Invisible Decrease (insert hook in front loop of next 2 sts, pull up loop, yarn over, pull through all 3 loops)
- hdc — Half Double Crochet
- inc — Increase (2 sc in same stitch)
- MR — Magic Ring
- sc — Single Crochet
- sl st — Slip Stitch
- st / sts — Stitch / Stitches
Crochet a plush ladybug amigurumi for beginners
Body (worked in red plush yarn)
This piece is worked in a continuous spiral — do not join or turn unless told to. Use a stitch marker to track the start of each round. The Body changes color from red to black partway through, right before Round 17.
- Round 1
6 sc in MR. (6)
- Round 2
inc in each st around. (12)
- Round 3
sc, inc repeat around. (18)
- Round 4
sc, inc, 2 sc, inc repeat 5 times, sc. (24)
- Round 5
3 sc, inc repeat around. (30)
- Round 6
2 sc, inc, 4 sc, inc repeat 5 times, 2 sc. (36)
- Round 7
5 sc, inc repeat around. (42)
- Round 8
3 sc, inc, 6 sc, inc repeat 5 times, 3 sc. (48)
- Round 9
7 sc, inc repeat around. (54)
- Round 10
4 sc, inc, 8 sc, inc repeat 5 times, 4 sc. (60)
- Rounds 11–16
sc in each st around. (60) Work 6 rounds even. Change to black plush yarn.
- Round 17
8 sc, dec repeat around. (54)
- Round 18
7 sc, dec repeat around. (48)
- Round 19
6 sc, dec repeat around. (42)
- Round 20
5 sc, dec repeat around. (36)
- Round 21
4 sc, dec repeat around. (30)
- Round 22
3 sc, dec repeat around. (24)Stuff the Body firmly now before continuing.
- Round 23
2 sc, dec repeat around. (18)
- Round 24
sc, dec repeat around. (12)
- Round 25
6 dec, sl st to close. Fasten off and weave in end. (6)
Head (worked in black plush yarn)
- Round 1
6 sc in MR. (6)
- Round 2
inc in each st around. (12)
- Round 3
sc, inc repeat around. (18)
- Round 4
sc, inc, 2 sc, inc repeat 5 times, sc. (24)
- Round 5
3 sc, inc repeat around. (30)
- Round 6
2 sc, inc, 4 sc, inc repeat 5 times, 2 sc. (36)
- Rounds 7–9(36)
sc in each st around. (36) Work 3 rounds even.Sl st to finish. Fasten off, leaving a long tail for sewing.
Spots (make 6–7, worked in black plush yarn)
Spots are not stuffed — work them flat and sew them on flat once you're finished crocheting.
- Round 1
6 sc in MR. (6)
- Round 2
inc in each st around. (12)Sl st to finish. Fasten off, leaving a long tail for sewing.
Eyes (make 2, worked in sport-weight cotton yarn)
The Eyes are not stuffed. They're worked flat in sport-weight cotton yarn, which gives a smooth, defined look that contrasts with the fluffy plush Body.
These are worked in two colors of cotton yarn — not plush yarn.
Black section:
- Round 1 (Black)
6 sc in MR. (6)
- Round 2 (Black)
inc in each st around. (12)Sl st to finish. Cut yarn, leaving a 2-stitch gap from the sl st, then join white cotton yarn.
White section:
- Round 1 (White)
ch 1, inc, sc repeat 5 times, inc, sl st to join. (18)Fasten off, leaving a long tail for sewing.
Where it goes
- A soft toy for a child's shelf or toy basket, paired with other small crochet animals for a matching set.
- A desk companion at work, sitting next to plants or pen cups for a spot of color.
- A handmade gift for a baby shower, paired with a knit blanket or onesie in coordinating red tones.
- A photo prop for craft fairs or online shop listings, styled alongside other amigurumi in the same plush yarn.
Color ideas
- Classic ladybug Red plush yarn for the whole Body, black plush yarn for the Head and every Spot, with black-and-white cotton yarn Eyes as shown.
- Two-tone contrast Keep the Body in red plush yarn as written, but work the Head in a different dark plush color you already have on hand, so the Spots pop against it.
Care
Hand wash the finished ladybug in cool water if needed, since bulky plush yarn can mat under harsh machine agitation.
Lay it flat to air dry away from direct heat, gently reshaping the Body and Head with your hands while damp.
Store it stuffed and upright on a shelf rather than squashed in a bin, so the plush fibers keep their loft.
Assembly
- Step 1 Attach the Head to the Body. Position the Head on top of the Body (over the red section, centered at the top). Using the long tail and tapestry needle, sew the Head securely in place using a whipstitch around the entire opening edge.
- Step 2 Sew on the Spots. Arrange 6–7 Spots across the red upper half of the Body, spacing them evenly. Use the yarn tail to stitch each Spot flat against the surface.
- Step 3 Attach the Eyes. Place the Eyes on the front of the Head, side by side. Sew each one down firmly using the yarn tail, making sure the white border faces outward.
- Step 4 Add a highlight (optional). Using a length of white cotton yarn and a tapestry needle, embroider a small stitch on each Eye to create a light reflection.
- Step 5 Make the antennae. Using black cotton yarn, ch 15. Starting in the 3rd ch from the hook, work: sc, 2 sc in next st, then sl st across the remaining 10 chains. Fasten off, leaving a tail for attaching. Make 2.
- Step 6 Attach the antennae. Sew both antennae to the top of the Head, positioning them slightly apart so they angle outward.
- Step 7 Add a decorative stripe (optional). Work a chain of stitches down the center of the Body’s red section in black cotton yarn to suggest the wing division of a ladybug.
- Step 8 Weave in all remaining ends. Use a lighter to carefully seal any plush yarn tails if needed — touch the flame briefly near (not to) the yarn end to prevent fraying.
Easy to get wrong
Losing the round marker in plush yarn
Plush yarn's fuzzy texture hides stitch markers easily, so use a large, high-contrast marker and check it every few rounds.
Sloppy color change on the Body
Leave the small gap noted in the pattern before joining the new color, and pull the first stitch snug so the join sits flush instead of gapping.
Under-stuffing before closing
Plush yarn fabric is stretchy and forgiving, so pack fiberfill in firmly as you go rather than trying to add more once the opening is nearly closed.
Listener questions
Can I use a different plush yarn brand than the ones listed?
Yes, any bulky-weight plush or velour yarn works as long as it matches the weight of the ones named. Just keep your hook at US G-6 / 4.0 mm and adjust if your fabric feels too loose or too tight.
Do I need to join each round or work in a spiral?
This pattern is worked entirely in a continuous spiral, so you never join or turn unless the instructions say otherwise. A stitch marker at the start of each round keeps you from losing track.
How do I change colors cleanly between red and black on the Body?
Work the last stitch of Round 16 until two loops remain on your hook, then pull the new black yarn through those two loops to complete the stitch. This locks the color change at exactly the right spot. Leave a tail of about 6 inches on both the old and new yarn, and weave both in securely once the piece is finished. With plush yarn, the transition blends in naturally and is nearly invisible.
How many Spots do I actually need to make?
The pattern calls for six to seven Spots, so you can choose based on how full you want the Body's surface to look. Space whichever number you make evenly across the red upper half.
What needle should I use for assembly?
A plastic tapestry needle with a wide eye is listed in the materials, and it's suited to threading through plush yarn without splitting it. Use the long tails left after fastening off for all the sewing steps.
Original pattern: https://amigurumiarts.com/crochet-ladybug-amigurumi-beginner-friendly-pattern/
About the Author

Marisol QuinteroWho runs Crochet Obsessed, why a stitch count sits at the end of every round, how a pattern gets written here, and the things this site will never do.
More Patterns
- IntermediateNo. 01

Slouchy everyday beanie worked flat in half double crochet
Crochet beanie pattern for a slouchy everyday look worked flat with hdc rows, then seamed into a soft,…
- IntermediateNo. 02
Crochet amigurumi doll with dress, shoes, and hat
Crochet amigurumi doll pattern with dress, shoes, and hat details for a soft, huggable keepsake you build one…
- IntermediateNo. 03
Chunky moss stitch crochet sweater with raglan-free shoulders
Chunky crochet sweater pattern using moss stitch, worked flat with a 10mm hook for a soft, fast, cool-weather…


