- LevelIntermediate
- Time4-6 hours
- Hook2.0 mm
- YarnWorsted
About This Pattern
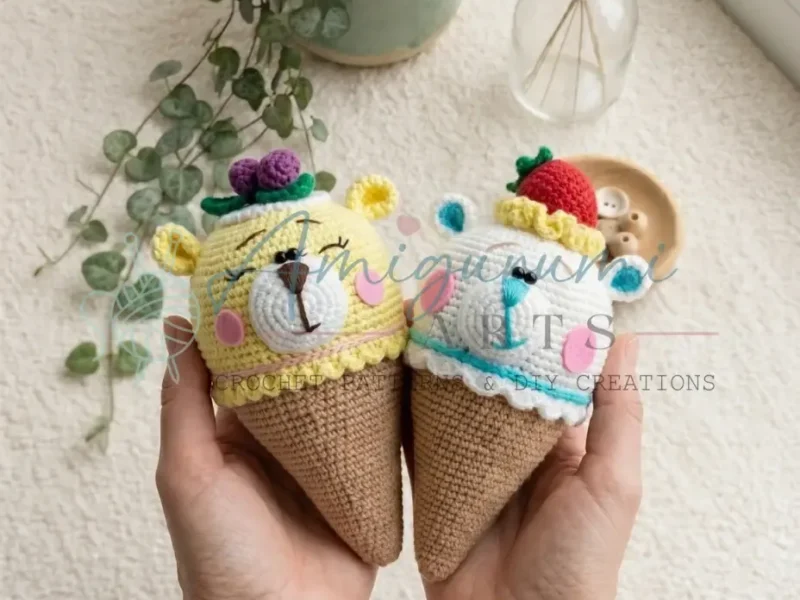
This one feels like a treat shop on a warm afternoon, three little bear faces peeking out of their cones like they just got handed the best order of the day. There is a playful, candy-shop energy running through every version, whether you are leaning toward the white, the turquoise, or something in between. It is cheerful work, the kind you pick up when you want your hands busy and your mood light.
Your hands will spend most of their time in a continuous spiral, moving from the base of the cone straight up into the scoop without a single join to track. Then they shift gears for the small stuff: a strawberry built in tight little rounds, a calyx worked leaf by leaf straight off the base, a scallop trim picked up in front loops only. It is a nice mix of steady rhythm and fiddly, rewarding detail work.
Finished, this bear sits happily on a shelf, a desk, or tucked into a kid's bed, looking like dessert that never melts. The beige cone grounds the whole thing while the scoop color does the talking, and the little beaded eyes give it a face you want to keep glancing at. It is the kind of softie that makes people smile before they even ask who made it.
I keep coming back to how three personalities emerge from one shared blueprint. Swap the scoop color, swap the topping, and the bear becomes a different character without any real change in technique. That kind of flexibility is quietly satisfying for anyone who likes efficient pattern design.
- Start the cone at its point, tucking a knotted cord stem inside before the first ring closes so it stays anchored.
- Keep working in back loops only throughout the cone section so the front loops stay free for trim later.
- Build the strawberry separately in its own steady rounds, stuffing firmly as the shape grows.
- Finish the strawberry with a calyx worked leaf by leaf directly from a five-stitch ring, then add its short stem.
- Shape the muzzle and both ears in the scoop's main color so the face reads as one cohesive character.
- Set the beaded eyes, cheek circles, and embroidered details once all the main pieces are stuffed and ready.
- Add the scallop trim into the front loops left open on the final cone round, tucking decreases in as you go.
On the desk
Yarn
- Worsted weight (e.g., Yarn Art Jeans) in sand/beige, white, turquoise, and lemon yellow as main colors
Hook
- US B-1 / 2.0 mm
Stuffing
- Polyester fiberfill
Beads
- 5 mm beads for eyes (2 per character)
Pink felt
- For cheeks — cut two 1–1.5 cm circles per character
Waxed cord
- For the cherry stem (approx. 5 cm piece)
Black sewing thread
- For embroidered facial details
- Craft glue or glue gun
- Tapestry needle / thick yarn needle
- Scissors
- Stitch markers
Stitch shorthand
- BLO — Back Loop Only
- ch — Chain
- dc — Double Crochet
- dec — Decrease (invisible decrease — insert hook through front loops of next 2 sts)
- FLO — Front Loop Only
- hdc — Half Double Crochet
- inc — Increase (2 sc in same stitch)
- MR — Magic Ring
- sc — Single Crochet
- sl st — Slip Stitch
- st(s) — Stitch(es)
- tr — Treble Crochet
Crochet ice cream bear amigurumi in three flavors
Cone (All Three Characters — Sand/Beige Yarn)
Stuff firmly as you go.
Step by step: All rounds are worked in BLO.
Step by step: Prepare the stem first: cut a 5 cm piece of waxed cord and tie a firm knot at one end; 6 sc in MR. Insert the stem (knot-end down) before pulling the ring closed. (6).
- Round 1
6 sc in MR. (6)
- Round 2
inc in each st around. (12)
- Rounds 3–4
sc in each st around. (12)
- Round 5
1 sc, inc repeat around. (18)
- Rounds 6–7
sc in each st around. (18)Fold the piece in half and join the edges with 9 sc. Cut yarn, leaving a long tail for sewing.
- Round 8
1 sc, inc, 2 sc, inc repeat 5 times, 1 sc. (24)
- Rounds 9–10
sc in each st around. (24)
- Round 11
3 sc, inc repeat around. (30)
- Rounds 12–13
sc in each st around. (30)Step by step: Cut yarn, leaving a long tail for sewing. Do not stuff.
- Round 14
2 sc, inc, 4 sc, inc repeat 5 times, 2 sc. (36)Stuff firmly. Cut yarn, pull tight to close. Cinch the cherry at its base with yarn to create the dimple, then weave the end inside.
Sl st to close the round. Ch 3, then work the bobble edging: 3 tr in 1 st, ch 3, sl st in next st, ch 3, 3 tr in next st, ch 3, sl st in next st — repeat to end. You should have 18 bobbles total. Cut yarn and fasten off. Work one round of sl st into the unworked front loops of the circle. Cut yarn and fasten off.Step by step: Stuff before closing. Cut yarn, pull tight to close, weave end inside.Work one round of reverse single crochet (crab stitch) around the edge. Cut yarn and fasten off.Turn the work so the wrong side faces you. Working in FLO, work 4 sc into each stitch around. Cut yarn and fasten off. - Rounds 15–16
sc in each st around. (36)
- Round 17
5 sc, inc repeat around. (42)
- Rounds 18–19
sc in each st around. (42)
- Round 20
3 sc, inc, 6 sc, inc repeat 5 times, 3 sc. (48)
- Rounds 21–22
sc in each st around. (48)
- Round 23
7 sc, inc repeat around. (54)
- Rounds 24–25
sc in each st around. (54)
- Round 26
4 sc, inc, 8 sc, inc repeat 5 times, 4 sc. (60)
- Rounds 27–28
sc in each st around. (60)
- Round 29
9 sc, inc repeat around. (66)
- Rounds 30–31
sc in each st around. (66)
Strawberry (Red Yarn)
Stuff firmly as you go.
- Round 1
4 sc in MR. (4)
- Round 2
1 sc, inc repeat twice. (6)
- Round 3
1 sc, inc repeat 3 times. (9)
- Round 4
1 sc, inc, 2 sc, inc repeat twice, 1 sc. (12)
- Round 5
3 sc, inc repeat 3 times. (15)
- Round 6
2 sc, inc, 4 sc, inc repeat twice, 2 sc. (18)
- Round 7
5 sc, inc repeat 3 times. (21)
- Round 8
3 sc, inc, 6 sc, inc repeat twice, 3 sc. (24)
- Rounds 9–11
sc in each st around. (24)
- Round 12
1 sc, dec, 2 sc, dec repeat 5 times, 1 sc. (18)
- Round 13
1 sc, dec repeat around. (12)
- Round 14
dec 6 times around. (6)Cut yarn, pull tight to close, and weave end inside.
Strawberry Calyx (Green Yarn)
- Round 1
ch 1, 5 sc in MR, sl st to ch-1. (5)For Rnd 2, work 5 individual leaves — one from each stitch.
For each leaf: ch 4, insert hook into the 2nd ch from hook and work back along the chain: 1 sl st, 2 sc. Insert hook into the next stitch of Rnd 1 and sl st to join. Repeat for all 5 leaves. End with sl st into the first ch-1. Cut yarn and fasten off.For the stem: ch 4, insert hook into the 2nd ch from hook, work 3 sc. Sew the stem to the calyx.
Ice Cream Scoop (All Three Characters — Main Color Yarn)
Change to your chosen ice cream color. Continue stuffing firmly as you go.
- Round 32
sc in each st around. (66)
- Round 33
sc in each st around, working in BLO. (66) The front loops left unworked in this round will be used for the decorative trim.
- Rounds 34–44
sc in each st around. (66)
- Round 45
9 sc, dec repeat around. (60)
- Round 46
4 sc, dec, 8 sc, dec repeat 5 times, 4 sc. (54)
- Round 47
7 sc, dec repeat around. (48)
- Round 48
3 sc, dec, 6 sc, dec repeat 5 times, 3 sc. (42)
- Round 49
5 sc, dec repeat around. (36)
- Round 50
2 sc, dec, 4 sc, dec repeat 5 times, 2 sc. (30)
- Round 51
3 sc, dec repeat around. (24)
- Round 52
1 sc, dec, 2 sc, dec repeat 5 times, 1 sc. (18)
- Round 53
1 sc, dec repeat around. (12)
- Round 54
dec 6 times around. (6)
this … Cut yarn, pull tight to close opening, and weave end inside the piece.
Leaves — Make 3 (Green Yarn)
Foundation chain: ch 9. Insert hook into 2nd ch from hook and work: 1 sl st, 1 sc, 1 hdc, 4 dc, then 4 sc in the last ch (tip of leaf). Working back along the opposite side: 4 dc, 1 hdc, 1 sc, 1 sl st. Cut yarn and fasten off.
Inner Ear Spot — Turquoise Ice Cream Version (Dark Turquoise Yarn)
In MR: ch 2, work 12 dc, sl st to 2nd ch to close. Pull ring tight, cut yarn, and fasten off. Sew or glue to the center of the ear.
Where it goes
- A desk companion that sits next to a monitor and makes calls look a little sweeter.
- A nursery shelf piece that pairs nicely with other soft, rounded toys in similar worsted weights.
- A handmade gift for a friend who collects novelty food-shaped amigurumi.
- A small-batch craft fair item, since the three-flavor design lets you make a matching trio to display together.
Color ideas
- Classic strawberry scoop Sand/beige for the entire cone, red for the main scoop and strawberry topping, with a small green calyx and stem, finished with brown for the embroidered facial details.
- Turquoise and cream Beige cone as always, turquoise for the scoop, muzzle, and ears, with a dark turquoise inner ear spot and pink used sparingly for the cheek circles.
Care
Hand wash in cool water with a mild detergent, since worsted weight acrylic-blend yarns like these hold their shape better when they are not machine agitated.
Lay the bear flat on a towel to air dry, reshaping the cone and scoop gently by hand while it is still damp so the spiral rounds settle evenly.
Store it upright on a shelf rather than squeezed into a bin, which keeps the stuffed scoop and ears from flattening over time.
Assembly
- Step 1 White Ice Cream — Decorative Trim (Front Loops of Rnd 32): Join yarn to the last st of Rnd 32 in the unworked front loops. Work a scallop edging: ch 2, 4 dc in the same stitch, skip 1 st, 1 sc, skip 1 st, 5 dc in next st, skip 1 st, 1 sc, skip 1 st — repeat 15 times. The stitch repeat is a multiple of 4, but there are 66 sts in the round. Work 2 invisible decreases at two arbitrary points during the single crochet stitches to account for the extra stitches so the pattern closes cleanly. End with sl st into the 2nd ch. Cut yarn and fasten off.
- Step 2 Lemon Ice Cream — Decorative Trim (Front Loops of Rnd 32): Join yarn to the last st of Rnd 32 in the unworked front loops. Work a ruffle: work (1 sc, 1 dc, 1 sc) all in 1 st, sl st in next st — repeat to end of round. Cut yarn, fasten off, and weave end inside.
- Step 3 Turquoise Ice Cream — Decorative Trim (Front Loops of Rnd 32): Join yarn to the last st of Rnd 32 in the unworked front loops. Work a dense ruffle: 4 sc in each st — repeat all 66 sts around. (264) Cut yarn, fasten off, and weave end inside. For the turquoise version also: chain 30, attach to the scoop with a sl st between Rnds 32 and 33. Work one round of sl st around the same join line. At the end, chain 30 again, then cut yarn and pull tight. Tie both yarn tails into a secure knot to form the bow loops.
Easy to get wrong
Losing track of back loops only
Mark the front loop of your very first cone stitch with a stitch marker before you begin, so you always know which loop is the working one versus the one saved for the trim.
Forgetting the cherry stem before closing the ring
Prepare the knotted cord and have it sitting ready beside your hook before you start the first six single crochets, since it has to go in knot-end down right as that ring closes.
Scallop trim not closing evenly
Count your single crochet stitches as you work the edging and place your two invisible decreases at roughly opposite points in the round, rather than both near the end.
Between the songs
- What I love here is how one core shape, the cone-into-scoop worked in a continuous spiral with back loops only, carries three completely different results just by changing yarn color and topping. Building the strawberry in tight ascending rounds and then crowning it with a calyx made of five individual leaves worked straight off the base ring is a genuinely satisfying bit of construction. The scallop trim along the front loops of the last round of the white version, with its hidden invisible decreases tucked into the single crochets, is the kind of detail that looks far more advanced than it actually is to execute. Little touches like the knotted cherry stem anchored inside the cone before closing it up give the whole piece a sense of real craft, not just repetition.
Listener questions
Can I work the cone and scoop in two pieces instead of one spiral?
You can, but the pattern is written to flow bottom to top in one continuous spiral precisely so the color change happens without a visible seam. Breaking it into two pieces means you will need to sew a join where the pattern expects a smooth transition.
Do I need the front loops left from the back-loop-only rounds?
Yes, those unworked front loops on the last round of the cone are exactly where the scallop trim gets joined. Skipping back loops only earlier in the pattern means you lose that edge entirely.
Why does the scallop edging need invisible decreases?
The stitch repeat for the scallop is a multiple of four, but the round itself has a stitch count that does not divide evenly into that repeat. The two invisible decreases quietly absorb the extra stitches so the trim closes without a visible gap or bump.
Can I make all three flavors from the same materials list?
Yes, the materials list already accounts for all three versions, since the sand/beige cone and the small-amount colors like red, green, and dark turquoise are shared across characters. Only the main scoop color changes between the white, turquoise, and other versions.
What size beads work for the eyes?
The pattern calls for 5 mm beads, two per character, which sit well against the muzzle once the cheek circles are glued in place. Any smaller and they tend to disappear against the stuffed scoop proportions.
Original pattern: https://amigurumiarts.com/crochet-ice-cream-amigurumi-pattern-3-flavors/
About the Author

Marisol QuinteroWho runs Crochet Obsessed, why a stitch count sits at the end of every round, how a pattern gets written here, and the things this site will never do.
More Patterns
- IntermediateNo. 01

Blush pink bow front cardigan crochet pattern
Blush pink bow front crochet cardigan pattern builds a V-neck mesh cardigan with ribbed trim and soft tie…
- IntermediateNo. 02
Flamingo, pineapple and monstera leaf charm trio pattern
Flamingo pineapple monstera leaf charm trio: tiny thread crochet and amigurumi shaping turn small motifs into three charming…
- IntermediateNo. 03
Sage green daisy bow bucket bag crochet pattern
Sage green daisy bow bucket bag crochet pattern with a sculpted bucket base, gathered rim, and a petaled…