- LevelIntermediate
- Time6-8 Hours
- Hook3.0 mm
- YarnDK
About This Pattern
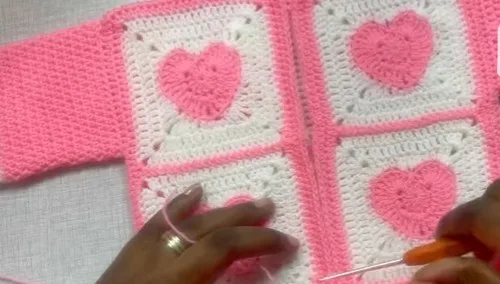
This heart baby cardigan is built entirely from granny heart squares, so every panel of the finished sweater carries a subtle heart motif from shoulder to hem. What makes it special is the construction: instead of working the cardigan in one continuous piece, you make individual squares first and then join them like a puzzle to form the back, both fronts, and both sleeves. It's a wonderful project for anyone expecting a baby, welcoming a new niece or nephew, or simply wanting a handmade heirloom-style gift with real detail in every square.
The techniques here revolve around working heart motifs in the round, with 8 large squares for the body and 4 smaller squares for the sleeves worked in fewer rounds to scale them down proportionally. You'll want some comfort with reading granny-style rounds, counting stitches carefully, and seaming or joining squares neatly, since the finished look depends on those seams lying flat. Expect to spend a weekend on this one, with most of the time going into making all 12 squares before the quicker assembly and edging steps.
Once joined, the cardigan measures about 23 cm across the finished body panels for the 0 to 3 month size shown, with a soft, structured drape thanks to the 100% acrylic yarn. The heart squares give it a charming, textured, quilt-like appearance rather than a plain stockinette look, and the 2.5 mm hook edging adds a firm, tidy finish around the collar and openings. It's the kind of piece that photographs beautifully and feels genuinely special to receive as a gift.
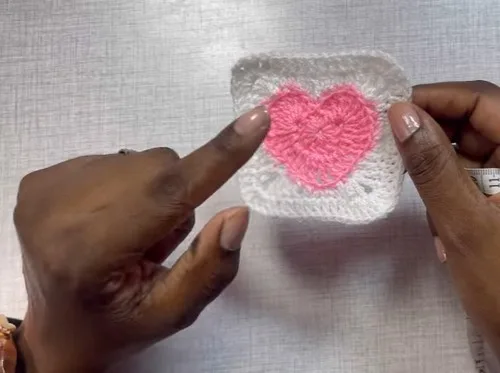
- Start by making 8 identical large heart squares using the 3.0 mm hook, each worked over the pattern's rounds until it measures about 10 cm.
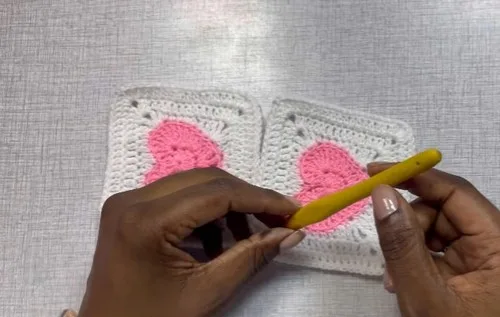
- Set 4 of those large squares aside and arrange them in a 2x2 grid layout as your guide before joining.
- Make 4 smaller heart squares for the sleeves, working fewer rounds so they come out proportionally smaller than the body squares.
- Join 4 large squares together to form the back panel of the cardigan body.
- Join 2 large squares into the left front panel and 2 more into the right front panel.
- Join 2 small squares per side to build each sleeve, keeping the heart motif consistent with the body squares.
- Follow the 5 assembly steps to attach the front panels, back panel, and both sleeves into one complete cardigan shape.
Materials
- 100 percent acrylic yarn approximately 70 g
- 3.0 mm crochet hook for motifs and body shaping
- 2.5 mm crochet hook for neat edging and collar if you want a firmer finish
- Scissors
- Stitch markers
- Yarn needle
Crochet Abbreviations
- ch
- chain
- st
- stitch
- sl st
- slip stitch
- sc
- single crochet
- hdc
- half double crochet
Crochet Heart Baby Cardigan Pattern (0-12 Months)
Main Pattern
- Round 1
Work HDC around Join with sl st Ch 1 and turn
- Round 2
Work HDC around Join with sl st Ch 1 and turn For Row 3 Work HDC around Join with sl stFasten off Front Panel Borders Use 3.0 mm hook.
Attach yarn at bottom of front panel edge Work HDC evenly around the outer edges of that front panel Do no the inner edge straight and neat
You will add 2 HDC rows to each front panel, but keep the center opening clean.
Part 2
- Round 1
t join across the inner front opening edge yet Keep Work HDC around outer edges Turn at the top and continue downKeep corners smooth with extra stitches if needed
- Round 2
Repeat HDC evenly Fasten off Measurement Check Lay left front, back, and right front flatAlign the top edges of the right front and back Use SC to join shoulder seams Shoulder seam steps Attach yarn at one shoulder edge
Work SC through both layers across the shoulder Stop to leave a neckline opening in the center The tutorial leaves about 9 cm open for the neckRepeat on the other shoulder Join Side Seams With cardigan inside out, align side edges Sew or slip stitch from the bottom hem upwardWork SC or sl st through both layers up the side Stop when armhole opening is reached Fasten off Repeat for the other sideJoin Sleeve Motifs For sleeve 1, join 2 small heart squares together Use the zig zag slip stitch seam Repeat for sleeve 2Form Sleeve Tube Fold sleeve panel so short edges meet Join the sleeve seam to form a tube Use sl st or SC seam Leave top opening for attaching to cardigan
Arrange them as they will sit when worn Measure chest width across the combined piece Stop adding border rows when chest width reaches approximately 23 cm
Part 4 Joining Shoulders and Sides Join Shoulders Place back panel and two front panels together as a cardigan shape Align the top edges of the left front and back
Stop to leave the armhole opening The tutorial leaves about 10 cm open for the armhole Side seam steps Attach yarn at bottom corner
Sleeves Each sleeve is made from 2 small heart squares plus added HDC rounds for length.
More photos
Assembly Instructions
- Step 1 Weave in all ends securely
- Step 2 Check seams for gaps
- Step 3 Lightly steam block if needed
- Step 4 Confirm sleeves hang evenly and collar lies flat
- Step 5 Your Baby Heart Cardigan is complete
Important Notes
- 💡 Keep your 3.0 mm and 2.5 mm hooks clearly separated as you work — the 3.0 mm is for the motif squares and body shaping, while the 2.5 mm is reserved just for the edging and collar for that firmer finish.
- 💡 Weigh out your 70 g of acrylic yarn before starting and track how much you use on the first few squares so you can tell early if you're on pace to finish all 12 squares comfortably.
- 💡 Since all 8 large squares should be identical, keep one finished square nearby as a visual and physical reference to compare against as you make squares 2 through 8.
- 💡 Use stitch markers to mark the first stitch of each new round on every heart square — with only 2-3 rounds per square it's easy to lose count without one.
- 💡 Lay your 4 large squares in the 2x2 grid layout and dry-fit them before joining, confirming which squares will form the back panel versus the left and right front panels.
- 💡 When making the 2 smaller squares per sleeve, complete both sleeve squares back to back so their reduced round count and finished size match exactly before joining.
Common Mistakes and Fixes
- Losing track of which round you're on within each heart square, especially since the large squares use 3 rounds and the small sleeve squares use fewer.
Place a stitch marker in the first stitch of every round before you begin the next one, and jot down a tally after each square so you don't accidentally work an extra or missing round.
- Making the 4 small sleeve squares the same size as the 8 large body squares instead of scaling them down.
Deliberately work fewer rounds or stop one round earlier on the sleeve squares — compare a finished sleeve square against a body square side by side before making all four to confirm the size difference is visible.
- Joining squares in the wrong order, mixing up which squares go into the back panel versus the front panels.
Lay all 8 large squares out in your 2x2 grid layout before you join anything, and label or photograph the layout so you always join 4 squares into the back and 2 into each front panel correctly.
- Inconsistent tension across the 12 total squares, making some hearts look puffier or looser than others.
Work all squares in one or two sittings if possible, and periodically measure a finished square against the 10 cm target size to catch tension drift early rather than after all squares are done.
- Skipping stitch markers when assembling, causing panels to shift out of alignment during the 5 assembly steps.
Pin or clip squares together with locking stitch markers before you sew or slip stitch them, checking that corners line up exactly before committing to the seam.
Frequently Asked Questions
How do I size this cardigan up beyond 0 to 3 months?
Add extra rounds to your heart squares to make them larger, keeping the same number of squares in the layout. Just make sure to add the same number of extra rounds to both the large body squares and the small sleeve squares so the proportions stay consistent.
Why are the sleeve squares smaller than the body squares?
The sleeves use 4 smaller heart squares worked with fewer rounds so they scale down proportionally to fit a baby's arm rather than matching the larger 10 cm body squares. This keeps the heart motif look consistent across the whole cardigan while adjusting the size where needed.
Do I need both hook sizes to finish this pattern?
The 3.0 mm hook is essential for the motif squares and body shaping, but the 2.5 mm hook is optional and only recommended if you want a firmer, neater edging and collar. You can use just the 3.0 mm throughout for a softer overall finish.
How many squares total do I need to make before assembly?
You'll make 12 squares in total: 8 large heart squares for the body panels and 4 smaller heart squares for the sleeves. Once all 12 are finished, the 5 assembly steps guide you through joining them into the complete cardigan.
Original pattern: https://crocheteverything.com/crochet-heart-baby-cardigan-pattern-free-for-0-to-12-months-old/
About the Author

Marisol QuinteroWho runs Crochet Obsessed, why a stitch count sits at the end of every round, how a pattern gets written here, and the things this site will never do.
More Patterns
- IntermediateNo. 01

Slouchy everyday beanie worked flat in half double crochet
Crochet beanie pattern for a slouchy everyday look worked flat with hdc rows, then seamed into a soft,…
- IntermediateNo. 02
Crochet amigurumi doll with dress, shoes, and hat
Crochet amigurumi doll pattern with dress, shoes, and hat details for a soft, huggable keepsake you build one…
- IntermediateNo. 03
Chunky moss stitch crochet sweater with raglan-free shoulders
Chunky crochet sweater pattern using moss stitch, worked flat with a 10mm hook for a soft, fast, cool-weather…


