- LevelIntermediate
- Time8-12 Hours
- Hook5 mm
- YarnWorsted
About This Pattern
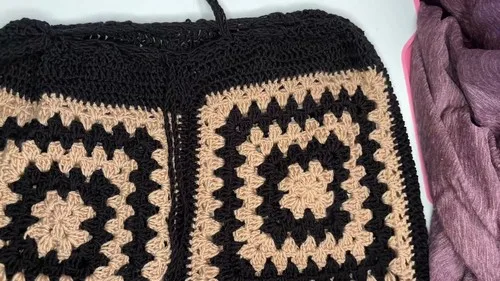
These crochet granny square pants take the classic granny motif and turn it into a wearable statement piece that's equal parts nostalgic and fresh. Twelve individual squares come together with connecting strips to form two legs, then join at the crutch and finish with a cozy waistband. It's perfect for crocheters who love the meditative rhythm of granny squares but want to graduate from blankets and bags into something you can actually wear out the door.
This project leans on techniques you likely already know — magic ring starts, corner chain-2 spaces, and color changes at the join — but stacks them into a full garment, which is where the intermediate skill level comes in. You'll practice consistent gauge across 12 matching squares, seaming with a join-as-you-go method, and building a border that shapes into a leg opening. Expect somewhere between 8 and 12 hours total, spread across square-making, connecting, and finishing sessions.
The finished pants have that unmistakable granny square texture — bold, graphic, a little bit retro — softened by a two-color palette that repeats every couple of rounds. They drape with the structured-but-stretchy feel worsted weight yarn gives garments, making them great for festival season, layering over tights, or just making a bold fashion statement at home. They also make a genuinely memorable handmade gift for a crochet-loving friend who wants something nobody else owns.
- Start by making 12 granny squares, alternating your two colors every couple of rounds until each one reaches the target size.
- Join two finished squares together along one side using the front-facing join-as-you-go technique to build the first leg panel.
- Repeat the joining process to connect all the squares needed for both legs into flat panels.
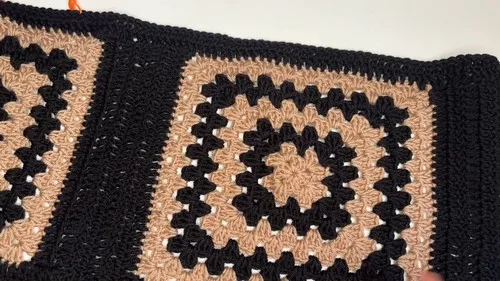
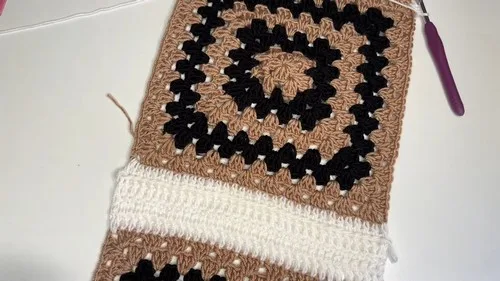
- Work the connecting strip rows along the joined edges to add structure and a contrasting color line between squares.
- Add the bottom row and leg opening border, working extra stitches at the corners to shape a comfortable opening.
- Join the two leg panels together at the crutch area, matching up the connecting strips for a clean seam.
- Finish by working the waistband rounds across the top edge to bring both legs into one secure, wearable garment.
- Weave in all remaining ends and try the pants on for fit before considering the piece complete.
Materials
- Two different colored four-weight yarns
- 5 mm crochet hook
- Needle
- Stitch markers
- Yarn cutter
Crochet Abbreviations
- ch
- chain
- dc
- double crochet
- sc
- single crochet
- sl st
- slip stitch
- MR
- magic ring
Crochet Granny Square Pants: Retro Boho Statement Piece
Granny Square
Make 12Make 12 granny squares total.
Alternate colors every 2 rounds; to change color, slip stitch to corner, yarn over with new color, chain 3, and continue pattern.
Complete 2 rounds of each color until square is the desired size, repeating Round 4 as needed.
- Round 1(4)
Start with a magic ring. Chain 3 (counts as first double crochet), add 2 double crochets into the ring. Chain 1, then add 3 double crochets into the ring. Repeat the chain 1 and 3 double crochets two more times (total: 4 clusters). Chain 1, pull yarn tail to close the ring. Slip stitch into top of the initial chain 3. Slip stitch into second double crochet, then into the chain 1 space. (4 dc clusters)
- Round 2
Chain 3 (counts as double crochet). Add 2 double crochets in the same space. Chain 2. Add 3 double crochets in the same space (creates a corner). In next space, add 3 double crochets. Repeat corner pattern (3 dc, ch 2, 3 dc) in each corner. Continue this pattern around the square.
- Round 3
Slip stitch to corner space. Yarn over with new color, pull through. Chain 3 with new color (counts as dc). Add 2 double crochets in the same space. Chain 2, then 3 more double crochets in the same space. Continue working 3 double crochets in each side space, and 3 dc, ch 2, 3 dc in each corner. Repeat this pattern around the square.
- Round 4
Slip stitch into third chain, then into corner space. Chain 3 (counts as dc), add 2 dc in same space. Chain 2, add 3 more dc in same space. Work 3 dc in each side space. Repeat corner pattern at each corner. Finish by slip stitching into chain 3, then into chain space.
Connecting Strip
Use connecting yarn (black recommended).
Repeat Rows 1-2 until length is reached (creator used 5 rows total).
- Row 1
Connect yarn to 2-chain space on one square. Chain 3 (counts as dc), add 1 dc in same space. Work dc into each V-stitch across. At end, add 2 dc in the last 2-chain space.
- Row 2
Turn work, single crochet into last dc, then another sc in second loop. Continue dc across row.
Bottom Row / Leg Opening Border
- Row 1
Insert hook into bottom space of connected squares, chain 3. Add 1 dc in same space. Work 3 dc in each space across, 2 dc in final space. Add 2 more dc in final space (total 4 dc at corner). Work up the side: 2 dc in each dc stitch. At top, add 4 dc to turn. Continue down other side. At base, chain 3 and turn.
- Row 2
Work back and forth in same pattern until leg opening is wide enough (creator did 2 rows total).
Waistband
- Row 1
Connect yarn to waistband and work double crochet around.
- Row 2
Double crochet around.
- Row 3
Decrease in every stitch to tighten waistband.
More photos
Assembly Instructions
- Step 1 Joining Two Squares: After connecting strip rows are done, chain 2. Place second square with front facing up, put them side by side. Yarn over and work dc into corner of second square, pull up loop, insert hook into first dc of first square, pull loop through. Repeat: dc in second square, pull loop through next stitch of first square, continuing to join across the side. Chain 1 and cut yarn when done. Repeat to connect second square.
- Step 2 Joining the Pants Together (Crutch Area): Measure and mark crutch area with a stitch marker on each leg. Align squares front-to-front (wrong sides out). Join at stitch markers using slip stitch: yarn over, insert hook into matching stitches, pull through. Chain 1 to secure. Continue slip stitching to the marker, then cut yarn. Repeat for the back side.
- Step 3 Connect Front and Back: Lay front piece with right side up. Align back piece on top (right sides together). Match middles and place a stitch marker. Slip stitch around edges to join, leaving waist and leg openings unstitched.
- Step 4 Make a drawstring by chaining the desired length.
- Step 5 Weave the drawstring through the waistband to adjust the fit.
Important Notes
- Use stitch markers to flag the corner chain-2 spaces on each square as you finish it, so you can find them instantly when it's time to connect.
- Block your 12 granny squares to the same measurements before joining — even a small size difference becomes obvious once squares are side by side.
- Work a swatch square first to confirm your 5mm hook and worsted weight yarn combo gives you the finished size you want for these pants.
- Keep a small note of exactly how many rows you worked for the connecting strip and border sections so both legs match perfectly.
- Weave in ends as you go rather than waiting until the end — with two colors changing every couple of rounds, tails add up fast.
- Try on the assembled pants after the crutch area join but before the waistband, so you can adjust rise or width while it's still easy to rip back.
Common Mistakes and Fixes
- Squares end up slightly different sizes
Check your gauge on the first two squares before making the rest, and count rounds carefully — if one square is a full round behind, add it before moving on to connecting.
- Color changes look messy or leave
Always change color by slip stitching to the corner space first, then yarn over with the new color and chain 3 to start the next round cleanly, weaving tails along the inside edge later.
- The connecting strips pucker or pull
Keep tension even across each row of the strip and count your dc stitches into each V-stitch space so the strip lies flat between squares.
- Losing track of which side is the front
Lay both squares right-side up before joining and use a stitch marker on the front side of each square as you work so orientation stays consistent throughout assembly.
- The leg opening border ends up
Try the leg opening on before finishing the second border row, and add or skip a round of the border pattern to adjust the fit before cutting yarn.
- Chain-2 corner spaces get skipped
Always work directly into the chain-2 space (not around the chain), and keep the space open enough that your hook slides through easily in the next round.
Variations
- The color story is where this pattern really lets you play. The original uses two alternating colors per square, but try a gradient effect by shifting to a slightly different shade every couple of squares — think sunset oranges fading into pinks, or ocean blues into teals. For a bolder look, make each of the 12 squares a totally different color combo using scrap yarn, so the finished pants read like a crochet color wheel. If you want something more subtle and wearable for everyday layering, stick to a neutral palette like oatmeal and charcoal, or cream and terracotta, letting the texture do the talking instead of contrast. Sizing is easy to adjust too: since the squares are worked to a specific finished size, simply add an extra round or two to each granny square before joining to make larger pants, or stop a round early for a more fitted, cropped silhouette. You can also lengthen the legs by adding extra rows to the connecting strips between squares. Yarn-wise, worsted weight cotton-acrylic blends give great stitch definition for the corners and clusters, while a cotton blend adds breathability if you're making these for warmer weather. For a fuzzier, cozier version, try working the final waistband round in a chunky mohair-blend yarn in a coordinating color for a soft, textured contrast against the crisp granny squares. You could even swap the connecting strip color to a bold contrast black or white to make the grid lines between squares pop, giving the whole piece a more graphic, quilted look.
- I'll be honest — I've made a lot of granny square blankets, but turning that same beloved motif into pants felt like unlocking a new level. There's something so satisfying about watching twelve identical squares pile up on your hook, each one a quick, portable project you can finish during a show, and then suddenly they're a garment. The join-as-you-go connecting strips are genuinely clever; instead of sewing everything together at the end, you build the structure right into your stitching, which saves so much finishing time. I love how the color changes at each square's third round create this graphic, almost patchwork-quilt look without any planning required. And the waistband at the end feels like such a reward — that's the moment it stops looking like a pile of squares and starts looking like real pants. If you've ever wanted to wear your granny square obsession instead of just sitting under it, this pattern is the one.
Frequently Asked Questions
How much yarn do I need for the full pair of pants?
Since these are worked from 12 granny squares plus connecting strips and borders, plan on several skeins of worsted weight yarn split between your two main colors, plus a smaller amount for the connecting strip color. It's smart to buy an extra skein of each color since running out mid-square is tricky to match later.
Can I make these pants a different size than the original?
Yes — the granny squares can be worked one round smaller or larger to shrink or grow the overall pants, and you can add extra rows to the connecting strips for extra length. Try on the piece as you assemble the crutch area to fine-tune the fit before adding the waistband.
Do I need to know how to join granny squares before starting?
Basic comfort with granny squares helps, but the join-as-you-go method used here is explained step by step and is beginner-friendly if you've made at least a few squares before. It just takes a little practice to keep tension even while joining.
What yarn weight and hook size does this pattern use?
This pattern uses worsted weight (four-weight) yarn in two colors with a 5mm crochet hook throughout every part of the pants, from the squares to the waistband.
Can I use more than two colors for the granny squares?
Absolutely — the pattern's color-change technique at each square's later rounds makes it easy to swap in a third or fourth color for extra visual interest, as long as you keep your gauge and square size consistent across all 12 squares.
Original pattern: https://crocheteverything.com/crochet-granny-square-pants-pattern-that-actually-fit-perfectly/
About the Author

Marisol QuinteroWho runs Crochet Obsessed, why a stitch count sits at the end of every round, how a pattern gets written here, and the things this site will never do.
More Patterns
- IntermediateNo. 01

Slouchy everyday beanie worked flat in half double crochet
Crochet beanie pattern for a slouchy everyday look worked flat with hdc rows, then seamed into a soft,…
- IntermediateNo. 02
Crochet amigurumi doll with dress, shoes, and hat
Crochet amigurumi doll pattern with dress, shoes, and hat details for a soft, huggable keepsake you build one…
- IntermediateNo. 03
Chunky moss stitch crochet sweater with raglan-free shoulders
Chunky crochet sweater pattern using moss stitch, worked flat with a 10mm hook for a soft, fast, cool-weather…


