- LevelIntermediate
- Time4-6 hours
- Hook3.5 mm
- YarnWorsted
About This Pattern
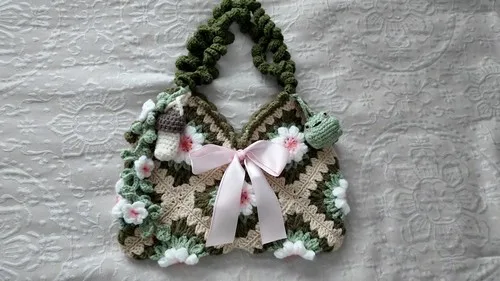
This one has a garden-on-your-arm kind of energy. It is cheerful without trying too hard, all those layered petals catching light from every angle. I think of it as the bag you reach for when a plain tote feels like it is missing something.
Your hands will spend real time in the details here. You are building a dimensional flower center round by round, working bubble stitches that pop forward, then joining leaf shapes and ten squares into one cohesive piece with careful whip stitching. It rewards patience over speed.
Set it on a hallway hook or a bedroom chair and it reads more like a small piece of textile art than a bag. The scalloped edges and spiral strap keep catching your eye as you walk past. It is the kind of finished object that makes a room feel a little more handmade.
- Begin each flower motif with a magic ring worked into a ring of double crochets and chain-1 spaces.
- Build the petals upward with dropped-loop bubble stitches that give the flower center real depth.
- Add the light green leaf details to round out each individual square before joining anything.
- Work through all four rounds of the main pattern until you have a full set of finished squares.
- Lay out all ten completed squares in the diagonal cross arrangement from the tutorial.
- Fold neighboring squares wrong sides out and whip stitch through the back and front loops to join seams.
- Turn the joined piece over and fold it into the actual bag shape.
- Finish with the scalloped edging and attach the ruffled spiral strap to complete the bag.
On the desk
- 4 skeins of yarn (White for flower center, Light Green for leaves, Pink or another color for border/background, Dark Green for strap)
- 3.5 mm crochet hook (or 3.0 mm to 4.0 mm)
- Tapestry needle
- Scissors
Stitch shorthand
- ch — chain
- sc — single crochet
- hdc — half double crochet
- dc — double crochet
- tr — treble crochet
- sl st — slip stitch
- tr2tog — treble crochet 2 stitches together
- tr3tog — treble crochet 3 stitches together
Crochet flower shoulder bag with a ruffled spiral strap
Main Pattern
- Round 1
Flower Center – White Yarn Make a Magic Ring Chain 4 (counts as first double crochet and chain-1 space)Work 1 dc, ch 1 into the ring Repeat until you have 8 double crochets total, each separated by a chain-1 Pull the magic ring closed
Slip stitch directly into the first chain-1 gap - Round 2
Flower Petals – White Yarn Chain 4 Work 4 tr into the same gap Drop loop from hookInsert hook into top of initial chain-4 Pick up dropped loop and pull through to create bubble stitch Chain 2 In each remaining gap, work 5 tr bubble stitch and chain 2
Continue until you have 8 petals Turn work slightly Slip stitch into the small space above the initial chain-4 petal Chain 1 and fasten off - Round 3
Leaves – Light Green Yarn Attach green yarn to any chain-2 gap Chain 4 Work tr2tog in the same gapChain 2 Work tr3tog in the same gap Chain 2 In next gap work tr3tog, chain 2, tr3tog, chain 2
Repeat around all gaps Chain 2 Slip stitch to top of first cluster Chain 1 and fasten off - Round 4
Squaring the Circle – Border Color Attach border yarn to any gap Chain 2 Work 2 hdc in same gapIn next gap work 3 dc In next gap work corner: 3 tr, ch 3, 3 tr In next spaces work 3 dc, 3 hdc, 3 dc In next space work corner: 3 tr, ch 3, 3 tr
Repeat around the square Finish final section with 3 dc Slip stitch to top of starting hdc Chain 1 and fasten off - Round 5
Final Square Expansion – Border Color Attach border yarn to any corner space Chain 3Work 2 dc in same corner Chain 2 Work 3 dc in same corner Work 3 dc in every side gap In each corner work 3 dc, ch 2, 3 dc
Continue around Slip stitch to top of beginning chain 3 Chain 1 and fasten off
Optional Flower Center Shading: Use a cotton swab and pink blush or eyeshadow. Lightly dab color into the flower center.
Finishing the Squares: Weave in all loose ends with a tapestry needle. Repeat until you have 10 identical flower squares.
Sewing the Bag Structure: Layout and Whip Stitching. Arrange all 10 squares following the diagonal cross layout from the tutorial. See the Assembly Instructions below for the full whip-stitching and bag-shaping steps.
Edging and Ruffles – Single Crochet Border: Join yarn to the top opening edge. Chain 1. Work 1 sc in same space. Work 1 sc in every stitch around the opening. If you reach a divider gap, chain 1. Fasten off and reattach yarn on the opposite side if needed.
Continue until border is complete. Scalloped Ruffle Edge: Slip stitch into first sc. Chain 1. Work 5 dc into same stitch. Slip stitch into next stitch.
Skip 1 stitch. Slip stitch into next stitch. Repeat around the opening. Fasten off. Ruffled Strap – Making the Strap: Using dark green yarn, make a slip knot.
Chain 94 or desired strap length. Turn work. Skip first 2 chains. Work 3 dc in third chain from hook. Work 4 dc in next chain.
Alternate 3 dc and 4 dc in each chain across. Continue to end of chain. Fasten off. Attaching the Strap: Position strap ends at the side connection points of the bag.
Pull yarn through both the bag edge and strap loop. Chain 1. Work 3 secure slip stitches across the connection point. Chain 1.
Fasten off. Weave in all remaining yarn tails.
Where it goes
- An everyday shoulder bag for running errands, paired with jeans and a plain tee so the flowers do the talking.
- A handmade gift for a friend who collects statement bags rather than practical ones.
- A textured accent piece for a crochet portfolio or craft fair table, hung where the strap detail shows.
- A lightweight going-out bag for evenings when you want texture over a smooth leather look.
Color ideas
- Classic Garden White for the flower centers, light green for the leaf details, soft pink for the border and background squares, dark green for the spiral strap.
Care
Hand wash the finished bag in cool water with a gentle detergent, since the dimensional petals and bubble stitches hold their shape better without a washing machine's agitation.
Lay it flat on a towel to air dry, easing the petals and leaves back into their raised shape with your fingers while damp.
Store it stuffed lightly with tissue paper so the flower centers keep their dimension, away from direct sunlight so the colors stay true.
Assembly
- Step 1 Layout and Whip Stitching: Arrange all 10 squares following the diagonal cross layout from the tutorial
- Step 2 Fold neighboring squares with wrong sides facing out
- Step 3 Cut a long strand of yarn
- Step 4 Thread tapestry needle
- Step 5 Double-knot through starting corner chains
- Step 6 Whip stitch seams by passing through the back loop of one square and front loop of the opposite square
- Step 7 Continue along each seam
- Step 8 Knot securely and trim excess yarn
- Step 9 Forming the Bag Shape: Turn joined piece over
- Step 10 Fold outer sides inward
- Step 11 Create the three-dimensional bag shape
- Step 12 Whip stitch side edges closed
- Step 13 Secure all seams
Easy to get wrong
Losing the dropped loop mid-bubble
Keep a stitch marker or scrap yarn clipped into the dropped loop the moment you drop it, so it is easy to find and pull through after working the tr group.
Uneven whip stitch tension between squares
Pull the yarn snug after every few stitches rather than at the very end of the seam, so the join stays flat instead of puckering.
Misreading the diagonal cross layout
Lay all ten squares flat on a table in the tutorial's arrangement and take a photo before you fold anything, so you have a reference if you lose your place.
Between the songs
- What makes this one satisfying is the layering. You start each flower with a magic ring and a simple chain-1 lace base, then build straight up into a bubble stitch round that gives the petals real dimension instead of leaving them flat. Add in the light green leaf details, the scalloped border tying every square together, and the twisted texture of the spiral strap, and you get a project that keeps introducing new techniques instead of repeating the same motion for hours. Assembling ten squares into the diagonal cross layout also gives you a genuine puzzle-solving moment before the whip stitching locks everything into its final bag shape.
Listener questions
Why does the flower petal round feel tricky the first time?
The dropped-loop bubble stitch is unusual if you have not done it before, since you are leaving a loop open while you work into the same gap. Once you complete one petal successfully, the rest fall into a steady rhythm.
Do all ten squares need to look identical?
the diagonal cross layout to read clearly, yes, keeping your color placement consistent across all ten squares matters. Any square that drifts in color order will stand out once everything is joined.
How do I keep the spiral strap from twisting oddly when worn?
Let the strap relax and settle for a few minutes after you finish it before attaching it to the bag body. This lets you see its natural spiral and attach it so that spiral falls evenly rather than bunching on one side.
Is the scalloped edging added before or after assembly?
The scalloped border finishes the outer edges once the squares are joined and the bag shape is formed, giving the whole piece a clean, unified outline. Working it too early, before joining, makes the edges harder to match up.
Original pattern: https://crocheteverything.com/crochet-flower-shoulder-bag-pattern-free-with-ruffled-strap-design/
About the Author

Marisol QuinteroWho runs Crochet Obsessed, why a stitch count sits at the end of every round, how a pattern gets written here, and the things this site will never do.
More Patterns
- IntermediateNo. 01

Slouchy everyday beanie worked flat in half double crochet
Crochet beanie pattern for a slouchy everyday look worked flat with hdc rows, then seamed into a soft,…
- IntermediateNo. 02
Crochet amigurumi doll with dress, shoes, and hat
Crochet amigurumi doll pattern with dress, shoes, and hat details for a soft, huggable keepsake you build one…
- IntermediateNo. 03
Chunky moss stitch crochet sweater with raglan-free shoulders
Chunky crochet sweater pattern using moss stitch, worked flat with a 10mm hook for a soft, fast, cool-weather…


