- LevelIntermediate
- Time4-6 hours
- Hook7 mm
- YarnWorsted
About This Pattern
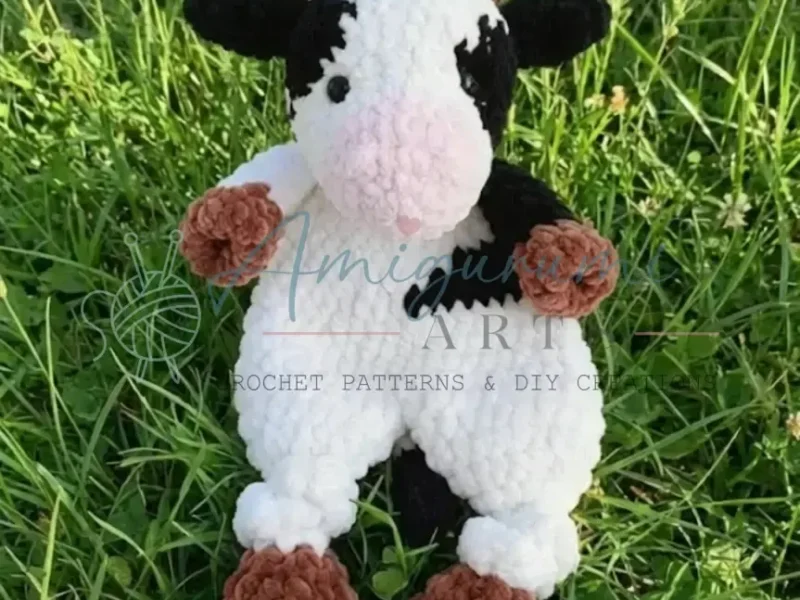
There's something so gentle about this one. A cow lovey sits right at the overlap of soft toy and baby blanket, and that in-between quality gives it a quiet, huggable mood. I think of it as the piece you make when you want to slow down, not rush toward a finished object by dinnertime.
Your hands will spend most of their time on tidy single crochet increases, round after round, building the head and the body out from a magic ring. There's shaping to pay attention to with the antlers and ears, and a little precision needed when you place the safety eyes and mark the nostrils. None of it is flashy, but all of it asks you to work evenly and check your stitch counts as you go.
Once it's stuffed and assembled, this little cow settles into a crib or a diaper bag like it was always meant to live there. The blanket body drapes rather than stands, so it reads as something to hold onto, not just something to look at. It's the kind of piece that ends up on the floor, in the car seat, and eventually in someone's fist.
Measuring approximately 40 cm (15.7 inches) when made with the recommended materials, this plush friend features sweet details like expressive safety eyes, cute little antlers, and distinctive cow markings that bring personality to every stitch.
- Start with the head, working single crochet increases in rounds using the powder main color until it's fully shaped.
- Crochet the two antlers separately in brown, keeping the increases on one side so they curve.
- Make the arms and the tail as smaller, quicker pieces using the same increase pattern.
- Crochet the legs and body as one longer continuous piece that forms the blanket portion.
- Stuff the head firmly with fiberfill before closing it, leaving the body softer for drape.
- Pin the antlers and ears in place on the head first, checking spacing, then sew them down.
- Mark the nostril points with pins and stitch them in place before weaving in every yarn end.
On the desk
Yarn
- Alize Velluto (100g/68m, 100% micropolyester):
- Color #340 (Powder) – main body color
- Color #60 (Black) – spots and details
- Color #62 (Cream) – face and body accents
- Color #329 (Brown) – hooves, antlers, and ears
Alternative Yarn Options
- Bernat Blanket Sparkle
- Bernat Blanket Big Ball Yarn
- PREMIER PARFAIT XL
- PREMIER BASIX CHENILLE
Additional Supplies
- 7mm crochet hook
- Black safety eyes (18mm size)
- Fiberfill for stuffing
- Sewing pins
- Scissors
- Darning needle
Skill Level
- Beginner to Intermediate
Stitch shorthand
- MR — magic ring
- Ch — chain stitch
- Sc — single crochet
- Hdc — half double crochet
- Inc — increase (2 single crochets in one stitch)
- Dec — decrease (crochet 2 stitches together)
- Important Note — This toy is crocheted in continuous spirals without joining the rounds. Do not turn or slip stitch unless specifically stated in the pattern.
Cozy cow lovey crochet pattern for a baby security blanket
Head
Using 7mm crochet hook and Alize Velluto Color #340 (Powder):
- Round 1(6)
6 sc in magic ring [6]
- Round 2(12)
(inc) repeat 6 times [12]
- Round 3(18)
(1 sc, inc) repeat 6 times [18]
- Round 4(24)
(2 sc, inc) repeat 6 times [24]
- Round 5
24 sc around [24] – 1 round Change yarn to Alize Velluto Color #62 (Cream):
- Rounds 6–7
24 sc around [24] – 2 rounds Color Change Instructions: To create smooth transitions, on the last stitch before the color change, insert your hook into the stitch, pull up a loop in the current color, yarn over with the new color and pull through both loops on the hook to complete the stitch in the new color.In Round 8, begin crocheting the black spots using Color #60 (Black). Stitches worked in black are indicated:
- Round 8(28)
5 sc (cream), 3 sc (black), 2 sc (cream), 4 inc (cream), 10 sc (cream) [28]
- Round 9(32)
4 sc (cream), 2 sc (black), inc (black), 3 sc (black), inc (black), 6 sc (cream), inc (cream), 3 sc (cream), inc (cream), 6 sc (cream) [32]
- Round 10(36)
6 sc (cream), 3 sc (black), inc (black), 2 sc (black), 2 sc (cream), inc (cream), 2 sc (cream), inc (cream), 1 sc (cream), 3 sc (black), inc (black), 9 sc (cream) [36]
- Round 11(36)
6 sc (cream), 8 sc (black), 7 sc (cream), 8 sc (black), 7 sc (cream) [36]
- Round 12(36)
8 sc (cream), 5 sc (black), 9 sc (cream), 6 sc (black), 8 sc (cream) [36]
- Round 13(36)
9 sc (cream), 3 sc (black), 11 sc (cream), 4 sc (black), 9 sc (cream) [36]
- Round 14
24 sc (cream), 2 sc (black), 10 sc (cream) [36] Eye Placement: Install safety eyes between rounds 8 and 9, with 10 stitches distance between them. Stuff the head lightly with fiberfill, inserting small amounts at a time to achieve the right shape.Continue crocheting using Color #62 (Cream):
- Rounds 15–16
36 sc around [36] – 2 rounds
- Round 17(30)
(4 sc, dec) repeat 6 times [30]
- Round 18(24)
(3 sc, dec) repeat 6 times [24]
- Round 19
(2 sc, dec) repeat 6 times [18] Stuff head but do not overstuff.
- Round 20(12)
(1 sc, dec) repeat 6 times [12]
- Round 21
(dec) repeat 6 times [6] Cut yarn leaving a few inches, use darning needle to thread through outside loops of remaining 6 stitches, pull tight to close. Use needle to pull yarn end up into head to finish off.
Pro Tip: With your fingers, gently press the eyes into the head so they are slightly recessed for a more natural appearance.
Antlers (Make 2)
Using 7mm crochet hook and Alize Velluto Color #329 (Brown):
- Round 1(4)
4 sc in magic ring [4]
- Round 2(5)
Inc, 3 sc [5]
- Round 3(6)
Inc, 4 sc [6]
- Round 4(7)
Inc, 5 sc [7]
- Round 5
Inc, 6 sc [8] Fasten off and leave a long tail for sewing.
Ears (Make 2)
Using 7mm crochet hook and Alize Velluto Color #60 (Black):
- Round 1(5)
5 sc in magic ring [5]
- Round 2
5 sc around [5] – 1 round
- Round 3(8)
Inc, 1 sc, inc, 1 sc, inc [8]
- Round 4(10)
2 sc, inc, 3 sc, inc, 1 sc [10]
- Round 5
10 sc around [10] – 1 round
- Round 6
(dec) repeat 5 times [5] Fasten off and leave long thread for sewing.
Arms (Make 2)
Using 7mm crochet hook and Alize Velluto Color #329 (Brown):
- Round 1(5)
5 sc in magic ring [5]
Note: You will now work with half double crochets. Any increases will be half double crochet increases, and any decreases will be half double crochet decreases.
- Round 2(10)
(inc) repeat 5 times [10 hdc]
- Rounds 3–4
10 hdc around [10] – 2 rounds
- Round 5
3 hdc, dec, 3 hdc, dec [8] Change yarn to Alize Velluto Color #62 (Cream) or Color #60 (Black):
- Rounds 6–10
8 hdc around [8] – 5 rounds Fold the arm in half and crochet through two layers: 4 sc. Fasten off and leave long thread for sewing.
Tail
Using 7mm crochet hook and Alize Velluto Color #60 (Black):
- Round 1(4)
4 sc in magic ring [4]
- Round 2(8)
(inc) repeat 4 times [8]
- Round 3
8 sc around [8] – 1 round
- Round 4
(dec) repeat 4 times [4] Change yarn to Alize Velluto Color #62 (Cream):
- Rounds 5–7
4 sc around [4] – 3 rounds Fold the tail in half and crochet through two layers: 2 sc. Fasten off and leave long thread for sewing.
Legs and Body
Using 7mm crochet hook and Alize Velluto Color #329 (Brown): First Leg:
- Round 1(6)
6 sc in magic ring [6]
Note: You will now work with half double crochets. Any increases will be half double crochet increases, and any decreases will be half double crochet decreases.
- Round 2(12)
(inc) repeat 6 times [12 hdc]
- Rounds 3–5
12 hdc around [12] – 3 rounds
- Round 6
(dec) repeat 6 times [6] Change yarn to Alize Velluto Color #62 (Cream):
- Rounds 7–17
6 hdc around [6] – 11 rounds
- Round 18(12)
(inc) repeat 6 times [12]
- Round 19(18)
(1 hdc, inc) repeat 6 times [18]
- Round 20(20)
(8 hdc, inc) repeat 2 times [20]
- Round 21
20 hdc around [20] Fasten off and cut the yarn. The legs don’t get filled.Second Leg: Crochet the second leg by repeating Rounds 1-21.
Joining Legs and Body:
- Round 22(42)
1 ch, 20 hdc on the first leg, 1 hdc in chain, 20 hdc on the second leg, 1 hdc on the back of chain [42]
- Round 23
42 hdc around [42] – 1 round
- Round 24(39)
(12 hdc, dec) repeat 3 times [39]
- Round 25
39 hdc around [39] – 1 round
Note: There may be a hole between the legs. This can be closed at the end by sewing. Gently knot each leg.
- Round 26(36)
(11 hdc, dec) repeat 3 times [36]In Round 27, begin crocheting black spots using Color #60 (Black). Stitches worked in black are indicated:
- Round 27(36)
6 hdc (cream), 13 hdc (black), 17 hdc (cream) [36]
- Round 28(30)
4 hdc (cream), dec (cream), 2 hdc (cream), 2 hdc (black), dec (black), 4 hdc (black), dec (black), 4 hdc (cream), dec (cream), 4 hdc (cream), dec (cream), 4 hdc (cream), dec (cream) [30]
- Round 29(30)
9 hdc (cream), 5 hdc (black), 16 hdc (cream) [30]
- Round 30(24)
(3 hdc, dec) repeat 6 times [24]
- Round 31
24 hdc around [24] – 1 round
- Round 32(18)
(2 hdc, dec) repeat 6 times [18]
- Round 33
18 sc around [18] – 1 round Fold the body in half and crochet through two layers: 9 sc. Fasten off and leave long thread for sewing.
Where it goes
- A crib companion that pairs with a plain cotton crib sheet so the cow's details stay the visual focus.
- A stroller or car seat lovey that clips or tucks in easily thanks to the soft, floppy body.
- A nursery shelf display piece that sits nicely alongside other amigurumi animals in the same yarn family.
- A baby shower keepsake gift that pairs well with a simple knit or crochet baby cap in a matching cream.
Color ideas
- Classic dairy cow Powder for the main head and body, black for the ears and the spots and details, cream for the face and body accents, and brown for the hooves, antlers, and ears.
- Soft monochrome calf Cream across the head and body as the dominant tone, powder reserved for smaller accent rounds, and brown kept only on the antlers and hooves for contrast.
Care
Hand wash the finished cow in cool water since Alize Velluto and the Premier and Bernat yarns here are all synthetic fibers that can mat if machine agitated too roughly.
Lay it flat to dry rather than hanging it, so the stuffed head keeps its shape and the blanket body doesn't stretch out of proportion.
Reshape the ears and antlers gently with your fingers while still damp, then store the piece flat or loosely folded rather than squeezed into a tight drawer.
Assembly
- Step 1 Attaching the Antlers: Attach the antlers between rounds 13 and 15, with 6 stitches distance between them. Secure with pins first, then sew in place. Weave in all yarn ends.
- Step 2 Attaching the Ears: Attach the ears between rounds 13 and 14. Secure with pins and sew them in place. Weave in the yarn ends.
- Step 3 Creating the Nostrils: Make nostrils on the cow’s nose by marking points with pins between rounds 3 and 4, with 4 stitches distance between them. Make 5-6 stitches with thread from one pin to the other.
- Step 4 Attaching the Head: Attach the cow’s head to the lovey body between rounds 11 and 12. Make sure the eyes are looking straight ahead and the right side of the lovey is facing you. Sew securely and weave in the yarn ends.
- Step 5 Attaching the Arms: Attach the arms between rounds 29 and 31. Secure with pins first, then sew in place. Weave in the yarn ends.
- Step 6 Attaching the Tail: Attach the tail between rounds 23 and 24. Secure with pins and sew in place. Weave in the yarn ends.
Easy to get wrong
Uneven antler shaping
Keep every increase on the same side as you work the five rounds so both antlers curve the same direction. Lay the two pieces side by side before attaching to check they match.
Ears attached at mismatched heights
Use pins to mark both ear positions between rounds 13 and 14 before sewing either one down. Step back and check symmetry from the front before you commit with the needle.
Overstuffed body, understuffed head
Keep the head firmly packed with fiberfill since it needs to hold its round shape and the safety eyes. Leave the legs and body softer so the piece drapes like a blanket instead of sitting stiffly.
Between the songs
- What I love here is the contrast between the firmly stuffed amigurumi head and the loose, floppy body and legs that behave more like a blanket. You're working the same basic single crochet increase technique throughout, but the character changes completely depending on how tightly you stuff. The antlers and ears are small enough to finish in one sitting, which makes them satisfying little wins before you tackle the longer head and body rounds. Placing the black safety eyes and marking the nostril points with pins is the moment the face actually appears, and that's always the payoff round for me. It's a project that rewards patience in the early rounds with a very expressive result at the end.
Listener questions
Can I make the body softer than the head?
Yes, that contrast is actually part of the design. Stuff the head firmly so it holds its round shape, but leave the legs and body lightly filled or unstuffed so it drapes like a blanket.
Why does the pattern call for a 7mm hook with worsted-weight yarn?
The larger hook keeps the stitches open and the fabric soft, which matters for a piece babies will handle and hug. It also speeds up the longer rounds in the head and the legs and body section.
Are the safety eyes actually safe for a baby lovey?
Safety eyes lock from the back and are standard for amigurumi, but for an item meant for very young babies, some crocheters prefer embroidering the eyes instead. If you do use the 18mm safety eyes, make sure they're fully locked before stuffing closes around them.
Do the antlers and ears need to match exactly?
They should be close, since they sit side by side on the head and any size difference will be visible. Working both from the same round-by-round counts and comparing them before attaching keeps them consistent.
What's the best order to assemble all the pieces?
Finish and stuff the head and body first, then pin the antlers and ears in place before sewing anything down permanently. Mark the nostril points with pins last, since that's easiest to adjust once the face is already taking shape.
Original pattern: https://amigurumiarts.com/free-cow-lovey-crochet-pattern-baby-security-blanket/
About the Author

Marisol QuinteroWho runs Crochet Obsessed, why a stitch count sits at the end of every round, how a pattern gets written here, and the things this site will never do.
More Patterns
- IntermediateNo. 01

Rose Granny Square Tote Crochet Pattern
Rose granny square tote crochet pattern made from 18 dimensional rose squares for a sturdy, romantic everyday bag.
- IntermediateNo. 02
Tropical octopus baby blanket crochet pattern with appliqués
Tropical octopus baby blanket crochet pattern: a cream filet base with coral and turquoise octopus appliqués, leaves, and…
- IntermediateNo. 03
Sunny lemon couple amigurumi crochet pattern
Sunny lemon couple amigurumi crochet pattern with embroidered slices and safety eyes for a cheerful handmade shelf pair.


