- LevelIntermediate
- Time4-6 Hours
- Hook4 mm
- YarnBulky
About This Pattern
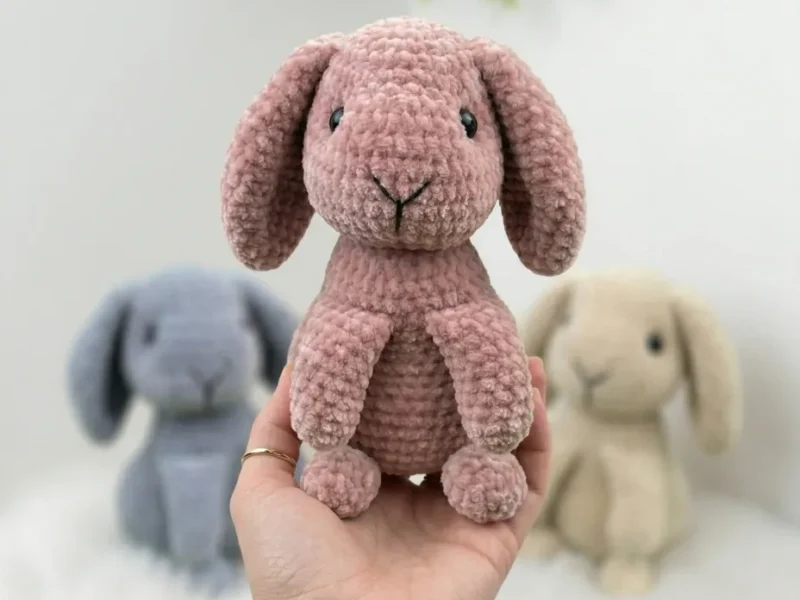
This crochet bunny amigurumi pattern creates the softest, plushest little companion using Himalaya Dolphin Baby yarn — a bulky, chenille-style yarn that makes every stitch feel like velvet. What makes this bunny special is how quickly the bulky weight yarn builds up a substantial 20 cm toy without hours of tiny stitches, making it wonderfully satisfying for anyone who loves seeing fast progress. It's perfect for crocheters who want a cuddly nursery accent, a new baby gift, or simply a soft creature to keep on the shelf.
You'll work through a mix of amigurumi fundamentals here: magic rings to start each piece, single crochet increases and decreases for shaping, and a continuous spiral technique throughout so there are no visible seams from joining rounds. The body and head are worked as one continuous piece across 37 rounds, which builds real confidence in shaping curves and necklines without sewing pieces together. Expect this to take an intermediate crocheter roughly 4 to 6 hours total, spread across the legs, arms, body/head, ears, and tail.
The finished bunny stands about 20 cm tall with a soft, huggable chenille texture that feels irresistible in small hands. The gray body paired with a hand-embroidered black nose gives it a simple, timeless look that fits any room's decor. Because it's stitched tightly and stuffed firmly, it holds its shape beautifully — making it a thoughtful handmade gift for a new baby, a birthday, or just because.
- Start by crocheting the two legs separately, each worked up quickly over just five rounds.
- Move on to the two arms, building them up over eight rounds of shaping and stitching.
- Work the body and head together as one continuous spiral piece across thirty-seven rounds without breaking your yarn.
- Stuff each piece firmly with fiberfill as you complete it, keeping the chenille fabric smooth and gap-free.
- Crochet the two ears separately, then set them aside along with the small tail piece.
- Cinch and sculpt the muzzle using a long yarn needle and sturdy thread to shape the signature bunny face.
- Embroider the tiny nose onto the muzzle using the small amount of black accent yarn.
- Assemble everything by sewing the legs, arms, ears, and tail onto the body following the five assembly steps.
Materials
- Yarn (Main Color): Himalaya Dolphin Baby, color 80351 (gray) — 1 skein; Bulky weight, plush/chenille-style
- Yarn (Accent): YarnArt Jeans (black) — a small amount, for embroidering the nose
Hook
- US G-6 / 4 mm
Safety Eyes
- 12–13 mm, 1 pair
- Fiberfill / Stuffing
- Stitch Marker
- Yarn Needle / Tapestry Needle
- Scissors
- Sewing needle and thread
- Long yarn needle and sturdy thread or yarn — for cinching/sculpting the muzzle
Crochet Abbreviations
- ch
- Chain
- dec
- Decrease (invisible decrease)
- hdc
- Half Double Crochet
- inc
- Increase (2 sc in same stitch)
- MR
- Magic Ring
- sc
- Single Crochet
- sl st
- Slip Stitch
- SM
- Stitch Marker
- st / sts
- Stitch / Stitches
Crochet Bunny Amigurumi Pattern — Bulky Yarn, 20 cm
Legs (Make 2)
- Round 1
6 sc in MR. (6)
- Round 2
inc in each st around. (12)
- Round 3-6(12)
sc in each st around. (12) (4 rounds) Stuff the lower portion of the leg firmly before continuing.
- Round 7
sc, dec repeat 4 times. (8)
- Round 8
sc in each st around. (8)Fasten off and cut yarn. When joining the legs to the body, fold each leg in half flat before working the joining stitches.
Arms (Make 2)
- Round 1
5 sc in MR. (5)
- Round 2
inc in each st around. (10)
- Round 3
sc in each st around. (10)
- Round 4
4 sc, inc repeat 2 times. (12)
- Round 5
sc in each st around. (12)
- Round 6-8(12)
5 sl st, 7 sc. (12) (3 rounds)
- Round 9
5 sc, inc repeat 2 times. (14)
- Round 10-12(14)
sc in each st around. (14) (3 rounds) Fasten off and cut yarn. When joining the arms to the body, fold each arm in half flat before working the joining stitches.
Body and Head (Worked in One Piece)
- Round 1
6 sc in MR. (6)
- Round 2
inc in each st around. (12)
- Round 3
1 sc, inc repeat 6 times. (18)
- Round 4
2 sc, inc repeat 6 times. (24)
- Round 5
3 sc, inc repeat 6 times. (30)
- Round 6
4 sc, inc repeat 6 times. (36)
- Round 7
5 sc, inc repeat 6 times. (42)
- Round 8
15 sc, 4 sc joining first leg, 4 sc, 4 sc joining second leg, 15 sc. (42)
- Round 9-11(42)
sc in each st around. (42) (3 rounds)
- Round 12
6 sc, inc repeat 6 times. (48)
- Round 13-15(48)
sc in each st around. (48) (3 rounds)
- Round 16
7 sc, dec repeat 2 times, 15 sc, dec, 7 sc, dec, 4 sc. (44)
- Round 17
7 sc, 2 dec, 2 sc, 2 dec, 14 sc, 2 dec, 2 sc, 2 dec, 1 sc, dec. (35)
- Round 18
1 sc, dec repeat 2 times, 1 sc, 3 dec, 14 sc, 3 dec, 2 sc. (27)
- Round 19
4 sc, 3 sc, inc repeat 5 times, inc, 2 sc. (33)
- Round 20-21(33)
sc in each st around. (33) (2 rounds) Position the arms so they sit parallel above the legs before working Round 22.
- Round 22
1 sc, dec repeat 2 times, 3 sc, inc, (3 sc joining arm, inc, 3 sc), inc, (3 sc joining arm, inc, 3 sc), inc, 1 sc, 1 sc, dec repeat 2 times. (34)Stuff the body firmly now before continuing.
- Round 23
sc in each st around. (34)
- Round 24
4 sc, dec, 3 sc, dec repeat 5 times, 3 sc. (28)
- Round 25
4 sc, dec repeat 4 times, 4 sc. (24)
- Round 26
2 sc, dec repeat 6 times. (18)
- Round 27
2 sc, inc repeat 6 times. (24)
- Round 28
3 sc, inc repeat 6 times. (30)
- Round 29
4 sc, inc repeat 6 times. (36)
- Round 30
5 sc, inc repeat 2 times, 1 sc, inc repeat 6 times, 5 sc, inc repeat 2 times. (46)
Note: From Round 31 onward, the increases and decreases marked below are positioned strictly at the center front of the work — they shape the muzzle.
- Round 31
14 sc, 2 sc, inc repeat 2 times, 2 sc, inc repeat 2 times, 2 sc, inc repeat 2 times, 14 sc. (52)
- Round 32
22 sc, 3 sc, inc repeat 2 times, 22 sc. (54)
- Round 33
sc in each st around. (54)
- Round 34
7 sc, dec repeat 6 times. (48)
- Round 35
6 sc, dec repeat 6 times. (42)
- Round 36
12 sc, 1 sc, dec repeat 2 times, 1 sc, dec repeat 2 times, 1 sc, dec repeat 2 times, 12 sc. (36)
- Round 37
12 sc, dec 6 times, 12 sc. (30)
- Round 38
sc in each st around. (30)
- Round 39
3 sc, dec repeat 6 times. (24)Insert safety eyes between Rounds 35 and 36, with 14 stitches between them. Stuff the head firmly.
- Round 40
2 sc, dec repeat 6 times. (18)
- Round 41
1 sc, dec repeat 6 times. (12)
- Round 42
dec 6 times. (6)Cut yarn, pull through remaining 6 stitches to close the opening, and weave in the end securely inside the toy.
Ears (Make 2)
- Round 1
6 sc in MR. (6)
- Round 2
inc in each st around. (12)
- Round 3
sc in each st around. (12)
- Round 4
1 sc, inc repeat 6 times. (18)
- Round 5
2 sc, inc repeat 6 times. (24)
- Round 6
sc in each st around. (24)
- Round 7
3 sc, inc repeat 6 times. (30)
- Round 8-11(30)
sc in each st around. (30) (4 rounds)
- Round 12
3 sc, dec repeat 6 times. (24)
- Round 13
sc in each st around. (24)
- Round 14
2 sc, dec repeat 6 times. (18)
- Round 15-16(18)
sc in each st around. (18) (2 rounds)
- Round 17
1 sc, dec repeat 6 times. (12)
- Round 18-19(12)
sc in each st around. (12) (2 rounds)Fasten off, leaving a long yarn tail for sewing. Do not stuff the ears.
Tail
- Round 1
6 sc in MR. (6)
- Round 2
inc in each st around. (12)
- Round 3-4(12)
sc in each st around. (12) (2 rounds)
- Round 5
1 sc, dec repeat 4 times. (8)Fasten off, leaving a long yarn tail. Lightly stuff the tail before sewing.
Assembly Instructions
- Step 1 Attach the ears to the sides of the head, aligned with Round 38, using the long yarn tail and a whipstitch. Sew securely all the way around the base of each ear so they sit upright before gently flopping to the sides.
- Step 2 Attach the tail to the back of the body at Round 8, centered, using the yarn tail. Stuff lightly as you go before closing the seam.
- Step 3 Muzzle sculpting: Thread a long sturdy yarn needle with matching or invisible thread. Insert the needle from underneath the muzzle at the center point, and work through the face sequentially to pull and sculpt the muzzle shape. Complete 9 stages of cinching, returning to your original entry point at the final step. Pull the thread tight, knot it, and bury the ends inside the toy. Repeat the cinching if needed to deepen the muzzle definition.
- Step 4 Nose embroidery: Using the black YarnArt Jeans yarn and a tapestry needle, mark two anchor points with pins between Rounds 34 and 35, with 5 stitches between the pins. Insert the needle from beneath the muzzle at the center. On the second step, bring the needle out 2 stitches above the starting point. On the fourth step, insert the needle back into that same point and return to the starting position (2 stitches down). Embroider the nose shape following this sequence. Knot the yarn and bury the tail inside the toy.
- Step 5 Weave in all remaining ends securely inside the body.
Important Notes
- 💡 Keep a stitch marker on hand at all times — every piece in this pattern is worked in a continuous spiral, so marking the start of each round is essential to avoid miscounting across 37 rounds on the body and head.
- 💡 Because Himalaya Dolphin Baby is a bulky, chenille-style yarn, work with a US G-6 (4mm) hook and check that your stitches stay snug; loose tension is the main cause of stuffing showing through on plush yarns like this.
- 💡 Stuff the legs and arms firmly before closing them, since these smaller 5-round and 8-round pieces are trickier to adjust once sewn onto the body.
- 💡 Save your small amount of YarnArt Jeans in black specifically for the nose embroidery — a little goes a long way, so you don't need a full skein just for this detail.
- 💡 When cinching the muzzle, use a long yarn needle with sturdy thread or yarn as instructed, not your regular working yarn, since it needs to hold tension firmly through the sculpting process.
- 💡 Work the body and head piece in one sitting if possible — since it's constructed continuously over 37 rounds without breaks, keeping consistent tension throughout gives the smoothest, most even shaping.
- 💡 This pattern is written in US crochet terminology throughout.
- 💡 Stitch counts are given at the end of each round in parentheses, e.g. (##) — use them to check your work as you go. The legs and arms are folded in half and crocheted directly into the body as you work; they are not sewn on separately.
Common Mistakes and Fixes
- Losing track of the beginning
Place a stitch marker in the first stitch of every round and move it up as you go — this pattern relies on spiral construction throughout, so without a marker it's easy to drift and lose your stitch count.
- Working the magic ring too loosely
Pull the tail yarn firmly after your first round of single crochet to close the center hole completely, otherwise stuffing will poke through that tiny gap later.
- Stuffing too lightly, allowing
Because Himalaya Dolphin Baby is a plush, chenille yarn, stuff firmly and evenly in small pieces as you go rather than adding it all at the end — this keeps the bunny's shape smooth and prevents lumpy sections.
- Rushing the muzzle-cinching step
Use a long yarn needle with sturdy thread and cinch gradually, checking the muzzle shape from multiple angles before knotting off securely — this step sculpts the bunny's signature face, so take it slow.
- Skipping gauge awareness and ending up
The pattern notes that gauge isn't critical, but your fabric must be tight enough to hide stuffing — if you see gaps between stitches, drop to a smaller hook like a US F-5 to tighten your tension.
- Attaching the ears, arms, legs, or tail
Complete the nose embroidery with YarnArt Jeans while the head is still easy to hold and turn, then move on to assembly — it's much harder to embroider neatly once all the limbs are sewn on.
Variations
- Once you've made this bunny in classic gray, there are so many fun ways to remix it. Try Himalaya Dolphin Baby in cream, blush pink, or soft lavender for a different nursery palette — the chenille texture reads beautifully in pastels too. If you can't find Himalaya Dolphin, Comfy Cotton Chenille or Bernat Baby Velvet are solid bulky-weight substitutes with a similarly plush hand-feel; just check your gauge stays tight enough that stuffing doesn't peek through. For a mini version, drop down to a US E-4 (3.5mm) hook with a worsted weight yarn like Vanna's Choice — you'll naturally get a smaller bunny since your stitch counts stay proportional to a smaller hook and thinner yarn, though you'll want to add or remove a round or two from the body/head section to keep the shaping balanced. Going bigger works in reverse: size up to a US H-8 (5mm) hook with a super bulky yarn for an extra-huggable oversized bunny. Seasonal color swaps are easy too — a soft white body with pink inner ears feels like spring, while a warm caramel or dove-gray with a tiny fabric bandana turns this into an everyday farmhouse-style decor piece. You could also make the ears floppier by working a few extra rounds before decreasing, letting them drape over the head instead of standing up. For a special-occasion twist, embroider a tiny heart on the belly with contrast yarn, or add a small crocheted flower to one ear using leftover scraps. However you customize it, the bones of this pattern — magic ring construction, continuous spiral, and sculpted muzzle — stay wonderfully consistent and forgiving.
- I adore this pattern because the Himalaya Dolphin Baby yarn does so much of the visual work for you — that chenille texture makes even simple single crochet rounds look luxuriously soft once stuffed. Working the body and head in one continuous piece across 37 rounds is genuinely satisfying; there's no seaming a neck later, just smooth, confident shaping from the bottom of the body all the way up through the head. I love how the legs and arms come together fast, only 5 and 8 rounds each, so you get that rewarding feeling of finished limbs early on. The muzzle-cinching step is my favorite little trick in this whole pattern — using a long yarn needle and sturdy thread to sculpt that sweet bunny face after stuffing is what gives this design its personality. Embroidering the tiny black nose with YarnArt Jeans is such a small detail, but it's the moment your bunny actually starts looking back at you. If you've made amigurumi before but want to push your shaping and finishing skills further, this project hits that sweet spot perfectly.
Frequently Asked Questions
What size hook and yarn do I need for this bunny?
You'll need a US G-6 (4mm) hook paired with Himalaya Dolphin Baby, a bulky chenille-style yarn, in the gray colorway or a similar substitute. A small amount of black yarn like YarnArt Jeans is also needed for the nose embroidery.
Is this pattern beginner-friendly?
It's best suited for intermediate crocheters who are comfortable with magic rings, increases, decreases, and continuous spiral construction. The 37-round body and head piece and the muzzle-cinching technique add a bit more complexity than a true beginner project.
How big is the finished bunny?
The finished bunny measures approximately 20 cm tall thanks to the bulky weight yarn and 4mm hook. Using a thinner yarn or smaller hook will result in a noticeably smaller finished size.
Why does the pattern say to work in a continuous spiral instead of joining rounds?
Working in a continuous spiral avoids the visible seam and jog created by joining and chaining up each round, giving the bunny a smoother, more seamless look. Just be sure to use a stitch marker since there's no join to signal where each round begins.
What is the muzzle-cinching step for, and is it necessary?
Cinching the muzzle with a long yarn needle and sturdy thread sculpts the bunny's face after stuffing, creating that signature rounded snout look. It's a key step for achieving the pattern's intended sweet, expressive face, so it's worth taking your time with.
Original pattern: https://amigurumiarts.com/crochet-bunny-amigurumi-pattern-easy-gray-rabbit-with-floppy-ears/
About the Author

Marisol QuinteroWho runs Crochet Obsessed, why a stitch count sits at the end of every round, how a pattern gets written here, and the things this site will never do.
More Patterns
- IntermediateNo. 01

Slouchy everyday beanie worked flat in half double crochet
Crochet beanie pattern for a slouchy everyday look worked flat with hdc rows, then seamed into a soft,…
- IntermediateNo. 02
Crochet amigurumi doll with dress, shoes, and hat
Crochet amigurumi doll pattern with dress, shoes, and hat details for a soft, huggable keepsake you build one…
- IntermediateNo. 03
Chunky moss stitch crochet sweater with raglan-free shoulders
Chunky crochet sweater pattern using moss stitch, worked flat with a 10mm hook for a soft, fast, cool-weather…


