- LevelIntermediate
- Time4-6 hours
- Hook2.0 mm
- YarnWorsted
About This Pattern
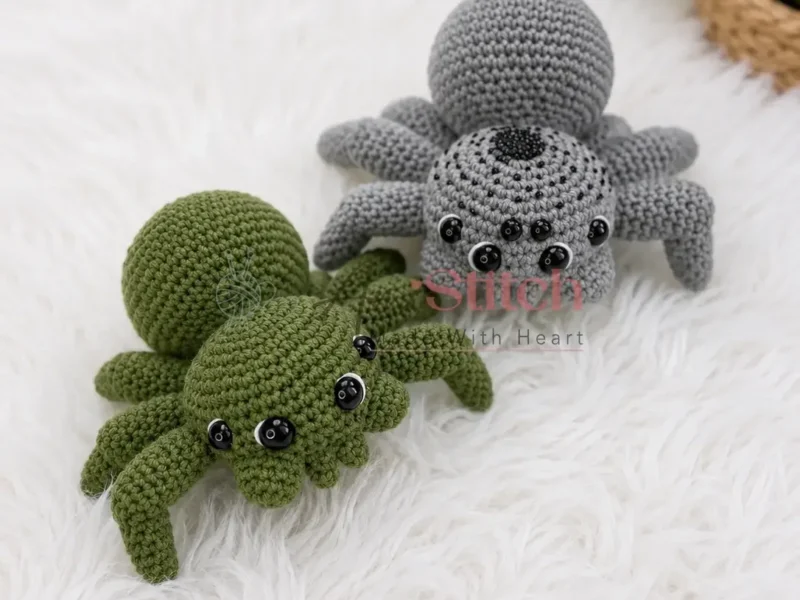
There's something gleefully creepy about this little spider, and I love that tension. The gray and green colorway keeps it from feeling gimmicky, more like a quirky creature than a prop. Each round builds that contrast between cute and unsettling, especially once the fangs go on. It's the kind of mood that makes you grin while you work, not wince.
Your hands stay busy with a continuous spiral the whole way through, so you're tracking increases more than counting joins. The Head alone climbs through eighteen rounds, which means steady rhythm more than fiddly shaping. Fangs ask for tighter attention since they're small and the increase lines matter for the point. Whipstitching the leg segments together at an angle is the one moment that asks for patience.
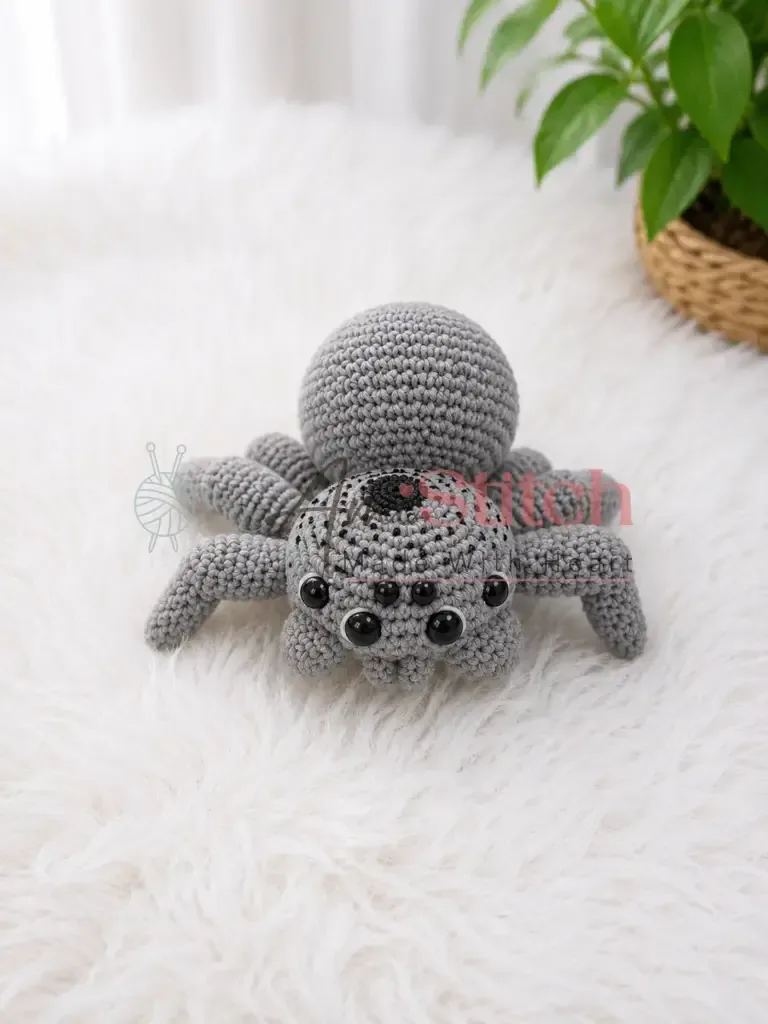
Once he's stuffed and assembled, Larry has real presence, bigger than a typical amigurumi thanks to all those legs. He looks right perched on a bookshelf, peeking from a plant pot, or lurking near a desk lamp. The seed-bead details catch light in a way that makes people lean in for a second look. He's unsettling enough to earn a laugh and charming enough to keep around.
This pattern is written in US crochet terminology. Gauge is not critical for amigurumi, but your fabric should be tight enough that no stuffing shows through — if you can see gaps, go down a hook size. Stitch counts are given at the end of each round in parentheses.
- Start with the Head, working in a continuous spiral from a magic ring until the sphere is fully shaped.
- Crochet two Small Fangs and two Large Fangs separately, each one a short, quick increase shape worked in minutes.
- Make the Body next, keeping your stitch marker in place so the spiral stays easy to track.
- Work six matching First Segments and six Second Segments for the legs, stuffing each one firmly as you go.
- Whipstitch each First Segment to a Second Segment at an angle so every leg bends like a real spider leg.
- Arrange and sew all six legs evenly along both sides of the Head before adding any fangs.
- Position the Large Fangs at the front-lower edge of the Head, then tuck the Small Fangs in beside them.
- Finish with seed beads for eyes or decoration, weaving in every yarn tail as you close up the piece.
On the desk
Yarn
- Worsted weight cotton blend in gray and green (or your choice of creepy colors) — approximately 100–150g total
Hook
- US size B-1 / 2.0 mm
Safety eyes
- Two 12 mm and two 10 mm (4 total)
Stuffing
- Polyester fiberfill
- Stitch marker
- Yarn needle / tapestry needle
- Scissors
Optional
- seed beads for decoration
Stitch shorthand
- ch — Chain
- dec — Invisible Decrease (2 stitches decreased to 1)
- inc — Increase (2 sc in same stitch)
- MR — Magic Ring
- sc — Single Crochet
- sl st — Slip Stitch
- st / sts — Stitch / Stitches
A creepy-cute spider amigurumi you can actually crochet
Head
- Round 1
6 sc in MR. (6)
- Round 2
inc in each st around. (12)
- Round 3
sc, inc repeat 6 times around. (18)
- Round 4
2 sc, inc repeat 6 times around. (24)
- Round 5
3 sc, inc repeat 6 times around. (30)
- Round 6
2 sc, inc, 2 sc repeat 6 times around. (36)
- Round 7
5 sc, inc repeat 6 times around. (42)
- Round 8
3 sc, inc, 3 sc repeat 6 times around. (48)
- Round 9
7 sc, inc repeat 6 times around. (54)
- Rounds 10–15
sc in each st around. (54)Eye placement: Insert the 12 mm safety eyes between Rounds 12 and 13, spacing them 4 stitches apart. Insert the 10 mm safety eyes between Rounds 11 and 12, positioning them 2 stitches away from the larger eyes on each side. Secure all backs firmly before continuing.
- Round 16
7 sc, dec repeat 6 times around. (48)
- Round 17
3 sc, dec, 3 sc repeat 6 times around. (42)
- Round 18
5 sc, dec repeat 6 times around. (36)
- Round 19
2 sc, dec, 2 sc repeat 6 times around. (30)
- Round 20
3 sc, dec repeat 6 times around. (24)Begin stuffing the head firmly with fiberfill now. Continue adding stuffing as you work the next rounds.
- Round 21
2 sc, dec repeat 6 times around. (18)
- Round 22
sc, dec repeat 6 times around. (12)
- Round 23
dec 6 times around. (6)Close the opening by threading your yarn needle through the front loops of the remaining 6 stitches, pulling tight to close. Fasten off and weave in the end.
Small Fangs (make 2)
- Round 1
4 sc in MR. (4)
- Round 2
inc, 3 sc. (5)
- Round 3
inc, 4 sc. (6)
- Round 4
sc in each st around. (6)Finish with a sl st. Leave a long yarn tail for sewing and cut yarn.
Large Fangs (make 2)
- Round 1
6 sc in MR. (6)
- Round 2
inc in each st around. (12)
- Round 3
inc, 11 sc. (13)
- Round 4
inc, 12 sc. (14)
- Round 5
inc, 13 sc. (15)Finish with a sl st. Leave a long yarn tail for sewing and cut yarn.
Body
- Round 1
6 sc in MR. (6)
- Round 2
inc in each st around. (12)
- Round 3
sc, inc repeat 6 times around. (18)
- Round 4
2 sc, inc repeat 6 times around. (24)
- Round 5
3 sc, inc repeat 6 times around. (30)
- Round 6
4 sc, inc repeat 6 times around. (36)
- Round 7
5 sc, inc repeat 6 times around. (42)
- Round 8
6 sc, inc repeat 6 times around. (48)
- Round 9
7 sc, inc repeat 6 times around. (54)
- Rounds 10–16
sc in each st around. (54)
- Round 17
7 sc, dec repeat 6 times around. (48)
- Round 18
6 sc, dec repeat 6 times around. (42)
- Round 19
5 sc, dec repeat 6 times around. (36)
- Round 20
4 sc, dec repeat 6 times around. (30)
- Round 21
3 sc, dec repeat 6 times around. (24)Finish with a sl st. Leave a long yarn tail for sewing and cut yarn. Stuff the body firmly with fiberfill before assembly.
Leg — First Segment (make 6)
- Round 1
6 sc in MR. (6)
- Round 2
inc in each st around. (12)
- Rounds 3–10
sc in each st around. (12)
- Round 11
2 sc, dec repeat 3 times around. (9)Finish with a sl st. Leave a long yarn tail for sewing and cut yarn.
Leg — Second Segment (make 6)
- Round 1
6 sc in MR. (6)
- Round 2
sc in each st around. (6)
- Round 3
inc, 5 sc. (7)
- Round 4
inc, 6 sc. (8)
- Round 5
inc, 7 sc. (9)
- Rounds 6–10
sc in each st around. (9)Finish with a sl st. Leave a long yarn tail for sewing and cut yarn.
More shots
Where it goes
- Set him on a bookshelf or window ledge as a playful bit of creepy-cute decor.
- Use him as a quirky desk companion that doubles as a conversation starter during calls.
- Pair him with other amigurumi creatures on a shelf to build a small, odd little collection.
- Give him as a handmade gift for anyone who loves spiders, bugs, or offbeat crochet characters.
Color ideas
- Gray Body, Green Accents Work the Head, Body, and all twelve leg segments in gray, then crochet both pairs of fangs in green so they stand out against the face.
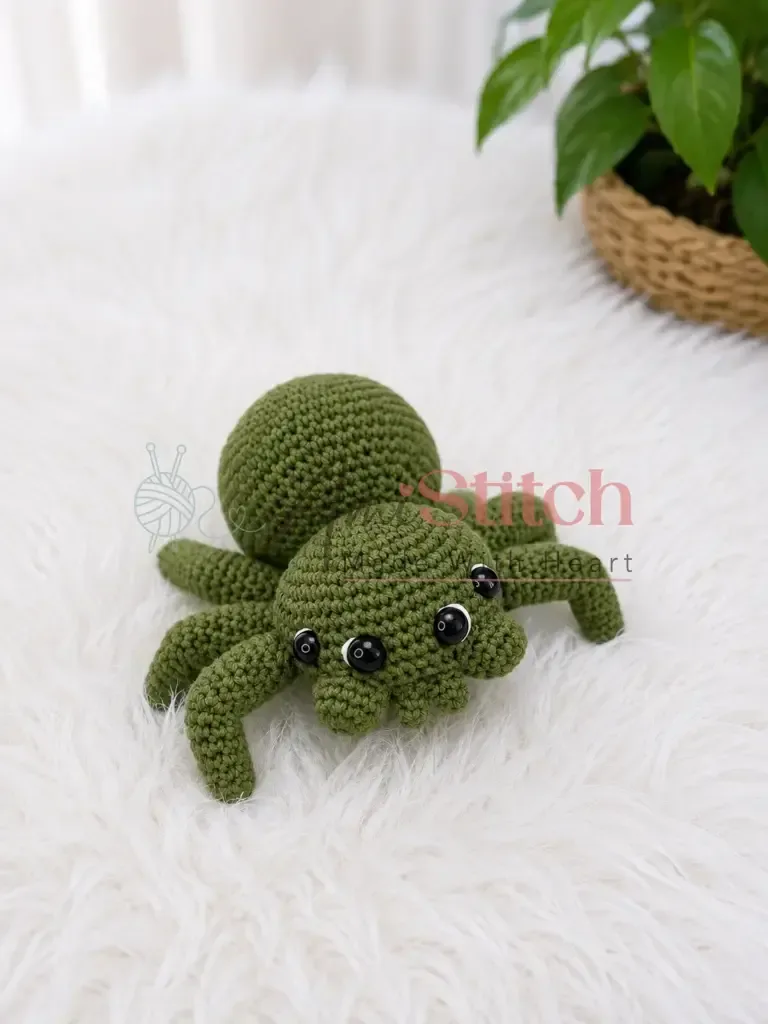
- Green Head, Gray Legs and Fangs Crochet the Head and Body in green, then work all six leg segments plus both sets of fangs in gray for a two-tone, almost camouflage look.
Care
Hand wash Larry gently in cool water since the cotton blend fiber can lose shape under hot water or a washing machine cycle.
Press out excess water in a towel and reshape the Head, Body, and legs by hand while still damp, then let him air dry fully flat.
Store him away from direct sunlight so the gray and green colors don't fade, and keep the legs loosely arranged rather than folded to avoid creasing.
Assembly
- Step 1 Stuff all leg segments firmly with fiberfill.
- Step 2 Sew one First Segment to one Second Segment at an angle using the yarn tails and a whipstitch, creating a bent leg shape. Repeat for all 6 legs.
- Step 3 Arrange the 6 completed legs evenly along both sides of the Head and sew each one securely in place using the remaining yarn tails.
- Step 4 Position the 2 Large Fangs at the front-lower edge of the Head, side by side, and sew them on using their yarn tails.
- Step 5 Position the 2 Small Fangs just beside or below the Large Fangs and sew them on securely.
- Step 6 Sew the Body to the underside/back of the Head using the Body’s long yarn tail, stitching all the way around the opening edge with a whipstitch for a secure join.
- Step 7 If desired, add seed bead accents to the body or head for extra detail.
- Step 8 Weave in all remaining yarn ends.
Easy to get wrong
Losing track of the spiral
Since every piece is worked in a continuous spiral without joining, it's easy to drift off round. Keep a stitch marker in the first stitch of each round and move it up every single round, not just occasionally.
Overstuffing the fangs
The Small and Large Fangs are only a few rounds tall, so packing in too much fiberfill can make them bulge instead of coming to a point. Use just a pinch of stuffing and work it in with the tip of your needle for a neat point.
Sewing legs on without matching angles
Whipstitching the First and Second Segments together at mismatched angles leaves some legs splayed and others tucked under. Lay all six assembled legs side by side before sewing them to the Head so the bend direction matches on every one.
Between the songs
- What makes this one satisfying is how much shaping happens through simple increase math. The Head grows from a tight magic ring through eighteen rounds, climbing through plain increase rows before the decreases bring it back in near the finish, so you watch a sphere take real shape under your hook. The fangs are tiny exercises in asymmetric increasing, just one extra stitch per round pushing them into a curved point. Assembling six legs from two segments each, then whipstitching them together at an angle, turns a pile of tubes into something that actually looks like it could scuttle. Adding seed beads at the end is the kind of small, fast detail that changes the whole character of the piece without adding real difficulty.
Listener questions
Do I need to join at the end of each round?
No, every part of this pattern works in a continuous spiral, so you never slip stitch to close a round unless the instructions say so. Just keep your stitch marker moving to track where each new round begins.
What are the 12 mm and 10 mm pieces for?
Those four pieces are meant for eyes, with the two larger 12 mm ones and two smaller 10 mm ones giving you a choice depending on the look you want. You can also use seed beads instead if you prefer a smaller, more detailed eye.
Why do I make two segments for each leg?
Each leg is built from a First Segment and a Second Segment that get whipstitched together at an angle afterward. Working them separately, then joining at a bend, is what gives the finished leg its realistic joint.
Can I use a different hook size than the B-1 / 2.0 mm?
You can, but amigurumi relies on tight fabric so stuffing doesn't peek through, and the US size B-1 / 2.0 mm hook paired with worsted weight cotton blend gives that density. If you size up, check your fabric closely and go down a size if you see gaps.
In what order should I assemble the pieces?
Stuff and whipstitch all six legs first, then sew them evenly along both sides of the Head. After that, position the Large Fangs at the front-lower edge and tuck the Small Fangs in just beside them.
Original pattern: https://amistitch.com/larry-the-spider-amigurumi-crochet-pattern/
About the Author

Marisol QuinteroWho runs Crochet Obsessed, why a stitch count sits at the end of every round, how a pattern gets written here, and the things this site will never do.
More Patterns
- IntermediateNo. 01

Blush pink bow front cardigan crochet pattern
Blush pink bow front crochet cardigan pattern builds a V-neck mesh cardigan with ribbed trim and soft tie…
- IntermediateNo. 02
Flamingo, pineapple and monstera leaf charm trio pattern
Flamingo pineapple monstera leaf charm trio: tiny thread crochet and amigurumi shaping turn small motifs into three charming…
- IntermediateNo. 03
Sage green daisy bow bucket bag crochet pattern
Sage green daisy bow bucket bag crochet pattern with a sculpted bucket base, gathered rim, and a petaled…