- LevelIntermediate
- Time10-14 hours
- Hook3.5 mm
- YarnWorsted
About This Pattern
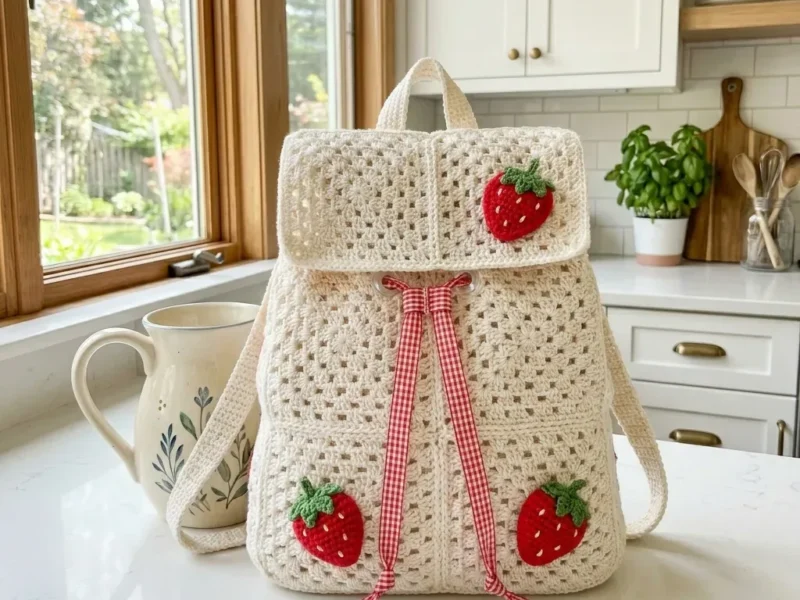
There is something a little dreamy about a bag that looks like it wandered out of a storybook garden. This backpack has that soft, sun-warmed feeling, cream fabric with tiny red berries peeking out like they grew there. It is sweet without being fussy, structured without losing its handmade charm.
Your hands will spend most of their time in a steady granny texture rhythm, building flat panels one row at a time. It is the kind of repeat you can settle into while you listen to a podcast or catch up on a show. Then you shift gears for the strawberries, working small rounds and adding neat little stitched seeds with embroidery thread.
Once it is finished, this backpack sits happily on a hook by the door or on a chair waiting for its next outing. It reads as considered and a little precious, the kind of bag people ask about. It belongs anywhere soft textures and warm color meet a bit of everyday function.
- Swatch first in the granny texture stitch so your panels will actually match up at assembly.
- Crochet the five main panels flat: the front, the back, both sides, and the bottom.
- Work each panel's border the same way so the edges are ready to seam together evenly.
- Make the rounded flap separately, then set it aside until the main box shape is joined.
- Crochet the long flat top handle and fold each short end under before it gets sewn on.
- Work the adjustable shoulder straps and add the strap adjusters, buckles or D-rings, and eyelets.
- Crochet three flat strawberries, add the little green leaf rounds, and stitch on white seed dashes.
- Sew all the panels, handle, straps, and strawberry appliques together to finish the backpack.
On the desk
Yarn
- Worsted weight cotton yarn in cream: 250 g / approximately 430 yards
- Worsted weight cotton yarn in red: 30 g / approximately 52 yards
- Worsted weight cotton yarn in green: 10 g / approximately 18 yards
- White embroidery thread for the strawberry seeds
Recommended Yarns
- Paintbox Yarns Cotton Aran, which has a crisp stitch texture and broad color range
- Choose a smooth worsted cotton or cotton blend that creates a firm fabric. If your swatch feels floppy, go down a hook size or plan to add a fabric lining.
Hook
- 3.5 mm (US E/4) crochet hook, or the size needed to match gauge
Notions
- Yarn needle
- Stitch markers
- Scissors
- Blocking pins
- Two 8 mm metal eyelets plus an eyelet setting tool
- Two 25 mm strap adjusters plus two small buckles or D-rings
Red gingham ribbon
- 31 to 36 inches (80 to 90 cm)
Optional
- lining fabric for extra strength and structure
Stitch shorthand
- Granny Texture Row — Chain 3 (ch 3), turn. Double crochet (dc) in the next stitch. Skip the next 2 stitches, work 3 dc in the next stitch. Repeat from to across until you reach the last 2 stitches. Work 1 dc in each of the last 2 stitches. On the following row, work each 3-dc group into the open space created by the skipped stitches below. Always keep 2 dc at each edge.
- sc2tog (single crochet decrease) — Insert your hook into the next stitch, yarn over, pull up a loop. Insert your hook into the following stitch, yarn over, pull up a loop. Yarn over and pull through all 3 loops on your hook.
- Clean Border Corners — Work 3 sc in each corner stitch to turn the corner smoothly without puckering.
- ch — chain
- sl st — slip stitch
- sc — single crochet (insert hook, yarn over, pull up a loop, yarn over, pull through both loops)
- hdc — half double crochet
- dc — double crochet (yarn over, insert hook, yarn over, pull up a loop, yarn over, pull through two loops, yarn over, pull through remaining two loops)
- sc2tog — single crochet two stitches together (a decrease)
- st/sts — stitch/stitches
- RS/WS — right side/wrong side
- MR — magic ring
Cream strawberry cottagecore crochet backpack pattern
Front Panel (Make 1)
Foundation: Ch 38.
Step by step: Foundation: Ch 38.
Step by step: Foundation: Ch 38.
Step by step: Foundation: Ch 7.
- Round 1
Sc in the 2nd ch from the hook and in each ch across. (37 sc)through 105: Ch 1, turn. Sc across. (6 sc) Thread each strap through your strap adjusters or buckles. Fold the ends under and sew securely using doubled yarn. This keeps the hardware firmly attached even with regular use.
through 8: Work the granny texture row. (37 dc each row) Border: Work 1 sc in each stitch and each row-end around the entire flap. Place 3 sc in each of the top corners and 3 sc in each of the bottom corners. Join with a sl st. (98 sc total)
Optional softer lower edge: On the final pass along the lower edge only, work sc, ch 1, skip 1 across before fastening off. This creates a more delicate, scalloped look.
through 7: Work the granny texture row. (37 dc each row) Border: Work the border the same as for the main panels. (96 sc total)
Checkpoint: Your base should measure approximately 9.25 inches by 3.25 inches (23.5 cm by 8 cm) before seaming.
- Round 2(130)
through 24: Work the granny texture row as described above. (37 dc each row) Border: Ch 1. Work 1 sc in each stitch across the top and bottom edges. Work 1 sc in each row-end along the sides. Work 3 sc in each corner. Join with a sl st. (130 sc total)
Checkpoint: Your panel should measure approximately 9.25 inches (23.5 cm) wide and 10.75 inches (27.5 cm) tall before seaming.
Side Panels (Make 2)
Foundation: Ch 14.
- Round 1
Sc in the 2nd ch from the hook and in each ch across. (13 sc)
- Round 2
through 24: Ch 3, turn. Dc in the next stitch. Skip the next 2 stitches, 3 dc in the next stitch. Repeat 3 times total. Dc in each of the last 2 stitches. (13 dc)Border: Work the border the same as for the main panels. (82 sc total)
Checkpoint: Each side panel should measure approximately 3.25 inches (8 cm) wide and 10.75 inches (27.5 cm) tall.
Top Handle (Make 1)
Foundation: Ch 7.
- Round 1
Sc in the 2nd ch from the hook and in each ch across. (6 sc)
- Round 2
through 38: Ch 1, turn. Sc across. (6 sc) When you attach the handle later, fold each short end under about 0.75 inches (2 cm) before sewing to the back panel.
Flat Strawberry (Make 3)
With red yarn, ch 2.
- Round 1
Work 3 sc in the 2nd ch from the hook. (3 sc)
- Round 2
Ch 1, turn. Work 2 sc in each stitch across. (6 sc)
- Round 3
Ch 1, turn. Sc in the next stitch, 2 sc in the next stitch. Repeat across. (9 sc)
- Round 4
Ch 1, turn. Work 2 sc in the first stitch, sc in the next 7 stitches, 2 sc in the last stitch. (11 sc)
- Round 5
Ch 1, turn. Work 2 sc in the first stitch, sc in the next 9 stitches, 2 sc in the last stitch. (13 sc)
- Round 6
Ch 1, turn. Sc across. (13 sc)
- Round 7
Ch 1, turn. Sc2tog, sc in the next 9 stitches, sc2tog. (11 sc)
- Round 8
Ch 1, turn. Sc2tog, sc in the next 7 stitches, sc2tog. (9 sc)
- Round 9
Ch 1, turn. Sc2tog, sc in the next 5 stitches, sc2tog. (7 sc) Border: Sc evenly around the entire strawberry, placing 2 sc at the lower point to create a nice rounded tip. Fasten off, leaving a long tail for sewing.
Back Panel (Make 1)
Work exactly the same as the Front Panel. You will have 37 stitches per row and a 130 sc border.
Before moving on, mark the top center 10 stitches. This is where you will attach the handle later. Also mark the lower left and right corners for strap placement.
Where it goes
- Carry it as a daily bag for a phone, wallet, and a paperback, since the panels give it real structure.
- Pack it for a picnic outing with a blanket rolled underneath the flap and snacks tucked inside.
- Bring it along to a farmer's market where the cream and red coloring feels right at home next to fresh produce.
- Pair it with linen dresses or denim and a straw hat for an outfit that leans soft and a little vintage.
Color ideas
- Classic cream and berry Work the front, back, side, bottom, flap, handle, and strap panels in cream, then use red for all three strawberry appliques and green for the little leaf rounds on each one.
- Soft neutral base Keep the five main panels and flap in cream as written, but swap the embroidery thread to a cream tone on cream for a quieter, monochrome seed detail while the strawberries stay red and green.
Care
Hand wash the finished backpack cold with a mild soap, since it is worked entirely in worsted weight cotton yarn.
Press the water out gently with a towel rather than wringing, then reshape the panels flat while damp so the granny texture dries evenly.
Spot clean when you can between full washes, and store the bag stuffed lightly with tissue so the panels keep their structured shape.
Assembly
- Step 1 Finishing tips:
- Step 2 Steam or wet block lightly, being careful not to stretch the granny spaces
- Step 3 Weave in every yarn end twice, going in different directions for extra durability
- Step 4 For heavy use, sew in a simple cotton lining before permanently attaching the straps
- Step 5 Trim ribbon ends on the diagonal and seal with a tiny bit of fray preventing glue if desired
- Step 6 Care instructions:
- Step 7 Spot clean when possible
- Step 8 Hand wash cold with mild soap
- Step 9 Press water out gently with a towel, never wring
- Step 10 Reshape while damp and dry flat away from direct heat
- Step 11 Remove or protect hardware before washing if it is not rustproof
Easy to get wrong
Skipping the gauge swatch
Because all five main panels need to fit together at assembly, swatch the granny texture stitch and block it before starting, matching both stitch and row gauge, not just one.
Stretching the granny spaces while blocking
Steam or wet block the finished panels lightly and avoid pulling on the fabric, since overstretching distorts the granny texture holes and throws off your panel sizing.
Rushing the strawberry seed embroidery
Take the time to stagger the white embroidery thread dashes across each berry in uneven rows rather than a tidy grid, since real seeds sit irregularly and that randomness is what sells the detail.
Between the songs
- What makes this project satisfying is the contrast between two very different techniques living in one piece. The main panels use a granny texture stitch worked flat, so you get that classic dimensional look but in clean rectangles and rounds instead of the usual granny square. Then the strawberries flip the mood entirely, small worked rounds finished with hand stitched white seeds that turn a simple applique into something genuinely charming. Building the bag from five separate panels, front, back, two sides, and a bottom, means you get frequent little finish lines instead of one long slog. Add in a fold-under handle, adjustable straps, and hardware like eyelets and buckles, and you end up with something that feels more like a real bag than a granny square stretched into a shape.
Listener questions
Can I use a different cotton yarn than the one listed?
Yes, any smooth worsted weight cotton or cotton blend that creates a firm fabric will work well here. Just swatch first, and if the fabric feels floppy, go down a hook size or plan on adding a lining.
Do I need to add the lining fabric?
It is optional but worth considering, especially if the bag will see heavy daily use. Sewing in a simple cotton lining before attaching the straps adds strength and helps the panels keep their shape.
How many strawberry appliques does the pattern make?
The pattern has you make three flat strawberries total, each finished with green leaf rounds and hand stitched white seed detail. They attach to the front panel as the signature decorative touch.
What are the eyelets and strap adjusters for?
The two metal eyelets and the strap adjusters with buckles or D-rings are part of how the adjustable shoulder straps attach and change length. You will need an eyelet setting tool to install them properly.
Is this a good first bag pattern for a confident beginner?
Yes, the pattern is written for confident beginners through intermediate crocheters who can work basic stitches and follow a simple repeat. The main skills are the granny texture stitch, simple seaming, and basic embroidery for the strawberry seeds.
Original pattern: https://crochetwithmia.com/cream-strawberry-cottagecore-backpack-free-crochet-pattern/
About the Author

Marisol QuinteroWho runs Crochet Obsessed, why a stitch count sits at the end of every round, how a pattern gets written here, and the things this site will never do.
More Patterns
- IntermediateNo. 01

Slouchy everyday beanie worked flat in half double crochet
Crochet beanie pattern for a slouchy everyday look worked flat with hdc rows, then seamed into a soft,…
- IntermediateNo. 02
Crochet amigurumi doll with dress, shoes, and hat
Crochet amigurumi doll pattern with dress, shoes, and hat details for a soft, huggable keepsake you build one…
- IntermediateNo. 03
Chunky moss stitch crochet sweater with raglan-free shoulders
Chunky crochet sweater pattern using moss stitch, worked flat with a 10mm hook for a soft, fast, cool-weather…


