- LevelIntermediate
- Time14-20 hours
- Hook4.0 mm
- YarnDK
About This Pattern
This one feels like a warm porch afternoon, the kind where lemonade sweats on the table and somebody's humming. The coral and teal play off each other the way beach glass does. It's a dress with a little swing to it, built for a baby who's about to get photographed a lot.
Your hands go from tight, disciplined solid crochet in the bodice straight into airy, open fan repeats in the skirt. You'll track raglan increases with stitch markers, work a back split for easy dressing, and finish with a dimensional flower that asks for real patience and a sewing needle. It's a pattern that rewards slowing down between sections.
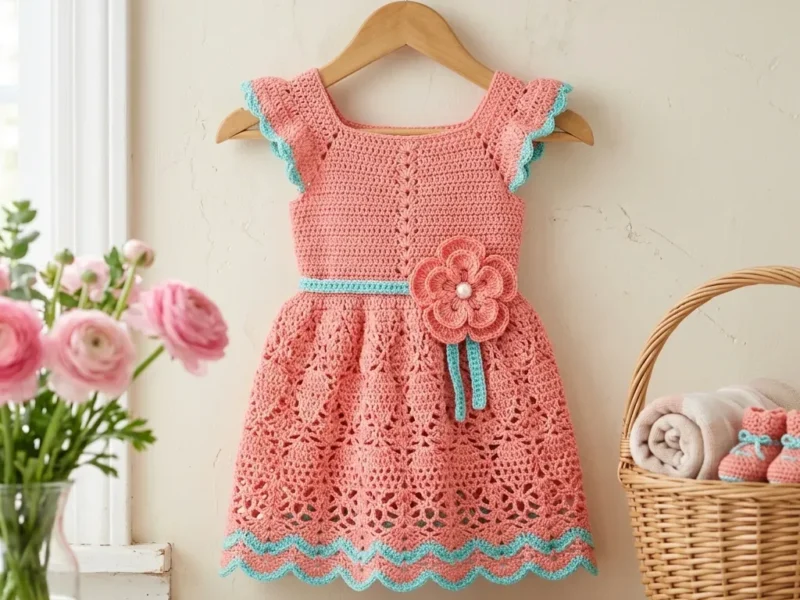
Hang this one on a nursery closet door and it reads like a tiny piece of art before it's ever worn. Laid flat on a changing table, the teal waistband and pearl-centered flower catch the eye before the lace does. It's the dress you pull out for the one photo you actually want to keep.
- Start the yoke flat at the neck, working a foundation row that you divide into back, sleeve, and front sections with stitch markers.
- Increase along the raglan lines row by row until the yoke reaches its full shoulder width.
- Separate the sleeves from the body so the dress splits into two armholes and one joined body.
- Continue the bodice in joined rounds with Yarn A to shape the fitted upper section.
- Work the waistband in Yarn B for the teal contrast band that breaks bodice from skirt.
- Check your stitch count carefully during the skirt transition before launching into the fan stitch repeat.
- Finish the hem with the scallop border and picot detailing, then add the flutter sleeve edging in Yarn B.
- Crochet the flower separately, attach the pearl button, and sew the flower to the waistband before blocking.
On the desk
- Yarn A (coral/salmon): DK weight, 100% cotton or cotton-blend, approximately 280 to 320 yards or 256 to 293 meters
- Yarn B (teal/mint): DK weight, 100% cotton or cotton-blend, approximately 60 to 75 yards or 55 to 69 meters
- Option 1: Lion Brand 24/7 Cotton, DK weight, 100% mercerized cotton, 186 yards per 3.5 ounce skein. Try Salmon for Yarn A and Mint for Yarn B. You will need 2 skeins of Yarn A and 1 skein of Yarn B.
- Option 2: Paintbox Yarns Simply DK, 100% premium acrylic, 137 yards per 1.76 ounce skein. Try Dusty Rose for Yarn A and Spearmint Green for Yarn B. You will need 3 skeins of Yarn A and 1 skein of Yarn B.
- Option 3: Cascade Yarns Nifty Cotton, DK weight, 100% cotton, 185 yards per 3.5 ounce skein. Try Coral for Yarn A and Aqua for Yarn B. You will need 2 skeins of Yarn A and 1 skein of Yarn B.
Substitution Note
- Any DK weight yarn with a smooth, tightly spun construction will show the lace pattern well. Avoid overly fuzzy or halo yarns. Cotton or cotton-blend is preferred for drape and breathability. If substituting a worsted weight, go up to a US G-6 (4.0 mm) hook and check your gauge carefully. Finished measurements will be slightly larger.
- US E-4 (3.5 mm) primary hook
- US D-3 (3.25 mm) for tighter trim sections if needed
- Yarn needle
- Stitch markers (at least 4)
- Scissors
- One 7 mm pearl shank button (for flower center)
- Two 6 mm snaps or one 8 mm button for back closure
- Sewing needle and thread to match
- Blocking mats and pins
Stitch shorthand
- ch — chain: wrap yarn over hook and pull through loop on hook
- sl st — slip stitch: insert hook, yarn over, pull through stitch and loop on hook in one motion
- sc — single crochet: insert hook, yarn over, pull up a loop, yarn over, pull through both loops
- hdc — half double crochet: yarn over, insert hook, pull up loop, yarn over, pull through all 3 loops
- dc — double crochet: yarn over, insert hook, pull up loop, yarn over, pull through 2 loops, yarn over, pull through remaining 2 loops
- tr — treble crochet: yarn over twice, insert hook, pull up loop, (yarn over, pull through 2 loops) three times
- sp — space
- ch-sp — chain space: the gap created by chain stitches in a previous row
- st(s) — stitch(es)
- beg — beginning
- rem — remaining
- rep — repeat
- sk — skip
- yo — yarn over
- RS — right side
- WS — wrong side
- pm — place marker
- sm — slip marker
- tog — together
- sc2tog — single crochet two together: a decrease where you work two stitches together as one
- dc2tog — double crochet two together: a decrease in double crochet
- inc — increase: 2 stitches worked into the same stitch
- rnd — round
Coral reef lace baby dress with flutter sleeves pattern
Flutter Sleeve Edging
With Yarn B, join to armhole edge.
- Round 1
Sc evenly around armhole opening.
- Round 2
Turn, ch 1, work (sc, ch 2, sc) into every other sc. Fasten off. This creates the ruffled flutter effect that looks so adorable on the finished dress.
Main Pattern
- Round 1
With Yarn A, make a magic ring, ch 1, work 6 sc into ring, join with sl st to first sc. (6 sc)
- Round 2
Ch 1, work 2 sc into each sc around, join. (12 sc)
- Round 3
Work (sl st, ch 2, 4 dc, ch 2, sl st) into each sc around. This creates 12 petals. Fasten off, leave a tail.
- Round 4
Back petals, optional for dimension Turn flower to WS. Working into the back loops of Round 1 sc sts, join Yarn B, work (sl st, ch 2, 3 dc, ch 2, sl st) into each sc. Fasten off.Attach a pearl button to the center of the flower with sewing thread.
Yoke (Worked Flat with Back Opening)
The yoke is worked flat from the top neck edge downward. The back opening is split at center back.
Foundation Chain: With Yarn A and US E-4 hook, ch 66.
- Round 1
RS, set-up row Sc in 2nd ch from hook and in each ch across. Turn. (65 sc) The 65 stitches are divided as follows: Left back = 10 stsLeft sleeve = 12 sts Front = 21 sts Right sleeve = 12 sts Right back = 10 sts
Place stitch markers between these sections now. The 4 markers sit at positions 10, 22, 43, and 55 counting from the left edge. - Round 2
WS, increase row Ch 1, sc in first 10 sts (left back), ch 2 (underarm join point marker), 2 sc in next st, sc in next 10 sts, 2 sc in next st (left sleeve increased, 14 sts worked in sleeve), ch 2, 2 sc in next st, sc in next 19 sts, 2 sc in next st (front increased, 23 sts), ch 2, 2 sc in next st, sc in next 10 sts, 2 sc in next st (right sleeve, 14 sts), ch 2, sc in rem 10 sts (right back). Turn. (71 sc)
- Round 3
(RS): Ch 1, sc in each sc across all sections (skip the ch-2 spaces for now, sc across them as 2 sts each on this row): sc in 10, sc in 2 (over ch-2), sc in 14, sc in 2 (over ch-2), sc in 23, sc in 2 (over ch-2), sc in 14, sc in 2 (over ch-2), sc in 10. Turn. (79 sc)Place 4 new stitch markers at the raglan lines after Row 3. Raglan marker positions (from left edge): after st 12, after st 28, after st 53, after st 69.
- Round 4
(WS): Ch 1, sc across, working 2 sc into the st immediately before and after each marker (8 total increases). Turn. (87 sc)
- Round 5
(RS): Ch 1, sc across, working 2 sc into st before and after each marker (8 inc). Turn. (95 sc)
- Round 6
(WS): Ch 1, sc across, 8 inc at markers. Turn. (103 sc)
- Round 7
(RS): Ch 1, sc across, 8 inc. Turn. (111 sc)
- Round 8
(WS): Ch 1, sc across, 8 inc. Turn. (119 sc)
- Round 9
(RS): Ch 1, sc across, 8 inc. Turn. (127 sc)
- Round 10
(WS): Ch 1, sc across, 8 inc. Turn. (135 sc) Checkpoint: After Row 10, your yoke measures approximately 2 inches from the top edge. The piece should be 135 stitches wide and fan out in a gentle arc.
- Round 11
(RS): Ch 1, sc across, 8 inc. Turn. (143 sc)
- Round 12
(WS): Ch 1, sc across, 8 inc. Turn. (151 sc)
- Round 13
(RS): Ch 1, sc across, 8 inc. Turn. (159 sc)
- Round 14
(WS): Ch 1, sc across, 8 inc. Turn. (167 sc) Checkpoint: After Row 14, your yoke measures approximately 3 inches from the top.
Separating Sleeves from Body
- Round 15
RS, separation Ch 1, sc in first 22 sts (left back). Skip the 38 left sleeve sts (do not work them). Ch 4 (underarm bridge). Sc in 47 front sts. Skip the 38 right sleeve sts. Ch 4 (underarm bridge). Sc in last 22 sts (right back). Turn. (99 sts including ch bridges)
- Round 16
WS, bridge join Ch 1, sc in each st and each ch across all sections. Turn. (99 sc)
Bodice
Continue flat with the back opening intact through the full bodice length.
- Round 17
(RS): Ch 1, sc in each of 99 sts. Turn. (99 sc)
- Round 18
(WS): Ch 1, sc in each of 99 sts. Turn. (99 sc)
- Round 19
(RS): Ch 1, sc in each of 99 sts. Turn. (99 sc)
- Round 20
(WS): Ch 1, sc in each of 99 sts. Turn. (99 sc)
- Round 21
(RS): Ch 1, sc in each of 99 sts. Turn. (99 sc)
- Round 22
(WS): Ch 1, sc in each of 99 sts. Turn. (99 sc) Checkpoint: After Row 22, your bodice measures approximately 1.5 inches from the separation row. Total bodice height from shoulder to waist should be approximately 5.5 to 6 inches. If you are short, add 1 to 2 more rows of sc before proceeding.
Waistband
- Round 23
Waistband decrease Work (sc in next 4 sts, sc2tog) 9 times, then work (sc in next 5 sts, sc2tog) 6 times, then sc in rem 18 sts. Join with sl st to first sc. (84 sc)
- Round 24
Yarn B trim Join Yarn B to any st. Ch 1. Sc in each sc around. Join. Fasten off Yarn B. (84 sc)Surface stripe: With Yarn B and a slightly smaller hook (US D-3), work a line of surface slip stitches along the top edge of Round 23 for a crisp visual stripe. Fasten off.
Skirt Transition
- Round 25
Increase round With Yarn A, join to any st at the waistband base. Ch 1. Work (sc in next 2 sts, 2 sc in next st) 28 times. Join with sl st. (112 sc)
Fan Stitch
This creates the beautiful lace pattern in the skirt. Work it over 14 stitches with chain-2 spaces.
Step 1: Skip 2 stitches or as directed.
Step 2: Work (dc, ch 1, dc, ch 1, dc, ch 1, dc, ch 1, dc) into the same stitch or chain space. This creates a fan of 5 double crochets separated by chain-1 spaces.
Step 3: Skip 2 stitches on each side of the fan as directed.
The fan counts as 14 base stitches consumed. For counting purposes in this pattern, one fan repeat occupies 14 chain positions at the foundation.
Shell Stitch
Used sparingly in the yoke for texture.
Work (dc, ch 1, dc, ch 1, dc) into the same stitch or space. This is a 3-dc shell.
Scallop Border Stitch
This creates the pretty teal edging at the hem.
Step 1: Join Yarn B to any stitch.
Step 2: Work sc in first st.
Step 3: Skip 1 st, work 5 dc into next st (shell made).
Step 4: Skip 1 st, work sc into next st.
Step 5: Repeat steps 3 and 4 across or around.
Picot
Chain 3, slip stitch into first chain of the chain-3. This creates a small decorative loop used in some trim sections.
Hem Border
Join Yarn B and work the scallop border stitch around the entire hem edge, following the special stitch instructions. This creates the beautiful zigzag teal trim visible at the bottom of the dress.
Flutter Sleeves
Return to each armhole opening. Join Yarn B and work the flutter sleeve edging as described in the special stitches section. This adds the sweet cap sleeve detail with teal trim.
Where it goes
- A photo-session dress for a baby's first warm-weather portraits, paired with simple sandals or bare feet.
- A special outdoor gathering outfit, worn over a plain onesie so the back snap stays accessible for quick changes.
- A handmade baby shower gift, boxed with a matching headband in the leftover Yarn B.
- A keepsake piece for a baby book, since the flower corsage and lace skirt photograph well laid flat.
Color ideas
- Coral and teal classic Yarn A coral/salmon for the yoke, bodice, skirt, and flower petals; Yarn B teal/mint for the waistband, flutter sleeve edging, and back flower petals.
- Dusty rose and spearmint Dusty Rose as Yarn A through the bodice and fan skirt rounds; Spearmint Green as Yarn B on the waistband and sleeve ruffle only, keeping the color change minimal.
Care
Hand wash the finished dress in cool water, since both the coral and teal yarns are cotton or cotton-blend and hold up best with gentle handling.
Lay flat to dry on a towel rather than hanging, which keeps the fan stitch skirt from stretching out of shape under its own weight.
Store folded rather than on a hanger, and reshape the lace skirt gently with your fingers before each wear.
Assembly
- Step 1 Weave in all ends. Attach snaps or sew a button loop to the back opening. Create the crochet flower following the instructions above and attach it at the waistband. Block the dress gently under a damp cloth, being careful not to stretch the lace skirt.
Easy to get wrong
Losing track of raglan markers
Keep all four stitch markers in place through every yoke row and recount the four sections before you increase. If a count is off, it is easier to fix immediately than three rows later.
Starting the fan skirt at the wrong count
Confirm your stitch count matches exactly before the skirt transition round, since the fan repeat depends on a precise base. Rip back to the waistband if the numbers do not line up.
Rushing the flower's back petals
Work the back petal round into the back loops only of the original ring, not through both loops. Turning the flower to the wrong side first makes this much easier to see.
Between the songs
- The satisfaction here is in the contrast. You build a fitted, top-down raglan yoke with careful increases and a clean back opening, then suddenly you're floating through an open fan stitch skirt that feels nothing like the bodice. The teal waistband is the hinge between the two moods, and getting the stitch count exact before the fan pattern starts is its own small victory. Then there's the flower: twelve petals worked into a ring, a second layer of back petals for depth, and a pearl button set into the center by hand. None of it is hard on its own, but stacking solid crochet, lace, color changes, and a sewn-on embellishment into one baby dress is genuinely satisfying to finish.
Listener questions
Can I make this dress in a different size for an older baby?
The pattern as written is sized for a baby around 6 to 12 months with the given chest circumference. Sizing up would mean recalculating the foundation chain and raglan increases, so I would treat that as an advanced adaptation.
What happens if I substitute worsted weight yarn?
Go up to a US G-6 hook if you swap in worsted weight, and check your gauge carefully before starting the yoke. Expect the finished dress to come out slightly larger than the stated measurements.
Is the back opening hard to sew closures onto?
Not really, since the pattern is designed with a simple split back that just needs snaps or a button sewn on with matching thread. It is one of the easier finishing tasks compared to the flower.
Do I need both hook sizes listed?
The US E-4 hook is your main hook for the whole dress. The US D-3 is only there as an option for tighter trim sections if you want a firmer edge.
How important is blocking the gauge swatch first?
Very, especially since the fan stitch skirt has its own gauge separate from the bodice. Blocking your swatch before you start tells you how the lace will actually behave once it relaxes.
Original pattern: https://crochetwithmia.com/coral-reef-summer-baby-dress-free-crochet-pattern/
About the Author

Marisol QuinteroWho runs Crochet Obsessed, why a stitch count sits at the end of every round, how a pattern gets written here, and the things this site will never do.
More Patterns
- IntermediateNo. 01

Rose Granny Square Tote Crochet Pattern
Rose granny square tote crochet pattern made from 18 dimensional rose squares for a sturdy, romantic everyday bag.
- IntermediateNo. 02
Tropical octopus baby blanket crochet pattern with appliqués
Tropical octopus baby blanket crochet pattern: a cream filet base with coral and turquoise octopus appliqués, leaves, and…
- IntermediateNo. 03
Sunny lemon couple amigurumi crochet pattern
Sunny lemon couple amigurumi crochet pattern with embroidered slices and safety eyes for a cheerful handmade shelf pair.


