- LevelIntermediate
- Time4-6 hours
- Hook3.5 mm
- YarnWorsted
About This Pattern
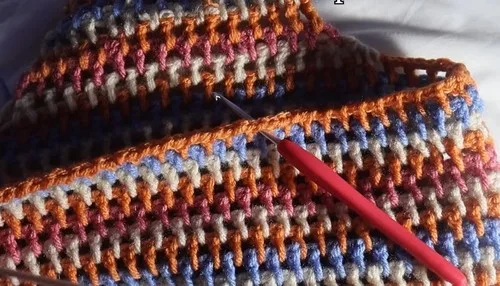
There's something breezy about this one, the kind of make you start on a Saturday morning with the windows open. It builds in a spiral, round after round, so the shape reveals itself fast. No long stretches of sameness here, just steady, visible progress from the very first loop.
Finished, it sits on a hook by the door or slouches on a chair arm, round and a little architectural. The color break between the center and the outer round catches the eye before anyone notices it's handmade. It reads as considered, not fussy.
- Start with a small chain loop and join it, so you have a firm center to build every round around.
- Work your first round of double crochets and chain spaces directly into that loop to set the stitch pattern.
- Change colors again and alternate a plain stitch pair with an increased one to keep the circle growing flat.
- Keep adding increases every few gaps in the following rounds until your circle reaches 70 stitches total.
- Once you hit 70 stitches, work even for 23 more rows with no further increases, building the body up to 30 rows total including the base.
- Shape each strap start by changing colors and working a double crochet decrease over the first two gaps, then continuing chain-1 spaces across 16 gaps.
- Taper the strap with a few more decrease rows until only 5 gaps remain, then work the narrow strap straight for 15 rows, treating the first stitch and turning chain as part of the stitch count.
- Sew or slip stitch the strap pieces together so they're sturdy enough to carry real weight.
- Weave in every loose end so the inside looks as tidy as the outside.
On the desk
- Weight 4 yarn
- 3.5 mm crochet hook
- Scissors
Stitch shorthand
- ch — chain
- st — stitch
- sl st — slip stitch
- dc — double crochet
- inc — increase
- dec — decrease
Round Granny Bag Crochet Pattern For Everyday Style
Bottom Circle
- Round 1
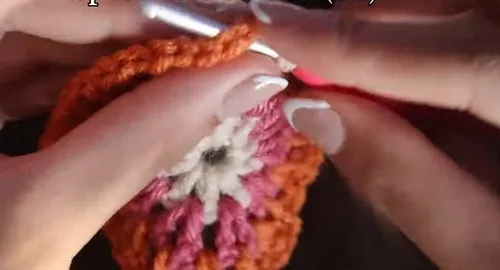
Chain 5 Slip stitch first and last stitch together to create a loop
- Round 2
Chain 3 (counts as 1 double crochet) Into loop: (double crochet, chain 1) × 9 Slip stitch to close (10 total stitches)
- Round 3
Change colors Chain 3 (Double crochet, chain 1) twice in each chain-1 space Slip stitch to close (20 total stitches)
- Round 4
Change colors Chain 3 Alternate: (Double crochet, chain 1) in one gap, then increase in the next Slip stitch to close
- Continue Increasing
Add increases every few stitches until there are 70 total stitches. For 60 stitches: (Double crochet, chain 1) in next 4 gaps, then increase in the fifth. For 70 stitches: (Double crochet, chain 1) in next 5 gaps, then increase in the sixth.
Body of the Bag
- Body Rows
Work (double crochet, chain 1) in each gap. Continue for 23 more rows (30 total including base)
Straps
- Strap Start
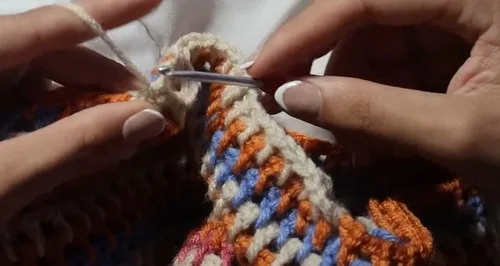
Change colors Chain 3 and begin with a double crochet decrease Yarn over, go into two gaps sequentially, pulling through two loops each time Then pull through all three loops Chain 1 (Double crochet, chain 1) in next 16 gaps
- Strap Decrease
Chain 3, skip first gap (Double crochet, chain 1) in each following gap Repeat, stopping when 5 gaps remain
- Strap Rows
Chain 3, (double crochet) in each gap for 15 rows Include a double crochet in the first stitch and the chain 3
More shots
Where it goes
- A market bag for picking up a few groceries or a loaf of bread on a walk.
- A go-to accessory to sling over jeans and a plain tee for instant color.
- A project bag itself, ironically, for carrying a small skein and hook to a coffee shop.
- A gift for a friend who loves color-block accessories and handmade extras.
Color ideas
- Two-tone build Keep the loop and first round in a light shade, change to a deeper shade for the second round, and repeat that deeper shade on the strap to tie the whole bag together.
Care
Hand wash the finished bag in cool water with a gentle detergent, since weight 4 yarn can felt or shrink if agitated too roughly.
Lay it flat on a towel to dry and gently reshape the circle while it's damp, easing the rounds back into an even curve.
Store it stuffed lightly with tissue paper so the shape holds, rather than folded flat, which can leave creases in the double crochet rounds.
Assembly
- Step 1 Sew or slip stitch straps together
- Step 2 Weave in all ends
Easy to get wrong
Losing track of chain-1 spaces
Mark the first chain-1 space with a scrap of yarn or a stitch marker so you always know where each round begins. Losing this spot is the fastest way to end up with an uneven circle.
Missing the increase pattern in later rounds
When you alternate a plain stitch pair with an increased one, say each choice out loud as you make it. It is easy to increase twice in a row by accident and end up with a ruffled edge instead of a flat circle.
Forgetting the turning chain counts as a stitch
the strap, remember the chain-3 at the start of each row stands in for your first double crochet. Skipping it, or double-counting it, throws off your stitch count row by row.
Between the songs
- The satisfaction here is in the increases. Starting from a tight chain-5 loop and doubling out to a full round of double crochet and chain-1 spaces teaches you to read your stitch pattern instead of just following it blindly. The color change between rounds gives you a clean, deliberate break, no messy fading, just a crisp line where one shade hands off to the next. Working the strap as its own flat piece, row by row instead of round by round, is a satisfying contrast after all that circular counting. Sewing the two strap pieces together at the end feels like the moment the whole project clicks into being an actual bag you'd carry, not just a swatch.
Listener questions
Can I use a different hook size than 3.5 mm?
You can, but going up or down a size will change the finished circle's dimensions and the drape of the strap. Stick close to 3.5 mm with weight 4 yarn for the tidiest stitch definition.
How many colors do I actually need?
The pattern is written with color changes at specific rounds, but you could work the whole main piece in one color if you prefer a solid look. The strap can match either color or introduce a third for contrast.
Why does my circle start to ruffle?
A ruffling edge usually means too many increases have crept into a round that should include some plain stitch pairs. Recount your alternating stitches from the start of that round.
Is the strap worked separately or attached as I go?
The strap is its own flat piece, worked in rows rather than rounds, and then sewn or slip stitched to the main piece at the end. This makes it easy to test the length before you commit to sewing.
What's the best way to join the strap pieces?
Either sew them together with a yarn needle for a smooth seam or slip stitch them for a visible, textured edge. Both are listed as options in the pattern, so pick whichever finish suits your look.
Original pattern: https://crocheteverything.com/diy-crochet-bag-pattern-every-fashion-lover-needs-right-now/
About the Author

Marisol QuinteroWho runs Crochet Obsessed, why a stitch count sits at the end of every round, how a pattern gets written here, and the things this site will never do.
More Patterns
- IntermediateNo. 01

Rose Granny Square Tote Crochet Pattern
Rose granny square tote crochet pattern made from 18 dimensional rose squares for a sturdy, romantic everyday bag.
- IntermediateNo. 02
Tropical octopus baby blanket crochet pattern with appliqués
Tropical octopus baby blanket crochet pattern: a cream filet base with coral and turquoise octopus appliqués, leaves, and…
- IntermediateNo. 03
Sunny lemon couple amigurumi crochet pattern
Sunny lemon couple amigurumi crochet pattern with embroidered slices and safety eyes for a cheerful handmade shelf pair.


