- LevelIntermediate
- Time4-6 hours
- Hook10 mm
- YarnSuper Chunky
About This Pattern
This one has the feel of a Sunday afternoon with nowhere to be. The moss stitch keeps a steady, almost musical rhythm, and the super chunky yarn means you watch the fabric grow in real time. It is the kind of project that rewards a big mug of something warm and a few uninterrupted hours.
Your hands get a simple, repeating job: chain one, skip one, single crochet, over and over until the texture builds itself. There is shoulder shaping to place with stitch markers, a bit of seaming at the end, and sleeve increases to track, but nothing that asks for constant concentration. It is handwork that lets your mind wander.
Finished, this sweater lands somewhere between a blanket and a garment. Draped over a chair or worn over leggings, the moss stitch catches light in a way flat single crochet never does. It reads as intentional, a little bit textured, and completely at home in a room full of soft things.
- Chain and work a slip stitch waistband strip until it reaches the length you want for the body edge.
- Attach your main color and build up single crochet into the moss stitch pattern across the body.
- Place stitch markers to mark off the neckline width before shaping either shoulder.
- Work each shoulder separately over its short run of rows, then attach yarn fresh for the second side.
- Repeat the whole body process again for the back panel, this time without breaking for a neckline.
- Build each sleeve from the cuff upward, alternating increase rows with plain moss stitch rows to widen it.
- Seam the shoulders, center and attach the sleeves, then join the side and sleeve seams in one pass.
- Add a narrow ribbing strip around the neckline and weave in every last end.
On the desk
- Three colors of super chunky yarn (e.g., James S Brett Top Value Super Chunky Premium Acrylic)
- 10 mm crochet hook
- Tapestry needle, scissors, and stitch markers
Stitch shorthand
- ch — chain
- st — stitch
- sl st — slip stitch
- sc — single crochet
- hdc — half double crochet
- dc — double crochet
- inc — increase
- dec — decrease
- mr — magic ring
- fo — finish off
Chunky moss stitch crochet sweater with raglan-free shoulders
Waistband
Make a slip knot and chain eight.
- Round 1
Work slip stitches across, starting in the second stitch from the hook. Next Rows: Chain one, turn, and work slip stitches in the front loop only.Continue until desired waistband length is reached.
Main Body (Moss Stitch)
Attach the next color to the waistband.
- Round 1
Chain one, turn, and work one row of single crochet along the waistband.
- Round 2
Chain one, turn, start with a single crochet, then chain one, skip one, single crochet in the next stitch. Repeat.
- Round 3
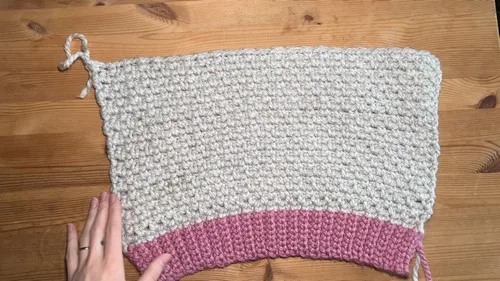
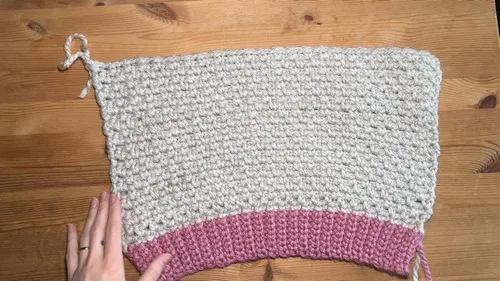
and onward: Continue the Moss Stitch, working into each chain-one space from the previous row.Change colors to create your preferred color block pattern (for example: 20 rows color one, 4 rows color two, 3 rows color three, 4 rows color two, 8 rows color one).
Main Sleeve Body
Attach yarn and work one row of single crochet along the cuff.
- Round 2
Chain one, turn, and work a Moss Stitch row.
- Round 3
Chain one, turn, start with an increase (two single crochets in the first stitch), continue Moss Stitch, end with another increase.
- Round 4
Work a Moss Stitch row with no increases. Alternate between increase and no-increase rows until the sleeve reaches desired width.Continue working straight Moss Stitch rows until the sleeve is the desired length.
Ribbing
Create the cuff ribbing using slip stitches in the front loop only.
More shots
Where it goes
- A relaxed layer over a t-shirt for chilly mornings on the porch or a walk around the neighborhood.
- Weekend loungewear paired with leggings or joggers for a soft, low-effort outfit at home.
- A cozy throw-on piece for reading corners, paired with a wool blanket in a matching color family.
- A handmade gift for someone who lives in sweaters, styled over a simple collared shirt for texture contrast.
Color ideas
- Warm neutral blocks Oatmeal for the waistband and ribbing, camel for the bulk of the main body rows, rust worked in as the narrower accent bands within the color block sequence.
- Tonal grey layers Charcoal for the waistband and cuffs, dove grey as the dominant body and sleeve color, silver used only for the thinner accent rows to keep the transitions subtle.
Care
Hand wash the acrylic yarn in cool water, since heat can flatten the texture that makes the moss stitch pop.
Lay flat to dry on a towel rather than hanging, so the weight of the wet chunky yarn does not stretch the shoulders or body.
Fold rather than hang for storage, and reshape the ribbing and cuffs gently by hand while damp if they lose their bounce.
Assembly
- Step 1 Create a narrow ribbing strip (about five stitches wide) for the neckline.
- Step 2 Sew front and back panels together at the shoulders using a tapestry needle.
- Step 3 Attach sleeves along the shoulder seam, centering them evenly.
- Step 4 Sew the sides of the sweater and sleeves together in one continuous seam.
- Step 5 Attach the neckline ribbing around the opening and sew securely.
- Step 6 Weave in all yarn ends neatly to finish.
Easy to get wrong
Losing the moss stitch rhythm
Always work your single crochet into the chain-one space, not into the stitch below it. Pause every few rows to check the pattern lines up before continuing.
Uneven shoulder rows
Count the four shoulder rows carefully on each side before joining new yarn for the second shoulder. Working both shoulders to the same row count keeps the neckline sitting evenly.
Sleeve increases placed inconsistently
Only add the two-single-crochet increase at the very first and last stitch of the marked increase rows, never in the middle. Alternating with a plain moss stitch row keeps the sleeve widening smoothly rather than flaring.
Between the songs
- The satisfaction here is in the moss stitch itself: that chain-one, skip-one rhythm turns basic single crochet into something with real depth and drape, and it looks far more complicated than it is. Working with super chunky yarn on a 10mm hook means the fabric builds up fast, so you get visible progress every single row instead of hours of tiny stitches. The construction stays flat and straightforward, with shoulders shaped by simple stitch-marker placement rather than fussy shaping math. Sleeve increases worked into that same moss texture keep the whole piece cohesive from cuff to body. Then the color blocking lets you make decisions as you go, which keeps a fairly repetitive stitch pattern feeling fresh from start to finish.
Listener questions
How do I know where to place the neckline stitch markers?
Count the stitches from each side of the body row as noted in the pattern, then clip a marker at that point on both sides. That marked section is where the moss stitch stops for the neckline opening while you work each shoulder separately.
Can I use a different chunky yarn than the one listed?
Yes, any super chunky acrylic that works comfortably with a 10mm hook will behave the same way here. Just keep the weight and hook size matched so your row height and moss stitch spacing stay consistent.
Do the front and back panels use the same instructions?
Almost. You repeat the entire main body process for the back panel, but you skip the neckline opening and shoulder-splitting steps entirely. The back is worked as one continuous piece from waistband to top.
How do I decide on my color block sequence?
The pattern gives one sample sequence, but the block widths are entirely up to you. I like sketching the row counts out first so the color changes land in a rhythm that feels balanced from waistband to shoulder.
What if my sleeve increases make the sleeve too wide?
Stop alternating increase and plain rows once the sleeve reaches the width you want, then continue with straight moss stitch rows only. The pattern is built to let you judge width by eye rather than a fixed stitch count.
Original pattern: https://crocheteverything.com/easy-chunky-crochet-sweater-pattern-free-easy-using-moss-stitch/
About the Author

Marisol QuinteroWho runs Crochet Obsessed, why a stitch count sits at the end of every round, how a pattern gets written here, and the things this site will never do.
More Patterns
- IntermediateNo. 01

Slouchy everyday beanie worked flat in half double crochet
Crochet beanie pattern for a slouchy everyday look worked flat with hdc rows, then seamed into a soft,…
- IntermediateNo. 02
Crochet amigurumi doll with dress, shoes, and hat
Crochet amigurumi doll pattern with dress, shoes, and hat details for a soft, huggable keepsake you build one…
- BeginnerNo. 03
A five-pointed amigurumi star keychain for beginners
Amigurumi star keychain pattern using magic circle rounds, simple single crochet increases, and a quick beginner-friendly finish for…