- LevelIntermediate
- Time5-7 hours
- Hook3.5 mm
- YarnBulky
About This Pattern
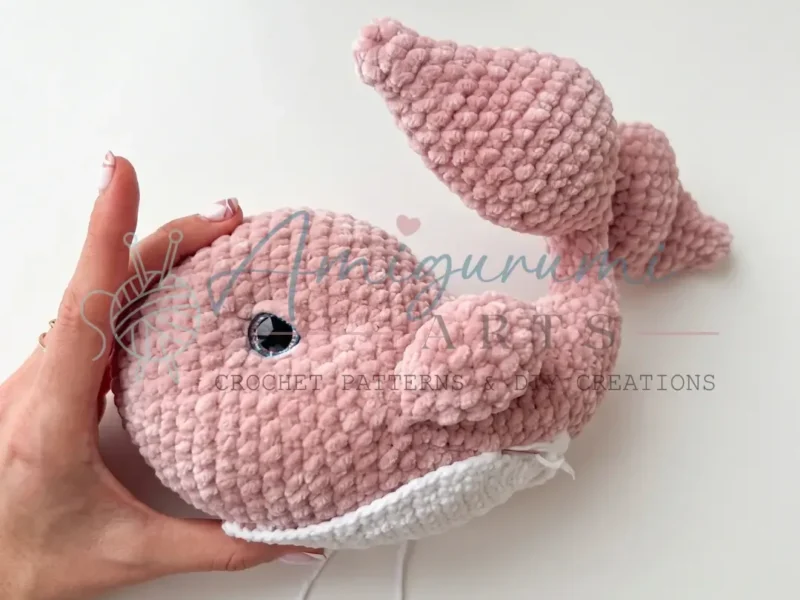
There's something cheerful about a whale shaped like a plump little pillow, blue on top and soft blush underneath. This one leans playful rather than realistic, with a round body, a sparkly-eyed face, and a tail that actually holds a pose. I think of it as the kind of project that makes you smile mid-round, especially once the increases round out into that classic chubby amigurumi silhouette.
Your hands spend most of this project in steady single crochet rounds, building the body up through increase after increase until the shape curves outward on its own. Partway through you shift to working flat rows for the belly, turning at the end of each one. Then comes the detail work: inserting wire into the tail fins so they hold a bend, tucking fiberfill as you go, and sewing small side fins on at a specific point along the body.
Once it's stuffed and sewn, the whale sits with real weight in your palm, round enough to prop against a pillow or sit on a shelf without tipping. The wire tail lets you angle it mid-swim, like it just surfaced, which makes it read as more alive than a plain stuffed shape. It suits a nursery shelf, a reading nook, or a desk where you want something soft and a little whimsical nearby.
Gauge isn't critical for this project, but your fabric should be worked densely enough that the stuffing doesn't show through; tighten your tension if you notice gaps between stitches.
- Start the body at the center and work it in joined increase rounds until it curves into a chubby dome shape.
- Stuff the body as you close it up, then insert the wire into the tail end before finishing the last rounds.
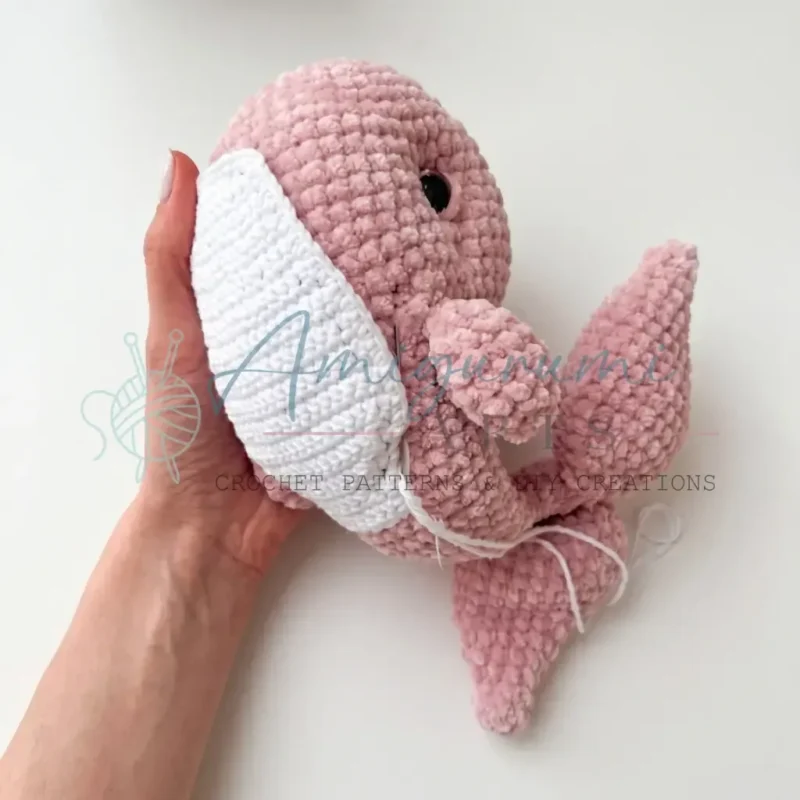
- Crochet the belly separately in flat turned rows, then pin and sew it onto the underside of the body.
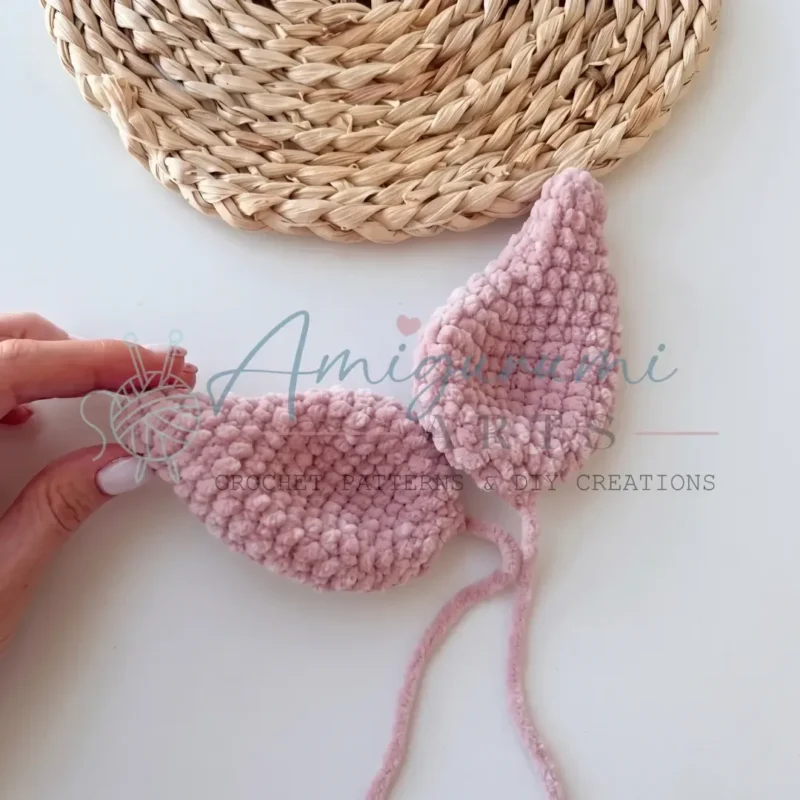
- Make two tail fins and sew them to the wired tail tip with their wavy edges pointing upward.
- Make two small side fins and attach them to the body sides at the point the pattern specifies.
- Pull the safety eyes in slightly with a long needle, then embroider the upper and lower eyelids by hand.
- Wrap the wire ends in tape before stuffing so nothing pokes through the yarn later.
- Add the optional flower embellishment if you want a little extra detail on the finished whale.
On the desk
- Yarn (Main Color — Blue): Bulky-weight plush/chenille yarn, blue (one skein)
- Yarn (Secondary Color — Powder/Blush): Bulky-weight plush/chenille yarn, powder pink (one skein)
- Yarn (Accent — White/Belly): Sport-weight cotton or cotton-blend yarn, white (small amount)
- Yarn (Flower Center): Sport-weight yarn, pink (small amount)
Hook
- E-4 / 3.5 mm
Safety eyes
- 16 mm with sparkle/glitter pupil — 2
- Fiberfill stuffing
Floral wire
- 1.2 mm gauge, approx. 18 cm (two pieces)
- Medical/fabric tape (adhesive bandage tape): for wrapping wire ends
- Stitch markers
- Yarn needle / tapestry needle
- Long needle (for eye indentation/pull-through)
- Scissors
Stitch shorthand
- ch — Chain
- dec — Invisible Decrease (insert hook through front loops of next 2 sts, yo, pull through both, yo, pull through 2 loops)
- dc — Double Crochet
- hdc — Half Double Crochet
- inc — Increase (2 sc in same stitch)
- MR — Magic Ring
- sc — Single Crochet
- sk — Skip
- sl st — Slip Stitch
- st / sts — Stitch / Stitches
Chubby whale amigurumi pattern with a wire-posed tail
Body
- Round 1
Ch 2, work 6 sc into the 2nd ch from hook, sl st to join. (6)
- Round 2
Inc in each st around, sl st to join. (12)
- Round 3
Sc, inc repeat 6 times around. (18)
- Round 4
2 sc, inc repeat 6 times around. (24)
- Round 5
3 sc, inc repeat 6 times around. (30)
- Round 6
4 sc, inc repeat 6 times around. (36)
- Round 7
Sc in each st around. (36)
- Round 8
5 sc, inc repeat 6 times around. (42)
- Round 9
Sc in each st around. (42)
- Round 10
6 sc, inc repeat 6 times around. (48)
- Rounds 11–17
Sc in each st around. (48) 7 rounds total.After completing Rnd 17, insert safety eyes between Rnds 12 and 13, spacing them exactly 24 sts apart.
- Round 18
6 sc, dec repeat 6 times around. (42)
- Round 19
Sc in each st around. (42)
- Round 20
5 sc, dec repeat 6 times around. (36)
- Round 21
Sc in each st around. (36)Begin stuffing the head firmly now. Continue adding stuffing as you close the piece.
- Round 22
16 sc, dec, dec, 16 sc. (34)
- Round 23
15 sc, dec, dec, 15 sc. (32)
- Round 24
12 sc, dec, dec, dec, dec, 12 sc. (28)
- Round 25
Sc in each st around. (28)
- Round 26
12 sc, dec, dec, 12 sc. (26)
- Rounds 27–28
Sc in each st around. (26)
- Round 29
11 sc, dec, dec, 11 sc. (24)
- Round 30
Sc in each st around. (24)
- Round 31
10 sc, dec repeat 2 times. (22)
- Round 32
9 sc, dec repeat 2 times. (20)
- Round 33
8 sc, dec repeat 2 times. (18)
At this point, insert the prepared wire. Cut a piece of floral wire approximately 18 cm long. Wrap it thoroughly with medical/fabric tape, paying special attention to both tips so no sharp ends are exposed. Screw one end into the stuffing already inside the body, leaving approximately 5–6 cm of wire extending beyond the crocheted fabric. Bend this free end upward (you can also adjust the bend at the very end). Continue crocheting the remaining rounds around the wire, stuffing the tail section firmly as you go.
- Round 34
7 sc, dec repeat 2 times. (16)
- Round 35
2 sc, dec repeat 4 times. (12)
- Round 36
Sc in each st around. (12)
- Round 37
4 sc, dec repeat 2 times. (10)
- Round 38
1 sc, dec, 3 sc, dec, 2 sc. (8)
- Rounds 39–41
Sc in each st around. (8)Using your yarn needle, close the opening by drawing through the front loops only of each stitch and pulling tight. If the wire tip is not fully enclosed after Rnd 41, simply work a few additional rounds of 8 sc until it is completely covered before closing.
Tail Fin (Make 2)
The tail is made of two identical fins that are sewn to the wire tip of the body.
- Round 1
Ch 2, work 6 sc into the 2nd ch from hook, sl st to join. (6)
- Round 2
5 sc, inc. (7)
- Round 3
6 sc, inc. (8)
- Round 4
3 sc, inc repeat 2 times. (10)
- Round 5
4 sc, inc repeat 2 times. (12)
- Round 6
5 sc, inc repeat 2 times. (14)
- Round 7
5 sc, inc, inc, 7 sc. (16)
- Round 8
6 sc, inc, inc, 8 sc. (18)
- Round 9
7 sc, inc, inc, 9 sc. (20)
- Round 10
8 sc, inc, inc, 10 sc. (22)
- Round 11
9 sc, inc, inc, 11 sc. (24)
- Rounds 12–14
Sc in each st around. (24) 3 rounds total.
- Round 15
4 sc, dec repeat 4 times. (20)
- Round 16
3 sc, dec repeat 4 times. (16)
- Round 17
2 sc, dec repeat 4 times. (12)
- Round 18
Dec 6 times around, sl st to join. (6)
Do not stuff the fins. If attaching with plush yarn, cut yarn and leave a long tail for sewing. If attaching with sport-weight cotton yarn, use your needle to weave the tail end inside the fin before sewing.
Small Side Fins (Make 2)
- Round 1
Ch 2, work 6 sc into the 2nd ch from hook, sl st to join. (6)
- Round 2
Sc, inc repeat 3 times. (9)
- Round 3
2 sc, inc repeat 3 times. (12)
- Rounds 4–5
Sc in each st around. (12)
- Round 6
2 sc, dec repeat 3 times. (9)
- Round 7
Sc, dec repeat 3 times. (6)Do not stuff. Fold the fin flat and work 2–3 sc through both layers to close.
Belly
The Belly is worked flat in turning rows. Begin with a foundation chain, then work back-and-forth. Each new row starts with 1 ch (turning chain, does not count as a stitch).
- Round 1
Ch 9, turn. Starting in the 2nd ch from hook, work 8 sc. (8)
- Round 2
Ch 1, turn. 8 sc. (8)
- Round 3
Ch 1, turn. 1 sc, inc, 6 sc. (9)
- Round 4
Ch 1, turn. 1 sc, inc, 7 sc. (10)
- Round 5
Ch 1, turn. 2 sc, inc, 7 sc. (11)
- Round 6
Ch 1, turn. 2 sc, inc, 8 sc. (12)
- Round 7
Ch 1, turn. 3 sc, inc, 8 sc. (13)
- Round 8
Ch 1, turn. 3 sc, inc, 9 sc. (14)
- Round 9
Ch 1, turn. 4 sc, inc, 9 sc. (15)
- Round 10
Ch 1, turn. 4 sc, inc, 10 sc. (16)
- Round 11
Ch 1, turn. 5 sc, inc, 10 sc. (17)
- Round 12
Ch 1, turn. 5 sc, inc, 11 sc. (18)
- Round 13
Ch 1, turn. 1 sc, inc, 16 sc. (19)
- Round 14
Ch 1, turn. 1 sc, inc, 17 sc. (20)
- Rounds 15–22
Ch 1, turn. Sc in each st across. (20) 8 rows total.
- Round 23
Ch 1, turn. 1 sc, dec, 14 sc, dec, 1 sc. (18)
- Round 24
Ch 1, turn. 1 sc, dec, 12 sc, dec, 1 sc. (16)
- Round 25
Ch 1, turn. 1 sc, dec, 10 sc, dec, 1 sc. (14)
- Round 26
Ch 1, turn. 1 sc, dec, 8 sc, dec, 1 sc. (12)
- Round 27
Ch 1, turn. 1 sc, dec, 6 sc, dec, 1 sc. (10)
- Round 28
Ch 1, turn. 1 sc, dec, 4 sc, dec, 1 sc. (8)
- Rounds 29–30
Ch 1, turn. Sc in each st across. (8)Do not cut yarn. Continue working sc evenly around the entire perimeter of the belly piece. Leave a long yarn tail for sewing.
Flower (Optional Embellishment)
- Round 1
Work 6 sc into a MR, pull ring closed. Switch to white yarn. (6)
- Round 2
Ch 4, sl st into the next st repeat 6 times. 6 chain-space loops formed.
- Round 3
For each loop, work: ch 3, 5 dc with a shared top closure (all drawn together into the same chain-space loop), ch 3, sl st into the same chain-space loop. Repeat for all 6 loops. 6 petals formed.For a more raised center: separately work 6 hdc into a MR using pink yarn, pull ring closed, and sew this small circle onto the center of the flower.
More shots
Where it goes
- A nursery shelf accent that pairs well with soft pastel blankets and other plush sea-creature toys.
- A desk companion for a reading nook, sitting alongside a stack of books and a reading lamp.
- A baby shower gift paired with a knit blanket or a set of board books about the ocean.
- A photo prop for a kid's bedroom styled next to other amigurumi animals on an open shelf.
Color ideas
- Classic Blue and Blush Body worked in the main blue, tail fin and small side fins in the powder/blush secondary color, belly in the white cotton accent, flower center in pink.
Care
Because the tail holds a hidden wire, I'd hand wash this whale only if needed, swishing it gently in cool water rather than putting it in a machine.
Chenille and cotton both do best air-drying flat, away from direct heat, since high heat can flatten the plush pile and warp the wire tail.
Reshape the tail bend gently by hand after drying, and store the whale stuffed and upright on a shelf rather than squashed in a bin so the fiberfill keeps its loft.
Assembly
- Step 1 Optional: Use a long needle and a length of yarn to pull the safety eyes inward slightly, creating a gentle eye indentation for a more dimensional face.
- Step 2 Embroider or wrap the upper eyelids using body-color yarn; define the lower eyelid with a few stitches of white cotton yarn.
- Step 3 Sew the two tail fins to the wire tip at the end of the body, with the curved/wavy edges facing upward.
- Step 4 Sew the two small side fins to the body between Rounds 19 and 20, one on each side.
- Step 5 Pin the belly panel to the body, aligning it between Rows 8 and 29 of the belly with the corresponding rounds on the body. Sew in place using the long yarn tail and a whipstitch or mattress stitch around the entire perimeter.
- Step 6 Sew or pin the flower embellishment to the body in your preferred position.
- Step 7 Weave in all remaining yarn ends securely.
Easy to get wrong
Skipping the wire-taping step
Always wrap the wire ends in medical tape before inserting them into the tail fins, since sharp tips can poke through the yarn and stuffing over time.
Mixing round and row methods
The body and fins are worked in joined rounds with a slip stitch to close, while the belly is worked flat in turned rows; use a stitch marker so you don't blend the two by mistake.
Uneven side fin placement
Pin both small side fins in place and check they sit at matching heights on the body before sewing, since uneven placement is obvious once the whale is stuffed.
Listener questions
Do I need the wire for the tail, or can I skip it?
The wire is what lets the tail hold a bent, swimming-style pose, so I'd keep it in if you want that dimensional look. If you skip it, the tail fins will simply lie flat instead.
What yarn weight should I use for the body?
The pattern calls for bulky-weight plush or chenille yarn for the body and secondary parts, which gives the whale its soft, rounded texture. Cotton or cotton-blend sport-weight yarn is used only for the belly and flower accents.
Where exactly do the small side fins attach?
They're sewn onto the body between the two rounds the pattern marks for fin placement, one on each side. Pinning them first lets you check they're even before you commit to sewing.
Is the eye indentation step necessary?
It's listed as optional, so you can skip it if you're short on time. I think it's worth the extra few minutes because it gives the face more depth than flat safety eyes alone.
Is the flower embellishment attached to the whale?
The pattern lists it as an optional embellishment, so you can crochet it separately and decide where, or whether, to attach it. It's a nice way to personalize the finished piece without changing the main body.
Original pattern: https://amigurumiarts.com/little-whale-amigurumi-crochet-pattern/
About the Author

Marisol QuinteroWho runs Crochet Obsessed, why a stitch count sits at the end of every round, how a pattern gets written here, and the things this site will never do.
More Patterns
- IntermediateNo. 01

Rose Granny Square Tote Crochet Pattern
Rose granny square tote crochet pattern made from 18 dimensional rose squares for a sturdy, romantic everyday bag.
- IntermediateNo. 02
Tropical octopus baby blanket crochet pattern with appliqués
Tropical octopus baby blanket crochet pattern: a cream filet base with coral and turquoise octopus appliqués, leaves, and…
- IntermediateNo. 03
Sunny lemon couple amigurumi crochet pattern
Sunny lemon couple amigurumi crochet pattern with embroidered slices and safety eyes for a cheerful handmade shelf pair.


