- LevelIntermediate
- Time4-6 hours
- Hook3.75 mm
- YarnBulky
About This Pattern
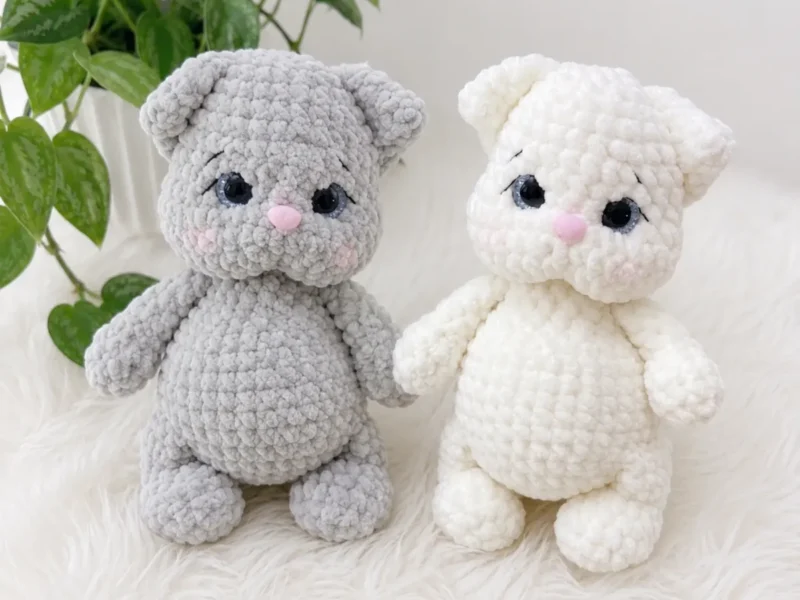
This one has a soft, sleepy energy to it, the kind of project I reach for when I want my hands busy but my brain quiet. There's no drama in a chubby kitten. It just sits there being round and pleased with itself, and somehow that calm transfers straight into the making.
Your hands will spend most of their time in a tight continuous spiral, building four short limbs before moving into the bigger shapes of the body and head. There's shaping to track, increases and decreases that change the stitch count round by round, so you stay alert without ever feeling rushed. The cinching steps at the end ask for patience and a light touch rather than speed.
Finished, this kitten settles into whatever spot gets the most attention in a room, a windowsill, a shelf, the corner of a couch cushion. The chenille catches light in a way that makes it look almost lit from within. It reads as soft before anyone even touches it.
- Start with the four legs and the tail, working each as separate shapes in a continuous spiral.
- Flatten and seam the top of each front leg, and work flat turning rows on the tail, so both attach neatly later.
- Build the body from the bottom up, increasing steadily until the round belly shape appears.
- Crochet the head as its own piece, shaping it before adding any facial features.
- Set the safety eyes and stuff every part firmly before closing up the openings.
- Attach the legs, ears, and tail to the body and head once each piece is finished.
- Use the cinching technique to pull the eyes inward and define the muzzle for expression.
- Finish with embroidered or glued facial details so the kitten's personality comes through.
On the desk
Yarn
- Chenille/plush yarn, slightly more than half a skein; CYCA #5 Bulky weight; cream or color of choice
Hook
- US F/5 (3.75 mm)
Eyes
- Two 14 mm sparkle safety eyes or 14 mm glue-on glass eyes
Nose
- One 12–15 mm glue-on nose
Stuffing
- Polyfill fiberfill
Additional notions
- Black embroidery yarn or thread for facial details; matching yarn for cinching; craft glue; tapestry needle; scissors; optional false lashes
Stitch shorthand
- ch — Chain
- dec — Invisible Decrease (2 sts together through front loops)
- dec3 — 3-stitch decrease (3 sc worked together)
- hdc — Half Double Crochet
- inc — Increase (2 sc in the same stitch)
- MR — Magic Ring
- Rnd — Round
- sc — Single Crochet
- sl st — Slip Stitch
- st / sts — Stitch / Stitches
Chubby kitten amigurumi crochet pattern
Front Legs (Make 2)
Worked in a continuous spiral.
- Round 1
6 sc in MR. (6)
- Round 2
inc in each st around. (12)
- Rounds 3–4
sc in each st around. (12)
- Round 5
3 sc, dec3, dec3, 3 sc. (8)
- Round 6
2 sc, sl st × 4, 2 sc. (8)
- Rounds 7–9
sc in each st around. (8)Shift stitches so the end of round sits at center back of the leg. Stuff lower portion only. Fold flat and join across with 4 sc through both layers. Fasten off and weave in end. Front legs will be joined during Body construction.
Back Legs (Make 2)
Worked in a continuous spiral.
- Round 1
8 sc in MR. (8)
- Round 2
inc in each st around. (16)
- Rounds 3–4
sc in each st around. (16)
- Round 5
[6 sc, dec] × 2. (14)
- Round 6
5 sc, hdc-dec, hdc-dec, 5 sc. (12)
- Rounds 7–8
4 sc, sl st × 4, 4 sc. (12)
- Rounds 9–10
sc in each st around. (12)Shift stitches so the end of round sits at center back of the leg. Stuff lower portion only. Fold flat and join across with 6 sc through both layers. Fasten off and weave in end. Back legs will be joined during Body construction.
Body
Worked in a continuous spiral, starting from the bottom.
- Round 1
7 sc in MR. (7)
- Round 2
inc in each st around. (14)
- Round 3
inc in each st around. (28)
- Round 4
sc in each st around. (28)
- Round 5
[3 sc, inc] × 7. (35)
- Round 6
sc in each st around. (35)
- Round 7
6 sc, sc across 6 sts of back leg joining both layers, 11 sc, sc across 6 sts of back leg joining both layers, 6 sc. (35) Join both back legs in this round.
- Rounds 8–9
sc in each st around. (35) Shift end of round to center back.
- Round 10
dec, 31 sc, dec. (33)
- Rounds 11–12
sc in each st around. (33)
- Round 13
7 sc, [dec, 2 sc] × 5, 6 sc. (28)
- Round 14
[2 sc, dec] × 7. (21)
- Round 15
inc, 20 sc. (22)
- Round 16
sc in each st around. (22)
- Round 17
4 sc, sc across 4 sts of front leg joining both layers, 7 sc, sc across 4 sts of front leg joining both layers, 3 sc. (18) Join both front legs in this round. Adjust start and end of round as needed so arms sit evenly at the sides.
- Round 18
dec × 10, 2 sc. (12) Stuff body firmly now, shaping a round belly. Continue adding stuffing as you close.
- Round 19
sl st × 12. Fasten off. Leave a yarn tail for attaching the head if sewing with the same yarn.
Head
Worked in a continuous spiral.
- Round 1
8 sc in MR. (8)
- Round 2
[1 sc, inc] × 4. (12)
- Round 3
[2 sc, inc] × 4. (16)
- Round 4
[3 sc, inc] × 4. (20)
- Round 5
[3 sc, inc] × 5. (25)
- Rounds 6–9
sc in each st around. (25) These rounds build forehead height.
- Round 10
5 sc, inc × 5, 5 sc, inc × 5, 5 sc. (35)
- Round 11
sc in each st around. (35) Shift end of round to center back of head.
- Round 12
5 sc, dec, 9 sc, dec, 10 sc, dec, 5 sc. (32)
- Round 13
6 sc, dec × 2, 12 sc, dec × 2, 6 sc. (28)Insert safety eyes between Rnds 9 and 10, with 5 sts between the eye posts. Press washers fully flush.
- Round 14
[2 sc, dec] × 7. (21)
- Round 15
[1 sc, dec] × 7. (14)Stuff head now, shaping full chubby cheeks before the opening becomes too small to reach inside.
- Round 16
[5 sc, dec] × 2. (12)
- Round 17
dec × 6. (6)Fasten off and close the opening. Attach head to body only after all facial finishing is complete.
Ears (Make 2)
Worked in a continuous spiral.
- Round 1
4 sc in MR. (4)
- Round 2
[1 sc, inc] × 2. (6)
- Round 3
[1 sc, inc] × 3. (9)
- Round 4
[2 sc, inc] × 3. (12)
- Round 5
[2 sc, inc] × 4. (16)Fold flat and join across with 8 sc through both layers. Leave a yarn tail for sewing. Set aside.
Tail
Worked in a continuous spiral.
- Round 1
6 sc in MR. (6)
- Rounds 2–19(6)
sc in each st around. (6) 20 rounds total. Adjust length by adding or removing rounds of 6 sc.Do not stuff the tail. Fold flat and join across with 3 sc through both layers. Work 2–3 flat turning rows of 3 sc without a turning chain. Set aside.
Where it goes
- A shelf companion for a nursery or kid's room, sitting alongside other soft toys without needing a stand.
- A desk mascot for a home office, small enough to perch near a monitor or lamp.
- A handmade gift for a cat lover, paired with a knit blanket or a set of coasters in the same yarn color.
- A photo prop for craft fairs or shop displays, styled next to other amigurumi animals from the same yarn family.
Color ideas
- Classic cream tabby Work the body, head, legs, and tail entirely in cream, then use a soft gray or beige for the ears to suggest inner ear shading.
Care
Hand wash the finished kitten in cool water with a mild soap, since chenille yarn can shed or flatten under a washing machine's agitation.
Reshape the body and head gently while damp and let it air dry fully on a towel, turning occasionally so the fiberfill doesn't clump on one side.
Store it upright on a shelf rather than packed in a bin, which keeps the plush chenille texture from getting crushed or matted over time.
Assembly
- Step 1 Cinch 1 — Eye Setting: Thread a tapestry needle with matching yarn. Insert at center front of the head between Rnds 15 and 16 and exit at the lower outer corner of one eye. Pass yarn under the eye; re-insert at the lower inner corner of the same eye. Exit 1 st from the starting point. Pull taut while pressing the eye inward with your finger to distribute stuffing. Repeat for the second eye. You may repeat the cinch a second time for greater definition. Do not cut yarn.
- Step 2 Cinch 2 — Muzzle Definition: With yarn at lower center, re-insert at the starting point and exit near the lower inner corner of one eye. Insert at the lower inner corner of the opposite eye so yarn spans the upper muzzle line. Exit 1 st from starting point. Pull slightly taut and press the resulting dimple firmly to settle the stuffing. Cut yarn.
- Step 3 Cinch 3 — Muzzle Lift (optional): Insert yarn into the magic ring at the base of the head and exit into the dimple from the previous cinches. Re-insert needle between the eyes and exit back at the magic ring. Pull taut while pressing upward on the dimple from below — the muzzle should lift forward. Repeat if needed. Redistribute stuffing afterward so the crown stays round and full, not flat or indented.
- Step 4 Glue on the nose at the center of the muzzle.
- Step 5 Embroider brow lines and whisker arrows with black yarn.
- Step 6 Optional: apply a small amount of blush or chalk pastel to the cheeks.
- Step 7 Sew ears to the sides of the head, angled slightly back, aligned with the cheek-increase rounds near Rnd 10.
- Step 8 Sew head to body using the yarn tail or a fresh length of matching yarn with whipstitch around the full base of the head opening.
- Step 9 Sew tail to the back of the body at the protruding point, at approximately Rnd 8 level.
- Step 10 Weave in all remaining ends securely.
Easy to get wrong
Losing the spiral on rounds
Since every part is worked in a continuous spiral with no joining, mark the start of each round with a stitch marker so you never lose your place.
Skipping the tail's turning rows
the tail, the flat turning rows worked after folding and joining are what let it lie flat against the body, so don't skip straight to fastening off.
Rushing the eye cinch
The eye-setting cinch relies on pulling taut while pressing the eye inward with your finger, so go slowly and check the effect before moving to the second eye.
Between the songs
- The real pleasure here is in the shaping. Watching the body grow from a tight magic ring up through increase rounds into that signature round belly is genuinely satisfying, and the plush chenille yarn makes every stitch look plumper than it is. The cinching technique for the eyes and muzzle is where the kitten actually gets its expression, a slow pull-and-press process that turns a stuffed shape into a face. Working front and back legs separately, with the flat turning rows on the tail, gives you two different construction skills in one project. By the time you reach the tail you've practiced magic rings, increases, decreases, and hand-finishing all in a single sitting.
Listener questions
Can I use a different yarn weight than the chenille called for?
You can, but chenille gives this kitten its plush, dense look, so a smooth worsted or bulky yarn will change the texture noticeably. If you swap yarns, keep an eye on your fabric tightness so stuffing doesn't peek through.
How much yarn do I actually need?
The pattern calls for slightly more than half a skein of CYCA #5 bulky chenille, so one skein comfortably covers the whole kitten with some left over. That extra is handy if you want to test your tension first.
Do I need safety eyes, or can I embroider them instead?
The pattern is written for 14 mm safety eyes or glue-on glass eyes, and the cinching step is designed around that install method. Embroidered eyes would need their own placement approach since the cinch technique specifically works around a set eye.
What if my hook size gives me a looser fabric?
the recommended US F/5 hook, gauge isn't critical, but the fabric needs to stay tight enough that fiberfill doesn't show through. If you notice gaps, drop down to a 3.5 mm hook as the pattern notes suggest.
Can I make the legs longer or shorter?
Yes, the front legs are specifically designed to be adjustable by adding or removing rounds of single crochet. Just keep the back legs proportional if you change the front leg length significantly.
Original pattern: https://amigurumicorner.com/milash-the-chubby-amigurumi-kitten-crochet-pattern/
About the Author

Marisol QuinteroWho runs Crochet Obsessed, why a stitch count sits at the end of every round, how a pattern gets written here, and the things this site will never do.
More Patterns
- IntermediateNo. 01

Slouchy everyday beanie worked flat in half double crochet
Crochet beanie pattern for a slouchy everyday look worked flat with hdc rows, then seamed into a soft,…
- IntermediateNo. 02
Crochet amigurumi doll with dress, shoes, and hat
Crochet amigurumi doll pattern with dress, shoes, and hat details for a soft, huggable keepsake you build one…
- IntermediateNo. 03
Chunky moss stitch crochet sweater with raglan-free shoulders
Chunky crochet sweater pattern using moss stitch, worked flat with a 10mm hook for a soft, fast, cool-weather…


