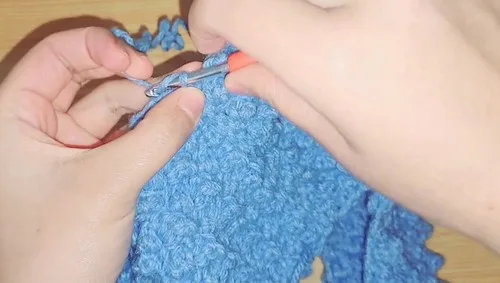
- LevelIntermediate
- Time4-6 Hours
- Hook4.5 mm
- YarnCategory 3 (Light Worsted)
About This Pattern
This crochet tote bag is the kind of project that earns a permanent spot on your shoulder. Built on a sturdy oval base and finished with a textured bubble-stitch body, it's a piece that feels both handmade and genuinely fashion-forward. It's perfect for crocheters who want to trade fast fashion for something they crafted themselves — a bag that carries groceries, books, or beach essentials while quietly making a statement about slow, sustainable style.
The techniques here revolve around oval increases for the base, alternating single crochet and bubble stitch for the body, and a clever back-post bubble variation for the straps that adds structure. If you've worked double crochet increases and basic bubble stitches before, you'll pick this up quickly; if not, it's still a friendly stretch project. Expect to spend somewhere between four and six hours total, easily split across a few cozy evenings.
The finished bag has a rounded, structured base, a richly textured body covered in little popcorn-like bumps, and two matching straps sized for comfortable shoulder or hand carrying. It has real presence — substantial enough to hold its shape, soft enough to feel handmade, and stylish enough to double as a gift for the sustainably-minded friend in your life.
- Chain a foundation and work double crochet increases around it to build a sturdy oval base.
- Add a second base round with more increases at the ends to shape the oval fully.
- Repeat the single crochet and bubble stitch pattern for a total of 24 rows to build up the sides.
- Start the first strap by working single crochet and bubble stitch across a set width.
- Count over from the first strap's start to place and work an identical second strap.
- Join the strap ends with slip stitch, weave in ends, and block the bag to finish.
Materials
- 4.5 mm crochet hook
- Category 3 yarn (blue used in the example)
- Stitch markers
- Yarn needle for sewing and weaving in ends
Crochet Abbreviations
- ch
- chain
- st
- stitch
- sl st
- slip stitch
- sc
- single crochet
- dc
- double crochet
- inc
- increase
Chic Crochet Tote Bag Pattern for Everyday Sustainable Style
Bag Base
- Round 1
Foundation: Make a slip knot and chain 34. Skip the first two chains. In the next stitch, make an increase (2 double crochets in the same stitch). Work 30 double crochets, one in each chain. In the last chain, make 4 double crochets. Mark the first of these stitches. Turn and work along the opposite side of the chain. Make 30 double crochets. In the final stitch (same as where you made the first increase), work another increase. Mark this stitch. Slip stitch into the first double crochet to close the round.
- Round 2
Oval Shaping: Chain 2. Work 2 increases (2 double crochets in each of the next 2 stitches). Make 30 double crochets. In the next 4 stitches, make 4 increases (2 double crochets in each stitch). Mark the first of these. Work 30 double crochets. Make 2 increases (2 double crochets in each of the last 2 stitches). Slip stitch to the first double crochet to join the round.
Bag Body
- Round 1
Chain 1 and make a single crochet in the same stitch. In the next stitch, work 3 double crochets and close them together (bubble stitch). In the next stitch, make a single crochet. Continue the pattern: 1 single crochet, 3 double crochets closed together (bubble stitch). Repeat this pattern around the entire row. Slip stitch to the first single crochet to close the round.
- Rounds 2-24
Chain 1, make a single crochet in the first stitch. In the next stitch, make a bubble stitch (3 double crochets closed together). Repeat: 1 single crochet, 1 bubble stitch. Continue this pattern for a total of 24 rows.
Bag Straps
Make 2- Round 1
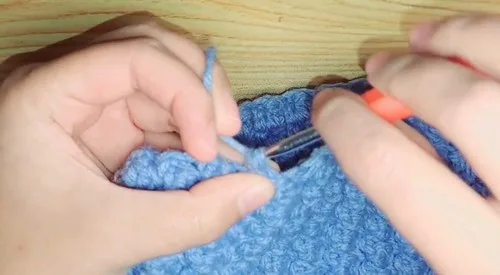
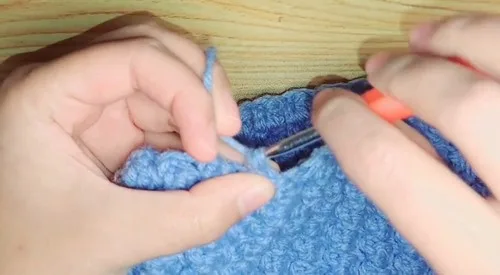
From where the body ends, chain 1 and make a single crochet. In the next stitch, work a bubble stitch. Continue the pattern (1 single crochet, 1 bubble stitch) until you have 8 bubbles, ending with a single crochet.
- Rounds 2-30
Turn and repeat the pattern on the next row. This time, insert your hook from the back to close the bubble stitches (back-post bubble stitch). Continue working in this method for 30 rows. Cut the yarn, leaving a long tail for sewing.Second Strap Second strap: Count 11 bubbles from where the first strap starts, then mark the next single crochet after the 11th bubble. Begin the second strap using the same pattern (8 bubbles across, 30 rows tall, back-post bubbles from row 2 onward). Make sure both straps are identical in size and placement.
More photos
Assembly Instructions
- Step 1 Cut the yarn, leaving a long tail for sewing after completing each strap.
- Step 2 Align the two strap ends.
- Step 3 Join them using a slip stitch.
- Step 4 Pull yarn to tighten and cut.
- Step 5 Weave in all loose ends with a yarn needle.
- Step 6 Check the bag for symmetry.
- Step 7 Block or shape if desired.
Important Notes
- Keep a stitch marker in the first stitch of every round throughout the base and body so you never lose track of where each round starts.
- The bubble stitch (3 double crochets closed together) should feel snug but not tight — practice a few before starting the body if it's new to you.
- When working the straps, remember rows 2 through 30 use the back-post version of the bubble stitch, which changes the texture and adds strength.
- Measure both straps against each other periodically as you crochet to make sure they match in length and bubble count before assembly.
- Leave a generous tail after finishing each strap — you'll need enough length to slip stitch the strap ends together securely.
- Weave in every loose end thoroughly with a yarn needle before blocking so the inside of the bag stays neat and tag-free.
Common Mistakes and Fixes
- Losing track of stitch counts
Use stitch markers at each increase point mentioned in the pattern so you can quickly verify you have the correct number of stitches before joining the round.
- Working the bubble stitch too loosely
Pull your loops snug when closing each 3-double-crochet bubble together, and keep consistent tension throughout the 24 body rows for uniform texture.
- Placing the second strap in the wrong
Carefully count exactly 11 bubbles from the start of the first strap before marking the stitch where the second strap begins.
- Not marking the first and last increase
Place a stitch marker in the very first increase stitch of each round so you always know where the round begins and ends.
- Skipping the blocking step, leaving
Lightly block or shape the finished bag as suggested in the assembly steps to even out stitch definition and help the oval base lie flat.
Variations
- This bag is wonderfully easy to make your own. Color is the fastest way to change its personality: try a deep terracotta or mustard yellow for an autumn-ready tote, or a crisp white with navy straps for a nautical look. For a two-tone effect, work the base and straps in one color and the bubble-stitch body in a contrasting shade — the texture will really pop. If you want an ombré effect, transition through three shades of the same color family as you work up the 24 body rows. Yarn substitution is simple too: any Category 3 (light worsted) yarn works, but consider a cotton or cotton-blend yarn for a crisper, more structured bag that holds its shape without a lining, versus a Category 3 acrylic for a lighter, more casual everyday carryall. To resize, add or subtract a few chains to the base foundation (adjusting increases proportionally) for a bigger or smaller bag, or work fewer than 24 rows on the body for a shorter, more slouchy tote. For the straps, add extra rows beyond 30 if you prefer a longer, over-the-shoulder length rather than a hand-carry style. You could also make one strap longer than the other for an asymmetrical crossbody effect. For embellishment, weave a coordinating ribbon through the top round of the body before attaching straps, or add a decorative button and loop closure at the top opening. If you love the bubble texture but want a different silhouette, work the same stitch pattern into a rectangular base instead of the oval for a more structured, boxy bag. Every choice keeps the sustainable, handmade spirit intact while letting the finished piece feel entirely yours.
- I fell for this bag the moment the bubble stitches started stacking up into that gorgeous textured surface — it genuinely looks more complicated than it is. Starting with the oval base is so satisfying because you can watch the shape emerge round by round instead of guessing at gauge. Then the body just settles into an easy single crochet, bubble stitch rhythm that becomes almost meditative once you find your groove. My favorite detail is the back-post bubble stitch on the straps from row two onward; it makes them sturdier and gives them a slightly different texture than the body, which is a nice subtle contrast. Counting out those eleven bubbles to place the second strap symmetrically feels like a small puzzle, and nailing it is deeply rewarding. This is a project that rewards patience without demanding expert-level skill, and by the end you have something you'll actually reach for constantly. It's crochet with a purpose — practical, pretty, and proof that a handmade accessory can hold its own against anything store-bought.
Frequently Asked Questions
What weight yarn works best for this bag?
A Category 3 light worsted yarn is ideal, as used in the original blue sample. Cotton or cotton-blend yarns give the bag more structure, while acrylic keeps it lighter and softer.
How long do the straps end up being?
Each strap is worked to 30 rows with 8 bubbles across, giving you a comfortably sized handle. If you want a longer shoulder strap, simply add extra rows beyond 30.
Is the bubble stitch difficult for beginners?
It's a great next-step stitch if you already know double crochet, since it's just three double crochets closed together in one stitch. With a little practice on a swatch, most confident beginners can master it quickly.
How do I make sure both straps match?
Count exactly 11 bubbles from the start of the first strap to place the second one, and mark that stitch clearly. Keeping the same row count and bubble count for both ensures they turn out identical.
Does this bag need a lining?
The pattern doesn't require a lining, but if you'd like extra structure or want to hide seams, you can add a simple fabric lining after weaving in ends and blocking.
Original pattern: https://crocheteverything.com/chic-trendy-crochet-bag-pattern-for-sustainable-fashion/
About the Author

Marisol QuinteroWho runs Crochet Obsessed, why a stitch count sits at the end of every round, how a pattern gets written here, and the things this site will never do.
More Patterns
- IntermediateNo. 01

Slouchy everyday beanie worked flat in half double crochet
Crochet beanie pattern for a slouchy everyday look worked flat with hdc rows, then seamed into a soft,…
- IntermediateNo. 02
Crochet amigurumi doll with dress, shoes, and hat
Crochet amigurumi doll pattern with dress, shoes, and hat details for a soft, huggable keepsake you build one…
- IntermediateNo. 03
Chunky moss stitch crochet sweater with raglan-free shoulders
Chunky crochet sweater pattern using moss stitch, worked flat with a 10mm hook for a soft, fast, cool-weather…


