- LevelIntermediate
- Time4-6 hours
- Hook4.0 mm
- YarnSuper Bulky
About This Pattern
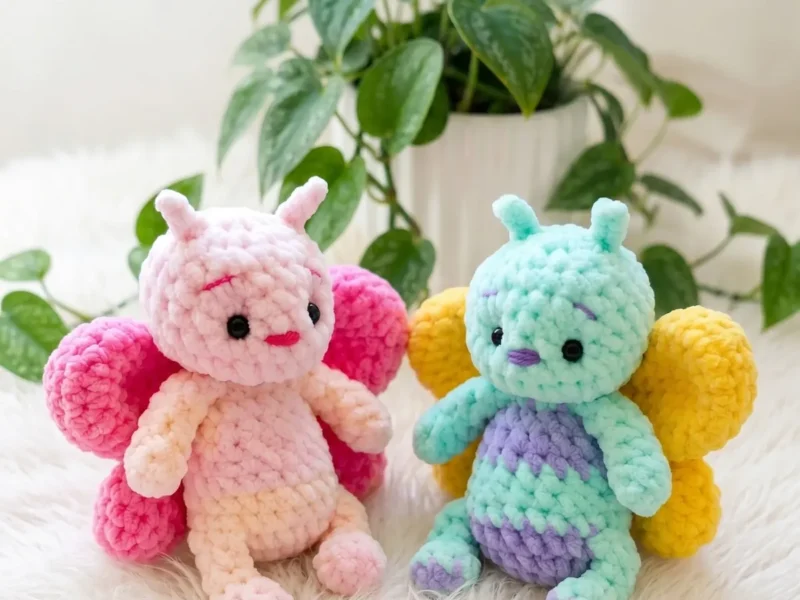
This one has that soft-focus, hush-the-nursery kind of mood. Two velvety chenille wings, a round little body, antennae that tip forward like she is listening for something. It is sweet without tipping into saccharine, which is a hard line to walk in baby amigurumi.
Your hands get a nice mix of tasks here. You will work tight continuous spiral rounds for the body and head, a flat foundation chain for each foot before the legs turn, and a two-section build for the wings where you join upper and lower pieces mid-round with a slip stitch. Nothing exotic, just steady, attentive stitching.
Set her on a changing table shelf or tucked into a crib rail and she reads as a small soft sculpture, not just a toy. The chenille catches light in a way plain worsted never does. When someone shakes her gently, the wings answer back with that quiet rustle.
- Start the body and head as one continuous spiral, building up from a magic ring to the full eighteen rounds.
- Set the head aside and work both arms in short spiral rounds before folding and closing each opening.
- Fold each leg in half and close it with single crochet through both layers before weaving in the tail.
- Build each wing in two separate sections, upper then lower, fastening off only the upper piece.
- Join the lower wing section to the upper one with a slip stitch and keep working around both as a single joined ring.
- Tuck a baking sleeve offcut into the wing before it closes so it keeps its rustling sound.
- Assemble everything onto the body, mark eye placement between rounds, set the safety eyes, and sew on the antennae.
On the desk
- Yarn (Main Color): Himalaya Dolphin Baby or equivalent Super Bulky (CYCA #6) chenille yarn — approx. ½ skein
- Yarn (Contrast Color): Same weight chenille yarn for wings — less than ½ skein
Embroidery thread
- For nose and eyebrows
Hook
- US G-6 (4.0 mm) or US G-7 (4.5 mm)
Safety eyes
- 9–10 mm, 2 pieces
Baking sleeve offcut
- A small piece inserted into the wings to create a rustling sound
- Fiberfill stuffing
- Stitch marker
- Tapestry needle
- Scissors
Stitch shorthand
- BLO — Back Loop Only
- ch — Chain
- dec — Decrease (invisible decrease method)
- inc — Increase (2 sc in same stitch)
- MR — Magic Ring
- sc — Single Crochet
- sl st — Slip Stitch
- st(s) — Stitch(es)
Chenille butterfly baby amigurumi pattern with rattle wings
Arms
Make 2Fold the piece in half. Work 3 sc through both layers to close the opening. Fasten off, leaving a yarn tail. Weave the tail inside the arm.
- Round 1
7 sc in MR. (7)
- Round 2
7 sc. (7)
- Round 3
dec, 5 sc. (6)
- Rounds 4–5
6 sc. (6)
- Round 6
5 sc. (5)
Wings
Make 2Each wing is made in two sections — upper and lower — then joined and shaped together.
Fasten off and secure the yarn at the end of the Upper Wing Section.
Do not fasten off the Lower Wing Section. Join the lower section to the upper section with a sl st. Continue working around both sections as one joined ring.
Fold the wing in half. Work 6 sc through both layers to close. Fasten off, leaving a yarn tail of approximately 8–10 inches (20–25 cm). This tail will be used to sew the wings onto the body.
- Round 1
(Upper Wing Section — Make 2): 6 sc in MR. (6)
- Round 2
Upper Wing Section 6 inc. (12)
- Round 3
Upper Wing Section (1 sc, inc) × 6. (18)
- Rounds 4–5
Upper Wing Section 18 sc. (18)
- Round 1
(Lower Wing Section — Make 2): 6 sc in MR. (6)
- Round 2
Lower Wing Section 6 inc. (12)
- Rounds 3–4
Lower Wing Section 12 sc. (12)
- Round 1
Joined Wing (4 sc, dec) × 3, (2 sc, dec) × 3, 1 sc. (25)
- Round 2
Joined Wing (3 sc, dec) × 5. (20)
- Round 3
Joined Wing (2 sc, dec) × 5. (15)
- Round 4
Joined Wing (3 sc, dec) × 3. (12)
- Round 5
Joined Wing 5 sc. (5)
Body and Head
Worked in one continuous piece, bottom up.
Insert the rattle insert after Round 7 of the Body. Stuff the body firmly with fiberfill, then continue working.
Head is worked continued directly from the Body.
Attach safety eyes between Rounds 18 and 19 of the Head, with 4 stitches between them, after completing the eye indentations.
Fasten off. Pull the opening closed tightly. Weave the yarn tail inside the head.
- Round 1
Body 6 sc in MR. (6)
- Round 2
Body 6 inc. (12)
- Round 3
Body (1 sc, inc) × 6. (18)
- Round 4
Body (2 sc, inc) × 6. (24)
- Round 5
Body 5 sc, join leg over next 3 sts, 6 sc, join leg over next 3 sts, 7 sc. (24)
- Round 6
Body 24 sc. (24)
- Round 7
Body (2 sc, dec) × 6. (18)
- Rounds 8–11
Body 18 sc. (18)
- Round 12
Body (1 sc, dec) × 6. (12)
- Round 13
Body 3 sc, join arm over next 3 sts, 2 sc, join arm over next 3 sts, 1 sc. (12)
- Round 14
Head (1 sc, inc) × 6. (18)
- Round 15
Head (2 sc, inc) × 6. (24)
- Round 16
Head (5 sc, inc) × 4. (28)
- Rounds 17–19
Head 28 sc. (28)
- Round 20
Head (5 sc, dec) × 4. (24)
- Round 21
Head (2 sc, dec) × 6. (18)
- Round 22
Head (1 sc, dec) × 6. (12)
- Round 23
Head 6 dec. (6)
Legs
Make 2Change to main color yarn after Row 2.
Fold the piece in half. Work 2 sc through both layers to close. Fasten off. Weave the tail inside the leg.
- Round 1
ch 4.
- Round 2
inc in 2nd ch from hook, sc 1, work 3 sc in last ch (corner), sc 2 along the opposite side of the foundation chain. (8)
- Round 3
8 sc BLO. (8)
- Round 4
3 sc, dec over 3 sts, 2 sc. (6)
- Round 5
3 sc, dec, 1 sc. (5)
- Rounds 6–7
5 sc. (5)
Antennae
Make 2- Round 1
Ch 4. Fasten off, leaving a tail for sewing.
Where it goes
- A crib companion that sits at the rail edge and rattles softly when a baby's hand brushes past it.
- A tummy-time prop that pairs well with a plain quilted play mat where the chenille texture stands out.
- A gift set piece alongside a knit baby blanket, wrapped together for a new parent.
- A nursery shelf accent that sits comfortably next to other soft-sculpture toys without competing for attention.
Color ideas
- Classic contrast Main color chenille covers the body, head, arms, and legs, while the contrast color is reserved entirely for both wings, upper and lower sections alike.
- Two-tone wings Keep the body, head, arms, and legs in one main color, then use the main color again for the upper wing sections and the contrast color only on the lower wing sections for a layered look.
Care
Chenille yarn like Himalaya Dolphin Baby handles a gentle hand wash well, but skip the wringing and press the water out instead to protect the pile.
Lay the finished toy flat to dry away from direct heat, since chenille can flatten or shed if it is tumble dried.
Store her uncrushed, ideally standing or propped rather than stuffed at the bottom of a bin, so the wings and pile keep their loft.
Assembly
- Step 1 Attach the antennae: Using the yarn tails, sew both antennae securely to the top of the head.
- Step 2 Create eye indentations: Using a length of yarn threaded on your tapestry needle, pull through the head between Rounds 18 and 19 to create subtle indentations for the eyes. Position the eyes with 4 stitches between them.
- Step 3 Attach safety eyes: Once indentations are set, push the safety eye posts through the fabric at those points and secure the washers on the inside.
- Step 4 Embroider the face: Using embroidery thread, stitch the nose and eyebrows directly onto the head.
- Step 5 Insert baking sleeve into wings: Before sewing the wings on, tuck a small cut piece of baking sleeve inside each wing. This creates the crinkle sound that babies find so engaging.
- Step 6 Sew wings to body: Using the long reserved yarn tails on each wing, sew both wings firmly to the back of the body. Position them symmetrically and stitch through several layers for security.
- Step 7 Weave in all remaining ends.
Easy to get wrong
Loose tension in chenille rounds
Chenille yarn is forgiving in feel but unforgiving in gaps, so work your single crochet rounds tightly enough that stuffing never peeks through. Size down a hook step if your stitches feel loose.
Joining the wing sections in the wrong order
Remember only the upper wing section gets fastened off; the lower section stays live so you can slip stitch it to the upper piece and continue around both as one ring. Reversing this leaves you with two separate pieces to sew together instead of one joined shape.
Skipping the BLO instruction on the legs
Working back loop only on that leg round keeps the front loops free and gives the foot its defined edge, so do not accidentally work through both loops there. Check your row against the stitch count before moving on if you are unsure.
Between the songs
- The satisfaction here is really in the wings. Building each one as an upper section and a lower section, then joining them with a single slip stitch and continuing around both as one ring, is a clever bit of construction that makes a flat motif suddenly have shape and depth. Add the baking sleeve offcut tucked inside for a rustle and the DIY or store-bought rattle in the body, and you have sensory features built right into the stitches. The legs also earn their keep, starting from a flat chain with an increase and a three-stitch corner before you fold and close them. It is the kind of project where the small engineering choices are the whole appeal.
Listener questions
Can I make this without a rattle insert?
Yes, you can simply stuff the body fully with fiberfill and skip the rattle capsule entirely. The toy will lose its shake sound but keep its shape and softness.
Why does the wing pattern have two separate sections?
The upper and lower wing sections are worked separately so they can be joined mid-round with a slip stitch, which gives the wing its layered, dimensional shape. It also creates a pocket where you can tuck the baking sleeve offcut for the rustling sound.
Is this pattern safe for a newborn?
Safety eyes and small rattle inserts mean this piece is best suited to display or supervised play rather than being left in a crib unattended. Always check that eyes and antennae are stitched down securely before gifting.
What if I only have one hook size on hand?
Either the US G-6 or G-7 hook works for this yarn weight, so use whichever you have and just keep your tension tight. The main thing to watch is density, not the exact hook size.
Original pattern: https://amigurumicorner.com/crochet-butterfly-baby-free-amigurumi-pattern/
About the Author

Marisol QuinteroWho runs Crochet Obsessed, why a stitch count sits at the end of every round, how a pattern gets written here, and the things this site will never do.
More Patterns
- IntermediateNo. 01

Slouchy everyday beanie worked flat in half double crochet
Crochet beanie pattern for a slouchy everyday look worked flat with hdc rows, then seamed into a soft,…
- IntermediateNo. 02
Crochet amigurumi doll with dress, shoes, and hat
Crochet amigurumi doll pattern with dress, shoes, and hat details for a soft, huggable keepsake you build one…
- IntermediateNo. 03
Chunky moss stitch crochet sweater with raglan-free shoulders
Chunky crochet sweater pattern using moss stitch, worked flat with a 10mm hook for a soft, fast, cool-weather…


