- LevelIntermediate
- Time4-6 hours
- Hook3.5 mm
- YarnWorsted
About This Pattern
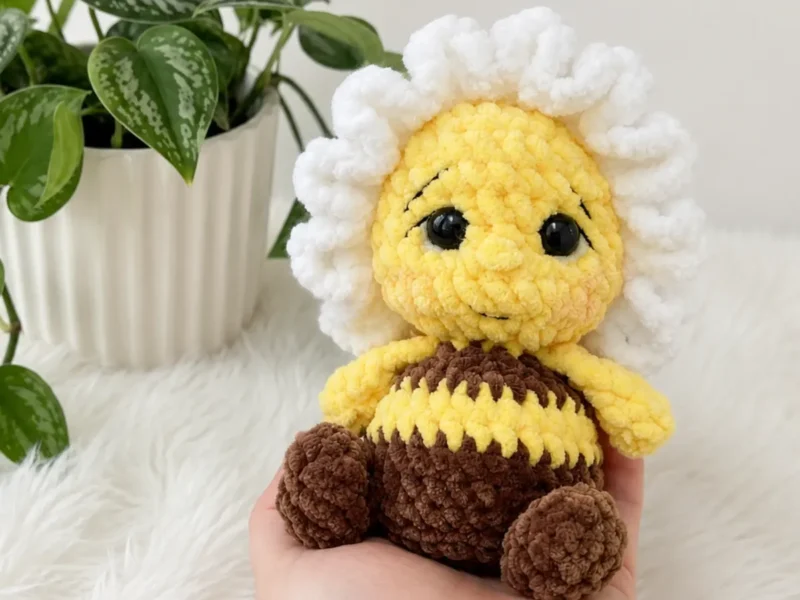
There is something cheerful and round about this bee before you even pick up a hook. The plush yellow and brown body sits low and soft, like it just landed and decided to stay. It has that bright, no-fuss energy of a toy made for a shelf someone actually looks at every day.
Your hands will spend most of their time in tight little spirals, tracking a stitch marker instead of counting chains. There is a rhythm to building the Body-Head up through increase rounds, then holding steady, then shaping down again. The Arms and Legs are small enough to finish in one sitting, which keeps your fingers from getting restless.
Set on a windowsill or a bookshelf, Buzzy reads as a small, confident splash of yellow and brown. The white Wings and tiny flower hat keep it from looking like just another round toy. It is the kind of piece that makes a plain shelf look intentional.
- Start the Arms and Legs first, since both are quick, small pieces worked in a handful of rounds.
- Leave a long tail on each Arm and Leg instead of weaving it in, because you will need it for joining later.
- Build the Body-Head as one continuous spiral, tracking your round with a stitch marker so you never lose your place.
- Join the Arms and Legs into the Body at their designated rounds while you still have those tails handy.
- Stuff the Body-Head firmly as you close it, but leave the Arms unstuffed and flattened as directed.
- Add the face with black sewing thread and use matching thread to cinch the face shaping for expression.
- Finish by attaching the Wings, Antennae, and Flower Hat, then weave in any tails still hanging loose.
On the desk
Yarn
- Worsted weight (4) plush/velvet yarn in yellow and brown, small amounts (about ¼ skein of each)
Yarn
- Fingering weight (1) cotton-blend yarn in black, small amount, for the antennae
Yarn
- Worsted weight (4) yarn in white, small amount, for the wings
Hook
- E-4 (3.5 mm) for the body, legs, arms, and wings
Hook
- B-1 (2.0 mm) for the antennae
- Black sewing thread, for face embroidery details
- Matching thread, for cinching the face shaping
- this …
Tools
- Stuffing/fiberfill
- Stitch markers
- Yarn needle / tapestry needle
- Scissors
Stitch shorthand
- BLO — Back Loop Only
- ch — Chain
- dec — Decrease
- dc2tog — Double Crochet 2 Together
- hdc — Half Double Crochet
- inc — Increase
- MR — Magic Ring
- rnd(s) — Round(s)
- sc — Single Crochet
- sl st — Slip Stitch
- st(s) — Stitch(es)
A plush little bee amigurumi worth making
Arms (make 2)
Worked in yellow.
- Round 1
6 sc in MR. (6)
- Rounds 2–3
sc in each st around. (6) (2 rounds total) Do not stuff this piece. Flatten the tube and work 3 sc through both layers to close it. Turn the piece without a turning chain and work 3 more sc through both layers. Fasten off, leaving a tail. The arms will be joined directly into the Body in a later round — do not weave in this tail yet.
Legs (make 2)
Worked in brown.
- Round 1
4 sc in MR. (4)
- Round 2
inc in each st around. (8)
- Rounds 3–4(8)
sc in each st around. (8) (2 rounds total)
- Round 5
dec around. (4)Stuff lightly — not too firm, since the leg needs to flatten for finishing. Flatten the piece and whipstitch it closed along the edge, working through the front loops only. Cut the yarn, leaving a tail. The legs will be joined directly into the Body — do not weave in this tail yet.
Body-Head
Begin in brown.
- Round 1
6 sc in MR. (6)
- Round 2
inc in each st around. (12)
- Round 3
inc in each st around. (24)
- Round 4
(5 sc, inc) repeat around. (28)
Before working Rnd 5, position your two finished Legs. Insert your hook through the three center stitches across rounds 3–4 of each leg, capturing the leg stitches together with the corresponding body stitches as you crochet (refer to a photo tutorial if you’d like a visual reference for this join).
- Round 5
8 sc BLO, 3 sc joining first Leg, 6 sc BLO, 3 sc joining second Leg, 8 sc BLO. (28)
- Rounds 6–7
sc in each st around. (28) (2 rounds total) Shift the end of your round to the center back of the piece. Switch to yellow — do not cut the brown yarn; carry it up inside the work.
- Rounds 8–9
sc in each st around. (28) (2 rounds total) Switch back to brown — do not cut the yellow yarn; carry it up inside the work.
- Round 10
(1 sc, dec) twice, 16 sc, (dec, 1 sc) twice. (24)
- Round 11
dec around. (12)
Switch to yellow. You may now fasten off and cut the brown yarn. Before working Rnd 12, position your two finished Arms in the same way as the legs, joining them as you crochet.
- Round 12
2 sc, 3 sc joining first Arm, 3 sc, 3 sc joining second Arm, 1 sc. (12)
- Round 13
sl st in each st around. (12)
- Round 14
inc in each st around. (24)
- Round 15
(5 sc, inc) repeat around. (28)
- Rounds 16–17(28)
sc in each st around. (28) (2 rounds total)
- Round 18
(5 sc, dec) repeat around. (24)Insert the safety eyes now, between Rounds 18 and 19, spacing them 5 sc apart at the front of the face. If using glued-on eyes instead, wait and attach them after the head is fully closed, in this same position.
- Round 19
sc in each st around. (24)
- Round 20
(4 sc, dec) repeat around. (20)
- Round 21
(8 sc, dec) repeat around. (18)
- Round 22
sc in each st around. (18)Stuff the head firmly now, before closing the opening — this is your last chance to add fiberfill.
- Round 23
(1 sc, dec) repeat around 6 times. (12)
- Round 24
dec around. (6)Fasten off and cinch the remaining opening closed using the tail. Move on to face shaping below.
Wings (make 2)
Worked in white.
- Round 1
Chain 8. Starting in the 2nd chain from the hook: 2 sc, 4 hdc, 3 hdc in the last chain (this turns the corner without a turning chain) . Continue back along the opposite side of the foundation chain: 4 hdc, 2 sc.Fasten off, leaving a tail for sewing.
Flower Hat
- Round 1
Chain 51.
- Round 2
Starting in the 2nd chain from the hook, sl st in each of the next 15 chains (this forms the first hat tie) . Sc once to transition into the petal section, then work the petals directly into the remaining foundation chain: (ch 3, 2 dc2tog into the same chain stitch, ch 3, sl st in next chain stitch) — repeat this petal sequence 10 times, adjusting the petal count up or down as needed to fully cover the head. Sl st in each of the final 15 chains to form the second hat tie.Fasten off, leaving tails at both ends of the ties.
Antennae (make 2)
Worked in black cotton-blend yarn with a B-1 (2.0 mm) hook.
Chain 10. Starting in the 4th chain from the hook: work 3 hdc in the same stitch (this forms the little antenna ball) , then sl st in each of the next 6 chains. (6 sl st total along the stem)
Leave a tail for sewing later.
Where it goes
- A desk companion for a home office, paired with a small potted succulent for a bit of color.
- A shelf piece in a kid's room, sitting alongside other amigurumi animals for a growing collection.
- A soft toy for a baby shower gift, paired with a hand-knit blanket in a coordinating yellow.
- A photo prop for craft fair displays, set next to other plush amigurumi to show off fiber variety.
Color ideas
- Classic bee Yellow for the Arms and the yellow bands of the Body-Head, brown for the Legs and the brown sections of the Body-Head, black cotton-blend for the Antennae, and white for the Wings.
- Soft garden Keep the Body-Head in its yellow and brown as written, but work the Flower Hat in a color that contrasts with both, letting the hat become the accent piece instead of the bee itself.
Care
Hand wash the plush yellow and brown body and the white wings in cool water, since worsted weight plush yarn can lose its texture in a hot machine wash.
Reshape the Body-Head gently while damp and lay it flat to dry, easing the Arms and Legs back into place so the seams sit evenly.
Store the finished bee away from direct sun so the plush yarn color stays true, and keep it away from anything that could snag the soft nap.
Assembly
- Step 1 Weave the brown yarn tail at the base of the head into the neck area to neaten the color change line, if needed.
- Step 2 With the tail left on each Arm, make sure both Arms are securely joined to the Body at Rnd 12 — tug gently to confirm there are no gaps, then weave the tail through to the inside of the body and trim.
- Step 3 With the tail left on each Leg, confirm both Legs are securely joined to the Body at Rnd 5 in the same way, then weave the tails to the inside and trim.
- Step 4 Using the tail on each Wing, whipstitch the Wings to the back of the Body, just above the yellow-and-brown color change, angling them slightly outward.
- Step 5 Using the tail on each Antenna, sew the Antennae to the top of the head, spacing them about 4 sc apart so they frame the face.
- Step 6 Shape the face: thread your needle with matching thread and insert it from the front at the base of the neck, bringing it out at the lower outer edge of one eye. Insert the needle into the lower inner edge of that same eye and bring it back out 1 sc away from your starting point. Pull the thread snug, pressing the eye gently with a fingertip to settle the stuffing evenly underneath it. Repeat the same shaping on the second eye, and repeat the whole process a second time on both eyes if you’d like a more pronounced indent.
- Step 7 Embroider the nose with a few short horizontal straight stitches centered below the eyes. Add eyebrow or eyelash lines and a simple curved smile with black thread. Optionally, embroider small white eye highlights and brush the cheeks with dry pastel for color.
- Step 8 Tie the Flower Hat onto the head using its two ties, knotting them at the back.
- Step 9 Weave in any remaining ends.
Easy to get wrong
Losing track of the spiral
Place a stitch marker in the first stitch of every round on the Body-Head and move it up as you go, since there is no join or chain to mark the round for you.
Weaving in Arm and Leg tails too soon
Leave those tails alone until you actually join each Arm and Leg to the Body, then use the same tail to secure the seam before trimming.
Stuffing the Arms by habit
The Arms are meant to stay flat and unstuffed, so flatten the tube and close it with single crochet through both layers instead of packing it with fiberfill.
Listener questions
Why does the Body-Head use two different colors?
The head starts in brown and transitions to yellow as the rounds continue, which is what gives Buzzy its two-tone look. Weaving in that color change tail neatly at the neck keeps the transition looking clean.
Do I need to stuff the Arms?
No, the pattern specifically says not to stuff this piece. You flatten the tube instead and close it with single crochet through both layers.
What is the smaller hook for?
The B-1 hook is used only for the Antennae, worked in the fingering weight cotton-blend yarn. Everything else, including the Body-Head, Arms, Legs, and Wings, uses the larger E-4 hook.
How do I attach the face details?
The face is added with black sewing thread for embroidery and a separate matching thread for cinching the face shaping. Both are worked after the Body-Head is stuffed and closed.
Original pattern: https://amigurumicorner.com/buzzy-bee-amigurumi-crochet-pattern/
About the Author

Marisol QuinteroWho runs Crochet Obsessed, why a stitch count sits at the end of every round, how a pattern gets written here, and the things this site will never do.
More Patterns
- IntermediateNo. 01

Slouchy everyday beanie worked flat in half double crochet
Crochet beanie pattern for a slouchy everyday look worked flat with hdc rows, then seamed into a soft,…
- IntermediateNo. 02
Crochet amigurumi doll with dress, shoes, and hat
Crochet amigurumi doll pattern with dress, shoes, and hat details for a soft, huggable keepsake you build one…
- IntermediateNo. 03
Chunky moss stitch crochet sweater with raglan-free shoulders
Chunky crochet sweater pattern using moss stitch, worked flat with a 10mm hook for a soft, fast, cool-weather…


