- LevelIntermediate
- Time4-6 Hours
- Hook2 mm
- YarnWorsted
About This Pattern
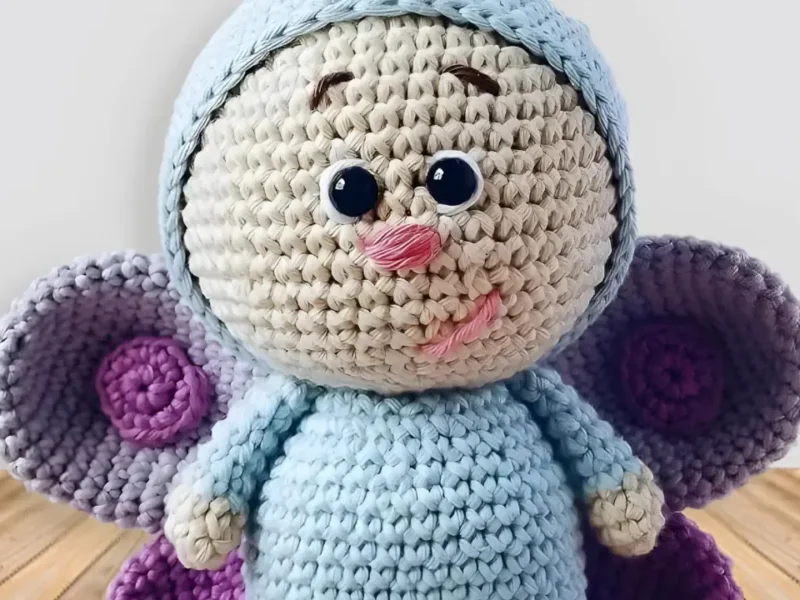
This butterfly amigurumi pattern brings a little garden magic into your yarn stash, using a rainbow of colors — purple, light blue, white, pink, yellow, brown, and green — to build a charming little creature that feels both nostalgic and fresh. It's the kind of project that makes you smile the moment you set out your yarn, because you already know the finished butterfly is going to be a burst of color. Perfect for crocheters who love working with multiple hues in one project and want a fast, joyful make.
This butterfly comes together in three main parts — a shaped head, a rounded body, and two tiny hands — worked in single crochet rounds from the center out with increases and decreases to build the shape. You'll get practice with color transitions, gradual shaping, and finishing details like the felt eyes and embroidered mouth. This is a great pattern for confident beginners ready to level up, or intermediate crocheters looking for a quick, cheerful weekend project — expect somewhere around 4 to 6 hours from first stitch to finished butterfly.
When it's all stitched up, you'll have a small, huggable butterfly amigurumi with a soft round body and a sweet hand-stitched face that gives it real personality. The mix of bright yarn colors makes it pop on a shelf, in a nursery, or tucked into a gift bag for a fellow crochet lover. It's soft, squeezable, and full of charm — the kind of handmade gift that gets an instant 'aww' the second it's unwrapped.
- Start the head with a small chain and shape it with increases and decreases across many rounds of single crochet.
- Stuff and close the head, then start the body with a fresh chain and work through its own increase rounds.
- Introduce your yarn colors in sequence, changing shades smoothly at the end of stitches.
- Work the two hands using the same magic-ring-and-increase approach, keeping stitch counts consistent as each shape develops.
- Stuff each piece firmly and evenly as you approach its final rounds for a smooth silhouette.
- Close the final round of each piece and secure the yarn tail to finish the shaped parts.
- Cut small pieces of black felt and position them as the eyes on the face.
- Hand-stitch the mouth with black yarn to complete the butterfly's sweet expression.
Materials
- 2 mm crochet hook
- Purple, light blue, white, pink, yellow, brown and green yarn
- Black yarn for sewing mouth
- Needle for sewing
- Stuffing
- Black felt
- Glue
- Scissors
Crochet Abbreviations
- ch
- chain
- st
- stitch
- sl st
- slip stitch
- sc
- single crochet
- inc
- increase
- dec
- decrease
- blo
- back loops only
- rep
- repeat
- R
- round
- F/O
- Fasten off
Butterfly Amigurumi Crochet Pattern
Head
Use purple yarn
- Round 1
ch 6, starting from 2nd chain from hook, 4 sc, 3 sc in last st, continue your work st around the other side of chain, 3 sc, 2 sc in last st. (12)
- Round 2
sc, inc, rep 6x (18)
- Round 3
2 sc, inc, rep 6x (24)
- Round 4
3 sc, inc, rep 6x (30)
- Round 5
4 sc, inc, rep 6x (36)
- Round 6-7
sc around
- Round 8
5 sc, inc, rep 6x (42)
- Round 9
sc around
- Round 10
6 sc, inc, rep 6x (48)
- Round 11
sc around
- Round 12
7 sc, inc, rep 6x (54)
- Round 13-15
sc around
- Round 16
7 sc, dec, rep 6x (48)
- Round 17
6 sc, dec, rep 6x (42)
- Round 18
5 sc, dec, rep 6x (36)
- Round 19
4 sc, dec, rep 6x (30)
- Round 20
3 sc, dec, rep 6x (24)Stuff
- Round 21
2 sc, dec, rep 6x (18)
F/O
Body
Use purple yarn
- Round 1
ch 2, starting from second chain from hook 6 sc
- Round 2
inc, rep 6x (12)
- Round 3
sc, inc, rep 6x (18)
- Round 4
2 sc, inc, rep 6x (24)
- Round 5
3 sc, inc, rep 6x (30)
- Round 6-18
sc around
- Round 19
3 sc, dec, rep 6x (24)
- Round 20
10 sc, dec, rep 2x (22)
- Round 21
9 sc, dec, rep 2x (20)Stuff
- Round 22
8 sc, dec, rep 2x (18)
F/O leave long tail for sewing
Hands (make 2)
Use purple yarn
- Round 1
ch 2, starting from second chain from hook 5 sc
- Round 2
inc, rep 5x (10)
- Round 3
sc, inc, rep 5x (15)
- Round 4-5
sc around
- Round 6
sc, dec, rep 5x (10)stuff
- Round 7
3 sc, dec, rep 2x (8)
- Round 8-16
sc aroundStuff
F/O leave long tail for sewing
Important Notes
- 💡 This pattern uses a 2 mm crochet hook — choosing a snug hook size for your yarn weight keeps stitches dense so stuffing doesn't peek through between the rounds.
- 💡 Pre-cut all seven colors of yarn into manageable lengths before you start so color changes go smoothly without digging through your stash mid-round.
- 💡 Keep a stitch marker on the first stitch of every round throughout the head, body, and hands — it's easy to lose your place when working continuously in the round.
- 💡 Cut your black felt pieces for the eyes before you finish stuffing the head, so you can test the size and placement against the actual finished shape.
- 💡 Thread your needle with black yarn for the mouth and lightly sketch the shape with a fabric marker first if you want extra confidence before sewing it permanently.
- 💡 Weave in ends as you finish each color section rather than waiting until the whole piece is complete — it keeps the inside tidy and prevents ends from getting stuffed in awkwardly.
- 💡 Work the head, body, and hands in continuous rounds (no slip stitch join) unless otherwise noted, using a stitch marker to track where each round begins.
Common Mistakes and Fixes
- Starting the magic ring too loosely
Pull the tail yarn firmly after your first round of single crochets and check that the center hole is fully closed before moving forward — snug it up again at the very end if needed.
- Losing track of stitch counts
Use a stitch marker at the beginning of each round and count your stitches before moving on, especially right after any increase or decrease round.
- Carrying yarn colors messily
Cut and tie off colors you're not actively using rather than carrying them, or bag them loosely on the outside of your work to keep the inside of the piece tangle-free.
- Under-stuffing or over-stuffing
Stuff firmly but evenly in small pinches as you go, checking the shape against your intended silhouette rather than stuffing everything in at the very end.
- Placing the felt eyes and embroidered
Pin or temporarily hold the felt pieces and mouth thread in place before sewing to check spacing and symmetry, then commit to stitching once you're happy with the placement.
Variations
- One of my favorite things about this butterfly is how easy it is to make it your own. Swap the classic purple and pink combo for monochrome wings in different shades of the same color family — think ombré blues Mandala or soft pastel pinks from Bernat Baby Blanket for a dreamier look. For a moth-inspired variation, trade the bright colors for browns, creams, and rusty oranges using something like Cascade 220 for a more muted, woodland feel. If you want a bolder statement piece, go neon: hot pink, electric blue, and lime green make a butterfly that looks straight out of a tropical rainforest. Sizing is flexible too — if you want a mini version, drop down to a smaller worsted weight or sport weight yarn with a smaller hook (try a 1.5mm-2mm instead of the standard 2mm) to shrink the whole butterfly proportionally while keeping the same overall stitch pattern. For a jumbo cuddle-sized butterfly, size up to a bulky yarn like Bernat Blanket with a much larger hook, which will noticeably enlarge every round without changing the stitch pattern itself. Seasonal fans can lean into fall with burnt orange, deep purple, and golden yellow for an autumn butterfly, or go pastel rainbow for a spring garden theme. You could even make a whole butterfly family in coordinating colorways using leftover scraps from your stash — this pattern is wonderfully scrap-friendly since each part uses relatively small amounts of each color. However you customize it, the simple round-by-round structure makes experimenting low-risk and high-reward.
- I fell in love with this butterfly the moment I started pulling out all those yarn colors — purple, light blue, pink, yellow, brown, and green all in one project feels like painting with fiber instead of pencils. Working through the head, body, and hands keeps things moving along nicely, with each part bringing its own bit of shaping and a fresh pop of color. I especially love adding the little details at the end: cutting tiny black felt pieces for the eyes and hand-stitching the mouth with black yarn gives the butterfly so much expression with so little effort. It's proof that amigurumi doesn't need to be complicated to be adorable. There's something deeply satisfying about seeing a pile of individual yarn colors transform into one cohesive, cheerful creature by the time you tie off that last stitch. This is the kind of pattern I reach for when I want a quick creative win — something colorful, cute, and finished in an evening or two, without sacrificing that handmade charm crocheters crave.
Frequently Asked Questions
How much yarn do I need for each color in this butterfly?
Since the head, body, and hands each use relatively small amounts of each of the seven colors, this pattern is a great way to use up leftover scraps from your stash. A single small skein or partial ball of each color is typically more than enough.
What size hook should I use for this amigurumi?
This pattern is written for a 2 mm crochet hook, which keeps stitches tight enough to hold the stuffing in and gives crisp, dense fabric for amigurumi.
Can I use safety eyes instead of black felt?
Yes, safety eyes are a great substitute if you prefer a more polished, permanent look, though felt gives the butterfly a softer, more handmade charm. Just be sure to attach safety eyes before stuffing the head fully, since you'll need access to the inside to secure the washers.
How long does this pattern take to finish?
Most crocheters can complete this butterfly amigurumi in about 4 to 6 hours, including the head, body, hands, color changes, and finishing details. It's a great weekend project that doesn't require multiple sittings to complete.
Is this pattern good for a first amigurumi project?
It's best suited for confident beginners or intermediate crocheters who already understand magic rings, increases, and basic color changes. If you're brand new to amigurumi, practicing a simpler single-color project first will make the color-change rounds here much easier.
Original pattern: https://onrecip.com/butterfly-free-amigurumi-pattern/
About the Author

Marisol QuinteroWho runs Crochet Obsessed, why a stitch count sits at the end of every round, how a pattern gets written here, and the things this site will never do.
More Patterns
- IntermediateNo. 01

Slouchy everyday beanie worked flat in half double crochet
Crochet beanie pattern for a slouchy everyday look worked flat with hdc rows, then seamed into a soft,…
- IntermediateNo. 02
Crochet amigurumi doll with dress, shoes, and hat
Crochet amigurumi doll pattern with dress, shoes, and hat details for a soft, huggable keepsake you build one…
- IntermediateNo. 03
Chunky moss stitch crochet sweater with raglan-free shoulders
Chunky crochet sweater pattern using moss stitch, worked flat with a 10mm hook for a soft, fast, cool-weather…


