- LevelIntermediate
- Time4-6 hours
- Hook4 mm
- YarnMedium (Worsted/4)
About This Pattern
There is something satisfying about a project that knows exactly what it is. This handle does not pretend to be a sweater or a blanket. It sets out to be one sturdy, good-looking strap, and it commits to that from the first chain to the last stitch of the border.
Your hands will spend most of this project alternating between plain single crochet and the raised loop stitch, so you get a nice rhythm of easy rows and focus rows. The fpdc work asks you to reach around the post of a stitch below instead of into the top, which takes a little getting used to but becomes automatic fast. Keeping tension even here matters more than speed.
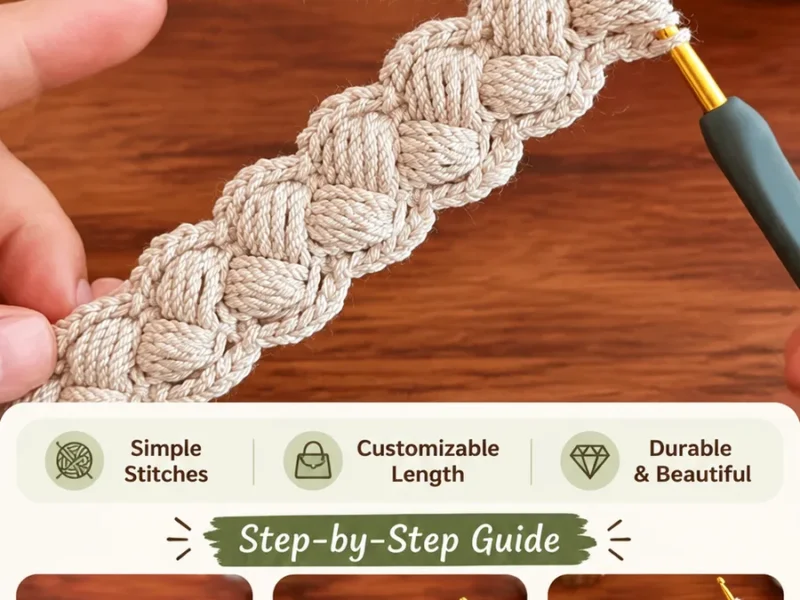
Once it is finished, this handle does not sit in a drawer. It gets attached to a tote or a shoulder bag and goes out the door with you, resting against a hand or a shoulder with that raised braided texture showing. It looks handmade in the best way, like something a friend would ask about.
This handle finishes at approximately 18 inches x 1.25 inches (46 x 3 cm), with a gauge of about 18 single crochet stitches by 20 rows measuring 4 inches (10 cm). The pattern is written in US crochet terms. A few notes to keep in mind: turning chains do not count as stitches, the handle is worked back and forth in rows, you can adjust the length by adding or removing repeat rows, and keeping your stitches firm throughout gives the strap the support it needs.
- Chain a short foundation row and work straightforward single crochet back and forth to set the strap width.
- Alternate plain single crochet rows with textured rows so the braided pattern stacks neatly up the length of the handle.
- Repeat the texture sequence as many times as needed to reach your desired strap length.
- Finish the long edges with a simple border round to smooth and reinforce the strap.
- Weave in the ends with a yarn needle and trim any stray tails with scissors.
- Shape the handle by hand and block it gently without stretching it while damp.
- Let it dry flat so the raised stitches hold their definition before attaching it to a bag.
On the desk
- Medium-weight cotton yarn, approximately 70 yards (64 meters)
- 4 mm (US G-6) crochet hook
- Yarn needle
- Scissors
- Stitch markers
Stitch shorthand
- ch — chain
- sc — single crochet
- sl st — slip stitch
- dc — double crochet
- fpdc — front post double crochet
- st — stitch
- rep — repeat
Braided texture crochet bag handle for beginners
Main Pattern
- Foundation Row
Ch 7.
- Row 1
Sc in 2nd ch from hook and across. Turn. (6 sc)
- Row 2
Ch 1, sc across. Turn. (6 sc)
- Row 3
Ch 1, sc in first 2 sts, fpdc around next st, dc in next st, fpdc around next st, sc in last st. Turn. (6 sts)
- Row 4
Ch 1, sc across. Turn. (6 sts)
- Row 5
Ch 1, sc in first st, fpdc around next st, dc in next st, fpdc around next st, sc in last 2 sts. Turn. (6 sts)
- Row 6
Ch 1, sc across. Turn. (6 sts)
- Repeat Rows 3-6
Repeat Rows 3 through 6: Repeat this four-row texture sequence until the handle measures approximately 17 inches (43 cm). End after a Row 6 repeat.
- Final Edge
Ch 1, work sc evenly around all four sides of the strap. Place 3 sc in each corner to prevent curling. Join with sl st to first sc.Cut yarn, secure the final loop, and weave in all ends.
Special Stitch Explanation
Raised Loop Stitch: Work 1 fpdc around the designated stitch from the previous row, then work 1 dc into the next stitch. These raised stitches create the braided texture.
Where it goes
- A replacement strap for a worn tote bag, sewn or crocheted directly onto the existing bag opening.
- A matching pair of handles for a crocheted shoulder bag, paired with a simple stockinette or single crochet bag body.
- A crossbody strap attached to a small purse, giving a plain fabric or leather bag a handmade focal point.
- A statement handle for a market bag, where the firm, raised texture holds up to being loaded with groceries.
Color ideas
- Natural and Neutral Work the entire main pattern, including the raised loop rows, in one undyed or ecru cotton, and use the same shade for the finishing border so the texture reads as the only design feature.
Care
After completing the handle, gently shape it with your hands and lightly block it if needed. Avoid stretching the strap while wet. Allow it to dry flat so the textured stitches remain defined.
Hand wash the finished handle in cool water with a mild detergent, since cotton holds up well to gentle washing but does not need frequent cleaning.
Lay it flat to air dry rather than using heat, which can shrink or weaken the cotton fibers over time.
Reshape the strap by hand while damp if the raised stitches flatten with use, then let it rest flat until fully dry.
Assembly
- Step 1 Position both ends of the handle evenly on the bag body. For crochet bags, sew each end securely using a yarn needle and several rows of whip stitches. For fabric bags, attach using strong hand stitching or reinforce the connection area before sewing.
- Step 2 For extra durability, create a small reinforcement square of crochet fabric and stitch it over each handle attachment point.
- Pro Tip If your handle stretches after attaching it to a bag, add a fabric strip or strong cord inside the handle before final assembly for additional support.
Easy to get wrong
Uneven Handle Edges
Uneven edges usually happen when stitches are missed at the beginning or end of rows. Count the 6 stitches after every row to maintain the correct width.
Loose Texture
If the raised stitches look too open, try a smaller hook size or use tighter tension. A firm handle will hold its shape better.
Twisted Strap
Lay the handle flat before sewing it onto the bag. Twisting the strap during assembly can affect the finished appearance.
Between the songs
- The pleasure here is in the contrast between flat and raised. Plain single crochet rows set up a calm, firm base, and then the fpdc-and-dc combination from the raised loop stitch pops up in the middle rows to build that woven, braided look. Working the front post stitches around the posts below, rather than into the usual top loops, is the one new skill this pattern teaches, and it pays off immediately in texture. Because the whole thing is worked lengthwise in rows, you can watch the braid stack and grow with every repeat. Finishing with a simple edging border means the piece ends up tidy on both sides, not just textured on top, so it feels like a complete, considered accessory rather than a swatch.
Listener questions
Can I make this handle longer than the pattern suggests
Yes, you can add or remove repeat rows to adjust the overall length. Just keep the sequence of plain and textured rows consistent so the braided pattern stays even.
Why does my fpdc look messy compared to the photos
This usually means the hook is going into the stitch instead of around the post. Slow down on the first few textured rows and double check you are wrapping the post itself.
What yarn works best besides cotton
A cotton or cotton-blend yarn is recommended because it keeps its shape and does not stretch out under the weight of a bag. A fiber with a lot of stretch will make the handle feel less supportive over time.
Does the handle need any extra reinforcement for heavier bags
Keeping your stitches firm throughout, as the pattern notes suggest, already builds in a lot of structure. If you want extra body, choose the firmer end of the suggested hook range rather than the looser one.
How do I attach the finished handle to my bag
Once the border is complete and the piece is shaped and dry, you can hand-sew it to the bag opening using a yarn needle. Position it evenly on both sides before stitching so the handle sits straight when worn.
How can I make the handle wider or narrower
Begin with 9 or 11 chains and increase the number of edge stitches for a wider handle, or start with 5 chains for a slimmer, narrow purse handle. For a longer shoulder strap, continue the texture repeat until you reach the desired length.
Original pattern: https://duniarecipe.com/easy-crochet-bag-handles-pattern-diy-bag-strap-tutorial-for-beginners/
About the Author

Marisol QuinteroWho runs Crochet Obsessed, why a stitch count sits at the end of every round, how a pattern gets written here, and the things this site will never do.
More Patterns
- IntermediateNo. 01

Rose Granny Square Tote Crochet Pattern
Rose granny square tote crochet pattern made from 18 dimensional rose squares for a sturdy, romantic everyday bag.
- IntermediateNo. 02
Tropical octopus baby blanket crochet pattern with appliqués
Tropical octopus baby blanket crochet pattern: a cream filet base with coral and turquoise octopus appliqués, leaves, and…
- IntermediateNo. 03
Sunny lemon couple amigurumi crochet pattern
Sunny lemon couple amigurumi crochet pattern with embroidered slices and safety eyes for a cheerful handmade shelf pair.


