- LevelIntermediate
- Time10-14 hours
- Hook6.0 mm
- YarnWorsted
About This Pattern
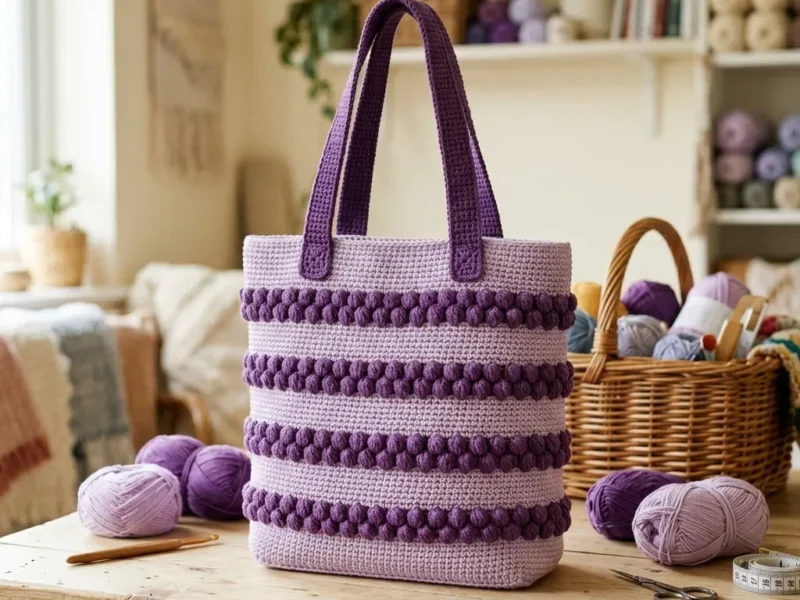
This tote has a calm, orderly feeling to it, like a rack of ribbon at the fabric store, lavender next to deep purple, row after row. There is nothing fussy about it. It is a bag built for real errands, with just enough texture to make it interesting on the shelf by your door.
Your hands get two very different jobs here. Long stretches of plain single crochet let your mind wander while the fabric grows fast, then the bobble rounds ask you to slow down and count your double crochets together. It is a nice rhythm, quick then careful, back and forth.
Picture this tote by the front door with keys tossed in the top, or slung over a chair at the farmers market with tomatoes poking out. The firm cotton fabric holds its shape even half empty. It looks like something you bought, not something you are still deciding whether to finish.
- Crochet a flat rectangle in rows to form the sturdy base your whole bag will stand on.
- Pick up stitches around that base and start working continuous rounds upward without turning.
- Work several plain single crochet rounds in the main lavender color to build height before any texture appears.
- Keep alternating bobble rounds with plain rounds, watching your color changes closely as they come up again and again.
- Finish the sides with a top border that neatens the opening edge of the bag.
- Make two matching handles worked flat, then finished around all four edges before attaching them to the bag.
- Weave in every yarn end in two directions, then wet block the whole bag and let it dry fully shaped.
On the desk
Yarn
- Yarn A (Main Color, Lavender): approximately 600 yards (550 m) of worsted weight cotton yarn
- Yarn B (Contrast Color, Deep Purple): approximately 250 yards (229 m) of worsted weight cotton yarn
- Lion Brand 24/7 Cotton in Lavender and Violet
- Paintbox Yarns Simply DK Cotton in Dusty Lilac and Pansy Purple
- WeCrochet Dishie in Clarity and Eggplant
- Cotton has less stretch than acrylic, which is actually perfect here. You want a firm fabric that holds its shape.
Hook
- US size J / 6.0 mm crochet hook
Additional Tools
- Stitch markers (at least 4, locking style preferred)
- Yarn needle for finishing
- Scissors
- Measuring tape
Stitch shorthand
- ch — chain
- sl st — slip stitch
- sc — single crochet (insert hook, yarn over, pull up a loop, yarn over, pull through both loops)
- dc — double crochet (yarn over, insert hook, pull up a loop, yarn over, pull through 2 loops, yarn over, pull through remaining 2 loops)
- bob — bobble stitch (see special instructions below)
- st/sts — stitch/stitches
- rnd — round
- BLO — back loop only
- yo — yarn over
- pm — place marker
Bobble stripe market tote crochet pattern with woven handles
The Base
The base is worked flat in rows to create your rectangular bottom.
With Yarn A and your J hook, chain 50.
- Round 1
Sc in 2nd ch from hook and in each ch across. Turn. (49 sc)
- Round 2
through 14: Ch 1, sc in each st across. Turn. (49 sc)
- Round 15
Ch 1, sc in each st across. Do not turn. (49 sc) You should have a rectangle measuring approximately 13 inches wide by 3.25 to 3.5 inches tall. Perfect!
The Sides
Here is where your tote really takes shape. You will work upward in continuous rounds, adding those gorgeous bobble stripes at specific intervals.
- Round 1
through 6 (Yarn A): Sc in each st around. (128 sc) Your bag sides should measure about 1.3 inches tall at this point.
- Round 7
Yarn B, First Bobble Round Change to Yarn B on the last yarn over of Round 6. Bob in each st around. (128 bob)
- Round 8
Yarn A Change to Yarn A. Sc in each st around, working into the top of each bobble. (128 sc)
- Round 9
Yarn B, Second Bobble Round Change to Yarn B. Bob in each st around. (128 bob)
- Round 10
through 15 (Yarn A): Sc in each st around. (128 sc) You have completed your first double bobble band! It should look chunky and textured.
- Round 16
Yarn B, Third Bobble Round Change to Yarn B. Bob in each st around. (128 bob)
- Round 17
Yarn A Sc in each st around. (128 sc)
- Round 18
Yarn B, Fourth Bobble Round Change to Yarn B. Bob in each st around. (128 bob)
- Round 19
through 24 (Yarn A): Sc in each st around. (128 sc) Two bobble bands done. You are doing great!
- Round 25
Yarn B, Fifth Bobble Round Change to Yarn B. Bob in each st around. (128 bob)
- Round 26
Yarn A Sc in each st around. (128 sc)
- Round 27
Yarn B, Sixth Bobble Round Change to Yarn B. Bob in each st around. (128 bob)
- Round 28
through 32 (Yarn A): Sc in each st around. (128 sc) All three bobble bands are complete. Your bag body should measure about 7 to 7.5 inches tall above the base.
Handles (Make 2)
With Yarn B, chain 81.
- Round 1
Sc in 2nd ch from hook and in each ch across. Turn. (80 sc)
- Round 2
through 5: Ch 1, sc BLO in each st across. Turn. (80 sc)
- Round 6
Ch 1, sc BLO in each st across. Do not turn. (80 sc) Work 1 round of sc evenly around all four edges to neaten: sc along the top edge, 6 sc along the short side, sc along the foundation chain, 6 sc along the other short side. Sl st to join. Cut yarn, leaving a 12 inch tail for sewing.
Each handle should measure approximately 21 inches long by 1 inch wide.
Top Border
- Round 33
through 35 (Yarn B): Sc in each st around. (128 sc)
- Round 36
Yarn B Sl st in each st around to finish the edge neatly. (128 sl st) Cut Yarn B, leaving a 6 inch tail. Weave in the end.
Handle Attachment
Center each handle over the front and back panels of your bag. Place the ends about 3 inches from the side edges. Each handle end should extend 2 inches below the top edge on the inside.
Using your yarn needle and Yarn B, whipstitch each handle end firmly to the inside of the bag. Sew a rectangle of stitches at each attachment point for maximum strength. This bag will carry weight, so secure those handles well!
Where it goes
- Weekly farmers market runs, where the firm cotton base holds produce without sagging or stretching out of shape.
- A dedicated project bag for yarn work, since the wide base fits skeins and a current crochet piece with room to spare.
- Library trips, where the tall sides and sturdy handles carry a stack of hardcovers without strain.
- An everyday carryall by the door, paired with denim and simple cotton separates for a low-key finished look.
Color ideas
- Classic lavender and eggplant Yarn A stays lavender for the base, plain single crochet rounds, and the top border, while Yarn B works every bobble round in a deep eggplant purple for high contrast.
- Tonal purple wash Use a lighter dusty lilac for Yarn A throughout the base and sides, then keep Yarn B in a mid-tone violet for the bobble rounds so the contrast stays soft rather than sharp.
Care
Hand wash the finished tote in cool water since it is worked entirely in cotton, which handles gentle washing well but can lose shape if agitated too roughly.
Squeeze out excess water without wringing, then roll the bag in a towel before laying it flat to air dry fully.
Store the empty tote flat or lightly stuffed rather than folded sharply, so the bobble stripes and squared base keep their crisp shape between uses.
Assembly
- Step 1 Weave in all your remaining yarn ends thoroughly. Work them in at least two directions so they stay put.
- Step 2 For blocking, submerge your finished tote in cool water. Gently squeeze out the excess without wringing. Roll it in a towel to remove more moisture. Shape the bag by hand, squaring the base and opening the top. Stuff loosely with plastic bags or towels to hold the shape while drying. Give it a full 24 to 48 hours.
- Step 3 Optional additions: You can insert a piece of plastic canvas cut to 13 by 5 inches in the bottom for extra structure. A fabric lining slip stitched to the inside top edge will protect your belongings and prevent stretching.
Easy to get wrong
Losing count during bobble rounds
Place a stitch marker at the start of each bobble round before you begin so you always know where the round starts and ends. Count your bobbles in small groups rather than all at once.
Skipping the gauge swatch
Chain 20 and work single crochet back and forth for 20 rows, then measure the center 4 inches before starting the bag. This one swatch determines whether your finished tote holds its shape once loaded.
Listener questions
Can I use a different cotton yarn than the ones suggested?
Yes, as long as it is a smooth, tightly spun worsted weight cotton or cotton blend. Fuzzy or loosely plied yarns will blur the bobble texture, so smoothness matters more than the exact brand.
Why does my bag feel floppy after the base rows?
Cotton has less stretch than acrylic, which actually helps here, but a floppy result usually means your gauge is too loose. Check your swatch against the 15 stitch by 18 row gauge over 4 inches and go down a hook size if needed.
How much yarn should I have left over for the handles?
Yarn B is used for both the bobble rounds and the handles, so keep this in mind when estimating your total yardage. The materials list allows for approximately 250 yards of Yarn B to cover both uses.
Do I need to block the tote before attaching the handles?
I recommend finishing all the pieces first, then blocking the whole assembled bag together. This lets the base, sides, and handles settle into their final shape as one unit during the 24 to 48 hour drying time.
What is the hardest part of this pattern for a first-time bobble maker?
Working five double crochets together without losing your place is the main challenge, especially early on. Once you get through the first bobble round, the rhythm becomes familiar and each following bobble round goes faster.
Original pattern: https://crochetwithmia.com/lavender-fields-floral-tote-free-crochet-pattern/
About the Author

Marisol QuinteroWho runs Crochet Obsessed, why a stitch count sits at the end of every round, how a pattern gets written here, and the things this site will never do.
More Patterns
- IntermediateNo. 01

Slouchy everyday beanie worked flat in half double crochet
Crochet beanie pattern for a slouchy everyday look worked flat with hdc rows, then seamed into a soft,…
- IntermediateNo. 02
Crochet amigurumi doll with dress, shoes, and hat
Crochet amigurumi doll pattern with dress, shoes, and hat details for a soft, huggable keepsake you build one…
- IntermediateNo. 03
Chunky moss stitch crochet sweater with raglan-free shoulders
Chunky crochet sweater pattern using moss stitch, worked flat with a 10mm hook for a soft, fast, cool-weather…


