- LevelIntermediate
- Time4-6 hours
- Hook2.25 mm
- YarnFingering
About This Pattern
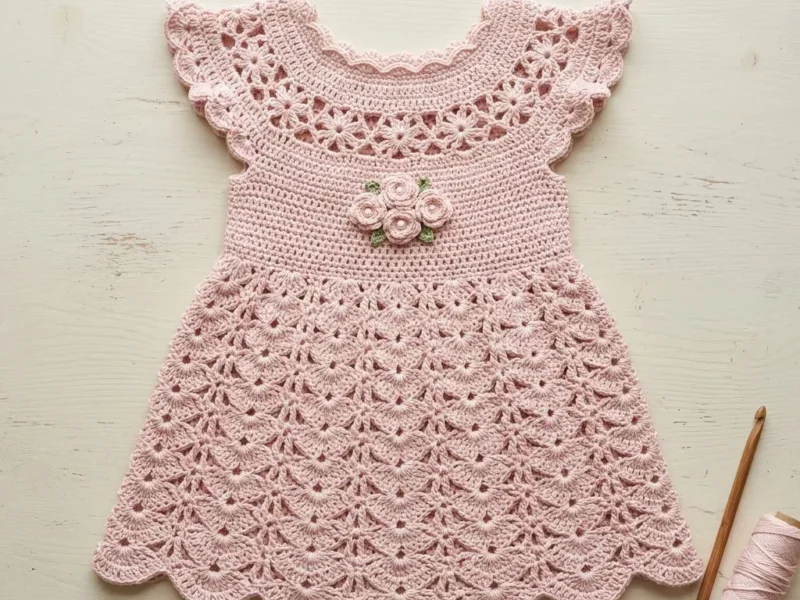
There is something quiet and a little hopeful about this one. Blush pink always reads soft to me, the kind of color that does not shout from the stroller. This dress sits in that gentle register the whole way through, lace openings and all.
Your hands will spend most of the time in small fingering weight stitches with a tiny B-1 or C-2 hook, so this is a slow, close-up kind of make. You will shift between dc and ch-2 spaces in the yoke, then pause to roll tiny roses and leaves separately. It rewards patience more than speed.
Finished, it is the kind of piece that looks lovely folded on a shelf before anyone has worn it. The lace yoke catches light at the collar, and the little roses give it a handmade, unmistakably gifted feel. It belongs in a nursery drawer or draped over a chair for photos.
- Start with a foundation chain that becomes the neckline edge and the opening for the back closure.
- Work the first yoke rows flat rather than joined, leaving a gap so the back opening forms naturally.
- Build the lace pattern through alternating rows of dc worked into ch-2 spaces and sc worked into dc clusters.
- Let the chain spaces widen gradually so the yoke fans out from neckline to bodice width.
- Once the yoke rounds are complete, the work joins and continues downward from the bodice.
- Set the yoke aside and roll the small roses and leaves separately from the same blush and green fiber.
- Stitch or tack the finished roses and leaves onto the yoke once the body of the dress is done.
- Wet block the piece flat so the lace rounds open up evenly before adding buttons or ribbon.
On the desk
- Option 1: Paintbox Yarns Cotton 4 Ply in Blush Pink (100% cotton, 186 yards per 50 g skein). Cotton gives excellent stitch definition for lace and is breathable for a baby. You will need approximately 2 to 3 skeins.
- Option 2: Scheepjes Catona 4 Ply in Powder Pink (100% mercerized cotton, 170 yards per 50 g ball). Mercerized cotton has a subtle sheen that enhances the lace motifs beautifully.
- Option 3: Drops Safran in Light Old Pink (70% cotton, 30% polyamide, 175 yards per 50 g ball). The polyamide content adds a gentle drape and softness ideal for baby skin.
Substitution Note
- Choose any fingering weight yarn with at least 170 yards per 50 g skein. Baby safe fiber content is recommended. Avoid yarns with added texture or boucle as these will obscure the lace pattern. Always swatch before beginning.
Yarn
- Approximately 400 to 450 yards of fingering weight yarn (CYCA weight 1) in blush pink. A small amount of the same yarn and a tiny bit of green fingering or sport weight yarn for the roses and leaves.
Hook
- US size B-1 (2.25 mm) or C-2 (2.75 mm) crochet hook. Use whichever hook achieves your gauge. The dress photographed uses a bamboo hook.
Notions
- Yarn needle for weaving ends
- Two small buttons approximately 0.4 inches (10 mm) diameter, or 12 inches of narrow ribbon
- Stitch markers, at least 4
- Small scissors
- Blocking board or flat surface
- Rust proof pins for blocking
- Spray bottle with water or a bowl for wet blocking
Stitch shorthand
- beg — beginning
- ch — chain (wrap yarn over hook and pull through loop on hook)
- ch-sp — chain space (the gap created by chains in previous row)
- dc — double crochet (yarn over, insert hook, pull up loop, yarn over and pull through 2 loops twice)
- hdc — half double crochet (yarn over, insert hook, pull up loop, yarn over and pull through all 3 loops)
- jo — join with a slip stitch
- mc — magic circle (adjustable ring to start rounds)
- pm — place marker
- rep — repeat
- rnd — round
- RS — right side
- sc — single crochet (insert hook, pull up loop, yarn over and pull through both loops)
- sc2tog — single crochet two together (decrease by working 2 stitches together)
- sk — skip
- sl st — slip stitch (insert hook, pull yarn through stitch and loop on hook)
- sp — space
- st(s) — stitch(es)
- tr — treble crochet (yarn over twice, insert hook, pull up loop, yarn over and pull through 2 loops three times)
- WS — wrong side
- yo — yarn over
Blush pink lacy baby dress with rose trim
Yoke
The neck opening is formed by a foundation chain; the back opening begins here. Foundation Chain: Ch 84. The chain should measure approximately 10 inches unstretched, giving a neck circumference appropriate for a 6 to 12 month baby.
We will work flat (in rows) for the yoke to create the back opening.
Checkpoint: After completing Round 8, the piece should measure approximately 3.5 inches in height from the foundation chain edge to the current row. The bottom of the yoke should be approximately 12 to 12.5 inches wide.
After the yoke rows are complete, the bottom edge becomes the armhole division row; we separate the front, back, and sleeve sections.
The total stitch count at the yoke base should be approximately 168 stitches. We normalize to 168 total stitches along the yoke base.
Division setup: the 168 stitches are divided as follows - Front bodice: 48 stitches; Right sleeve opening: 12 stitches each side; Left sleeve opening: 12 stitches; Back bodice: 48 stitches (split as 24 each side of back opening); Underarm chains: 6 chains each side to bridge front to back.
Total bodice circumference after joining = 48 (front) + 6 (chain) + 48 (back) + 6 (chain) = 108 stitches.
Flutter Sleeve Construction (Make 2): the flutter sleeves are formed by working additional lace rows along the sleeve edges, then finishin
- Round 1
(RS): Ch 84 (foundation chain). Sc in 2nd ch from hook. Sc in each ch across. Turn. (83 sc)
- Round 2
Ch 5 (counts as dc + ch 2). Sk first 2 sc. Dc in next sc. (Ch 2, sk 2 sc, dc in next sc) repeat across. Turn. (28 dc, 27 ch-2 spaces)
- Round 3
(RS): Ch 1. Sc in first dc. (4 dc in ch-2 space, sc in next dc) repeat across to last ch-2 space. 4 dc in last ch-2 space. Sc in 3rd ch of turning ch-5. Turn. (141 sts: 29 sc, 112 dc)
- Round 4
Ch 1. Sc in first sc. (Ch 3, sk 4 dc, sc in next sc) repeat across. Turn. (29 sc, 28 ch-3 spaces)
- Round 5
(RS): Ch 5. Dc in first ch-3 space. (Ch 2, dc in same space, ch 2, dc in next ch-3 space) rep across. End ch 2, dc in last sc. Turn. (58 dc, 57 ch-2 spaces)
- Round 6
Ch 1. Sc in first dc. (4 dc in next ch-2 space, sc in next dc) rep across. Turn. (286 sts: 58 sc, 228 dc)
- Round 7
Ch 1. Sc in first sc. (Ch 3, sk 4 dc, sc in sc) rep across. Turn. (58 sc, 57 ch-3 spaces)
- Round 8(229)
RS, final yoke lace row before division Ch 3 (counts as dc). 3 dc in first ch-3 space. (Sc in next sc, 3 dc in next ch-3 sp) rep across. Sc in last sc. Turn. (229 sts approx)
Where it goes
- A baby shower gift that photographs well laid flat, paired with a simple cotton bonnet or booties in the same blush tone.
- A christening-alternative dress-up piece for portrait sessions, paired with a plain cream blanket as backdrop.
- A nursery keepsake displayed on a small hanger or padded frame alongside the matching roses as a swatch.
- An everyday soft dress for warm weather wear, paired with plain cotton leggings so the lace yoke stays the focus.
Color ideas
- Classic blush and leaf Work the entire yoke and body in blush pink, then roll the roses in the same blush pink and the leaves in the small amount of green fingering yarn.
- Powder pink with deeper rose accent Use a powder pink for the yoke and body rounds, then work just the rosebuds in a slightly deeper pink from your stash and keep the leaves green for contrast.
Care
Hand wash in cool water with a mild detergent, since the cotton and blended options in this pattern hold their shape best without a machine cycle.
Lay the dress flat on a towel to dry, easing the lace yoke back into its blocked shape while it is still damp.
Store folded flat rather than hung, so the ch-2 lace spaces in the yoke do not stretch out of shape over time.
Assembly
- Step 1 Back Opening Closure: Choose one of these options: Button Closure: Sew two small buttons (approximately 0.4 inches diameter) along one side of the back opening. Use the natural lace holes on the opposite side as buttonholes. Ribbon Closure: Thread 12 inches of narrow ribbon through the lace at the neckline and tie in a bow.
- Step 2 Attaching Roses and Leaves: Position 3 roses at the center front of the bodice, just below where the yoke meets the bodice section. Arrange 4 leaves behind and around the roses. Use your yarn needle and matching yarn tails to secure each piece with small stitches on the wrong side.
- Step 3 Blocking: Wet block your finished dress for best results. Soak in lukewarm water for 15 minutes. Gently squeeze out excess water without wringing. Lay flat on your blocking board and pin to measurements. Allow to dry completely before removing pins. Blocking opens up the lace motifs dramatically and gives your dress that professional, heirloom quality look.
Easy to get wrong
Losing the back opening gap
Place a stitch marker at the point where you stop turning each yoke row so you remember to leave those last stitches unworked. Check the gap against the opening width before moving past round 8.
Miscounting ch-2 spaces in lace rounds
Place a marker every few repeats across round 2 and round 5 so you can recount quickly if the dc total looks off. Pulling markers along as you go saves a full re-count later.
Roses pulling the yoke out of shape
Wet block the yoke flat before attaching any roses or leaves so the lace spaces are already set. Tack the trim on after blocking rather than before, so stitching tension does not flatten the lace.
Between the songs
- What I love here is the lace yoke doing double duty: it shapes the neckline and sets up the fullness below in one continuous sequence of dc and ch-2 spaces. Watching those open rounds build from a plain foundation chain feels like the dress deciding its own silhouette. The separate rosebuds and leaves, worked in that same fine fiber plus a touch of green, let you treat trim as its own small project rather than an afterthought. And because the back opening is built into the yoke rows instead of added later, you get a tidy closure without any extra seaming. It is fussy in the best way, the kind of fussy that teaches your hands new lace rhythm.
Listener questions
Which yarn option should I pick for my first try?
Any of the three listed fingering weight options will work since they are all close in yardage and weight. I would reach for the mercerized cotton option if you want the stitch definition in the lace yoke to show up clearly.
Why does the yoke start in rows instead of joined rounds?
Working the first rounds flat rather than joined is what creates the back opening at the center. Once those rows are complete the piece joins and continues as true rounds.
Do I need buttons or can I use ribbon instead?
The materials list gives you both options, so either two small buttons or a length of narrow ribbon will close the back opening. Pick whichever sits better against the lace yoke to your eye.
When do I make the roses and leaves?
The roses and leaves are worked separately from the main yoke and body using the small amounts of blush and green yarn set aside for them. I like to make them once the body is finished so I can judge placement against the finished piece.
How do I know my yoke tension is on track?
Check your piece against the height and width checkpoint given after round 8 before continuing to the bodice. If your measurements run noticeably off, adjust hook size slightly rather than fighting your natural tension.
Original pattern: https://crochr.com/blush-pink-lacy-baby-dress-free-crochet-pattern/
About the Author

Marisol QuinteroWho runs Crochet Obsessed, why a stitch count sits at the end of every round, how a pattern gets written here, and the things this site will never do.
More Patterns
- IntermediateNo. 01

Rose Granny Square Tote Crochet Pattern
Rose granny square tote crochet pattern made from 18 dimensional rose squares for a sturdy, romantic everyday bag.
- IntermediateNo. 02
Tropical octopus baby blanket crochet pattern with appliqués
Tropical octopus baby blanket crochet pattern: a cream filet base with coral and turquoise octopus appliqués, leaves, and…
- IntermediateNo. 03
Sunny lemon couple amigurumi crochet pattern
Sunny lemon couple amigurumi crochet pattern with embroidered slices and safety eyes for a cheerful handmade shelf pair.


