- LevelIntermediate
- Time9-13 hours
- Hook4.00 mm
- YarnDK
About This Pattern
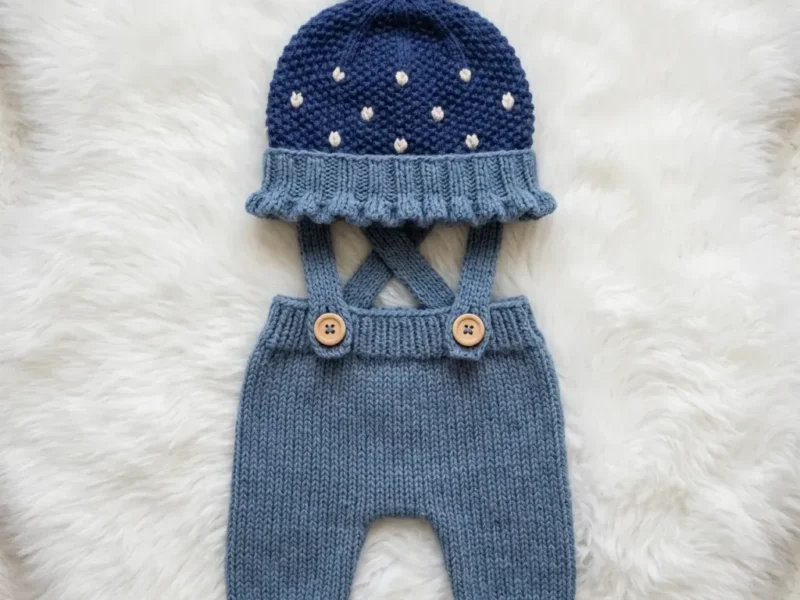
There's something about this set that feels like the first cool morning of fall, the kind where you want to wrap a baby in something a little whimsical. The navy dome and scattered white seeds do all the talking here. You don't need a loud color story when the shape itself is the punchline.
Picture this folded on a changing table shelf, hat nested into the waistband of the pants, waiting for its first wear. The wavy steel blue brim catches light differently than the flat navy body. It reads as handmade in the best way, the kind of thing a visitor picks up and asks where you found it.
- Start the hat crown with a magic ring and increase steadily until the dome reaches its full width.
- Transition from Yarn A to Yarn B, then swap hooks to crochet the wavy ruffle brim.
- Make three small leaves separately and sew them in a fan shape to the center of the crown.
- Work each pants leg flat, starting with a ribbed ankle cuff before moving into the leg tube.
- Seam the two finished legs together and crochet a ribbed waistband to join them.
- Crochet two suspender straps and attach them crossed at the back with wooden buttons in front.
- Finish by stitching French knots across the hat dome, then block both pieces to set their shape.
On the desk
Yarn
- Yarn A (Navy Blue): approximately 80 yards (73 meters) of DK weight yarn
- Yarn B (Steel Blue/Slate Blue): approximately 150 yards (137 meters) of DK weight yarn
- Yarn C (Sage Green): approximately 15 yards (14 meters) of DK weight yarn
- Yarn D (White or Cream): small amount, approximately 5 yards (4.5 meters) for French knot embellishments
Hooks
- US size G-6 / 4.00 mm hook for main fabric
- US size E-4 / 3.50 mm hook for ruffle and ribbing
Notions
- 2 wooden or natural finish buttons, approximately 0.75 inch (18 to 20 mm) diameter
- Yarn needle or tapestry needle
- At least 4 stitch markers
- Scissors
- Embroidery needle for French knots
- Measuring tape
Yarn suggestions
- Paintbox Yarns Simply DK works beautifully for this project with excellent stitch definition. Lion Brand Pound of Love is another great option, especially if you want something super soft against newborn skin. For warmer climates, try Paintbox Yarns Cotton DK, but definitely swatch first since cotton has less stretch than acrylic.
- Avoid fuzzy or loosely spun yarns here. They’ll hide that lovely moss stitch texture you’re working so hard to create.
Stitch shorthand
- ch — chain, the foundation stitch created by pulling yarn through a loop
- sl st — slip stitch, insert hook, yarn over, pull through both loops at once
- sc — single crochet, insert hook, yarn over, pull up a loop, yarn over, pull through both loops
- dc — double crochet, yarn over, insert hook, yarn over, pull up a loop, yarn over, pull through two loops, yarn over, pull through remaining two loops
- hdc — half double crochet, yarn over, insert hook, yarn over, pull up a loop, yarn over, pull through all three loops
- sc2tog — single crochet two together (a decrease), insert hook in first stitch, pull up a loop, insert hook in next stitch, pull up a loop, yarn over, pull through all three loops
- BLO — back loop only, working into just the back loop of the stitch creates a ribbed texture
- FLO — front loop only
- MR — magic ring, an adjustable starting ring that closes tightly
- st(s) — stitch(es)
- rnd(s) — round(s)
- RS — right side
- WS — wrong side
- sk — skip
- sp — space
- ch-sp — chain space
- rep — repeat
Blueberry Baby Hat and Pants Crochet Set
Crown (Yarn A, US G-6 / 4.00 mm hook)
Begin with a magic ring.
- Round 1
Ch 1 (does not count as stitch), work 6 sc into magic ring, join with sl st to first sc. Pull ring closed. (6 sc)
- Round 2
Ch 1, 2 sc in each st around, join. (12 sc)
- Round 3
Ch 1, [sc in next st, 2 sc in next st] 6 times, join. (18 sc)
- Round 4
Ch 1, [sc in next 2 sts, 2 sc in next st] 6 times, join. (24 sc)
- Round 5
Ch 1, [sc in next 3 sts, 2 sc in next st] 6 times, join. (30 sc)
- Round 6
Ch 1, [sc in next 4 sts, 2 sc in next st] 6 times, join. (36 sc)
- Round 7
Ch 1, [sc in next 5 sts, 2 sc in next st] 6 times, join. (42 sc)
- Round 8
Ch 1, [sc in next 6 sts, 2 sc in next st] 6 times, join. (48 sc)
- Round 9
Ch 1, [sc in next 7 sts, 2 sc in next st] 6 times, join. (54 sc)
- Round 10
Ch 1, [sc in next 8 sts, 2 sc in next st] 6 times, join. (60 sc) Checkpoint: After Rnd 10, your flat circle should measure approximately 4.25 inches (10.75 cm) in diameter. Check your gauge before continuing.
Leaf Cluster (Yarn C, US E-4 / 3.50 mm hook)
Make 3 leaves separately and attach all three to the crown center.
For each leaf: Foundation: Ch 6.
- Round 1
Sl st in 2nd ch from hook (leaf tip), sc in next ch, hdc in next ch, dc in next ch, (dc, ch 2, sl st) in last ch (leaf base with stem nub). Do not fasten off after last leaf. Leave an 8 inch (20 cm) tail for sewing.Pinch each leaf gently to give a slight curl. Arrange the 3 leaves in a fan formation at the crown of the hat. Thread a tapestry needle with the tail and sew each leaf securely to the center of the magic ring on the right side. The leaves should fan outward to resemble the calyx of a blueberry.
Pants Leg (Make 2, Yarn B, US G-6 / 4.00 mm hook)
Ankle Cuff: Foundation: Ch 24.
- Round 1
(RS): Sc in 2nd ch from hook and in each ch across, turn. (23 sc)
- Round 2
through 6: Ch 1, sc in BLO of each st across, turn. (23 sc each row) Working in back loop only for these 6 rows creates that lovely ribbed ankle cuff effect.
- Round 7
Ch 1, sc in both loops of each st across, turn. (23 sc)
Leg Tube:
- Round 8(23)
through 14: Ch 1, sc in each st across, turn. (23 sc each row)
- Round 15
Ch 1, 2 sc in first st, sc to last st, 2 sc in last st, turn. (25 sc)
- Round 16(25)
through 20: Ch 1, sc in each st across, turn. (25 sc each row)
- Round 21
Ch 1, 2 sc in first st, sc to last st, 2 sc in last st, turn. (27 sc)
- Round 22(27)
through 26: Ch 1, sc in each st across, turn. (27 sc each row)
- Round 27
Ch 1, 2 sc in first st, sc to last st, 2 sc in last st, turn. (29 sc)
- Round 28(29)
through 32: Ch 1, sc in each st across, turn. (29 sc each row)
- Round 33
Ch 1, 2 sc in first st, sc to last st, 2 sc in last st, turn. (31 sc)
- Round 34
through 38: Ch 1, sc in each st across, turn. (31 sc each row) Fasten off, leaving a 12 inch (30 cm) tail for seaming.
Checkpoint: Each completed leg panel should measure approximately 6 inches (15 cm) wide at the top and approximately 4.75 inches (12 cm) wide at the ankle cuff. Total height should be approximately 8.5 inches (21.5 cm).
Waistband (Yarn B, US E-4 / 3.50 mm hook, worked in the round)
Join Yarn B to any stitch at the top edge of the joined pants.
- Round 1
Ch 1, sc evenly around the entire top opening, picking up approximately 62 sts, join. (62 sc)
- Round 2
through 6: Ch 1, sc in BLO of each st around, join. (62 sc each round) Fasten off. Weave in ends.Working 6 rounds in BLO creates that stretchy ribbed waistband. It will measure approximately 1.25 inches (3 cm) in height.
Suspender Straps (Make 2, Yarn B, US G-6 / 4.00 mm hook)
Foundation: Ch 5.
- Round 1
Sc in 2nd ch from hook and in each ch across, turn. (4 sc)
- Round 2
through 46: Ch 1, sc in each st across, turn. (4 sc each row) Each strap should measure approximately 9 inches (23 cm) in length.Button Loop: After Row 46, do not fasten off. Instead, ch 4, sl st into the same stitch to form a small button loop. Fasten off and weave in ends.
Hat Body in Moss Stitch (Yarn A, US G-6 / 4.00 mm hook)
Now we transition from plain single crochet to that beautiful textured moss stitch. Your 60 stitch count divides evenly for this pattern.
- Round 11
Ch 1, [sc in next st, ch 1, sk next st] 30 times, join to first sc. (30 sc and 30 ch-1 sps = 60 stitch positions)
- Round 12
Sl st into first ch-1 sp, ch 1, [sc in ch-1 sp, ch 1, sk sc] around, join to first sc. (30 sc and 30 ch-1 sps = 60 stitch positions)
- Round 13
through 20: Rep Rnd 12. Continue working sc into each ch-1 sp and ch 1 over each sc, joining each round. (30 sc and 30 ch-1 sps = 60 stitch positions each round)Place a stitch marker at the beginning of each round to keep track. Don’t turn between rounds when working moss stitch in the round.
Checkpoint: After Rnd 20, the hat body from the crown base to the current edge should measure approximately 3.5 to 4 inches (9 to 10 cm).
Brim Transition (Yarn A to Yarn B)
- Round 21
With Yarn A, sl st into first ch-1 sp, ch 1, sc in each ch-1 sp and each sc around, join. Fasten off Yarn A. (60 sc)This round converts the moss stitch back to plain single crochet to prepare for the ruffle.
Ruffle Brim (Yarn B, switch to US E-4 / 3.50 mm hook)
- Round 22
Join Yarn B to any st, ch 1, 2 sc in each st around, join. (120 sc) Doubling the stitch count is what creates that gathered ruffle effect. It’s like magic watching it bloom.
- Round 23
Ch 3 (counts as first dc), 2 dc in same st, [3 dc in next st] around, join to top of ch-3. (360 dc)Fasten off Yarn B. Weave in ends.
Checkpoint: The completed hat including ruffle brim should measure approximately 5.5 inches (14 cm) from crown to brim edge. The ruffle should lie in pretty waves around the hat opening.
Moss Stitch (Also Called Linen Stitch)
This stitch creates that gorgeous dense, seed-like texture that makes the blueberry hat look so realistic. It works over an even number of stitches.
- Round 1
How to work it in the round: 1. Single crochet (sc) in the first stitch 2. Chain 1 (ch 1)
- Round 2
3. Skip the next stitch 4. Single crochet in the following stitch 5. Chain 1 6. Skip the next stitch 7. Repeat steps 4 through 6 around
- Round 3
When working subsequent rounds, you’ll work your single crochets into the chain-1 spaces of the previous round, not into the skipped stitches. The chain-1 spaces count as stitches for counting purposes.
French Knot (Surface Embroidery)
This creates those adorable white dots scattered across the berry.
1. Thread your tapestry needle with Yarn D 2. Insert needle from wrong side to right side at the desired dot location 3. Wrap the yarn around the needle twice (or three times for a larger knot)
4. Insert needle back into the fabric as close to the exit point as possible without going back through the same hole
5. Pull the needle through to the wrong side while holding the wrapped loops against the fabric with your thumb 6. The wraps form a raised dot on the right side
7. Secure on wrong side with a small knot
Don’t stress if your first few French knots look a bit wonky. They take practice, and the scattered, organic look actually works in your favor here.
Adding the French Knot Dots
Using Yarn D and a tapestry needle, add French knot dots scattered across the navy dome of the hat body (Rnds 11 through 20). Place approximately 15 to 18 dots evenly but organically scattered. Avoid the brim transition and ruffle.
Space them approximately 0.75 to 1 inch (2 to 2.5 cm) apart in a scattered pattern. Larger dots can be achieved with 3 wraps. Standard dots use 2 wraps. Secure each knot on the wrong side and weave in all ends.
Your hat is complete!
Seaming the Legs
Fold each leg panel with right sides together so the long edges align. Using the yarn tail and a tapestry needle, seam the inseam using whipstitch or mattress stitch, picking up matching rows on each edge. The inseam runs the full length from ankle to the top. Leave the top edge open for the waistband.
Turn each leg right side out.
Attaching the Straps
1. Lay the pants flat with the front facing you
2. Position the two button loops at the front waistband, spaced approximately 2.5 inches (6.5 cm) apart 3. Sew the button loop end of each strap to the outside top of the front waistband ribbing
4. Cross the straps at the back so the right strap crosses over the left strap, forming an X
5. Sew the opposite ends of each strap to the back waistband, placing each attachment point approximately 2.5 inches (6.5 cm) from center back
6. Sew buttons to the front waistband directly beneath each button loop using a doubled length of Yarn B
Where it goes
- A coming-home outfit for a newborn photo session, paired with a simple white onesie underneath.
- A nursery shelf display piece, folded next to a basket of burp cloths and swaddles.
- A baby shower gift set, wrapped together so the hat and pants read as one coordinated outfit.
- A everyday cool-weather layer for stroller walks, worn over a long-sleeve bodysuit.
Color ideas
- Classic Blueberry Navy Blue on the crown and hat body, white French knots scattered across the dome, sage green for the leaf cluster, and steel blue for the ruffle brim, pants legs, waistband, and suspender straps.
- Monochrome Berry Use a single deep navy for the crown, hat body, pants legs, and waistband, keep the leaf cluster in sage green for contrast, and drop the ruffle brim to a lighter slate blue so the brim still stands apart from the dome.
Care
Hand wash in cool water with a small amount of wool wash, since this set is worked in DK weight acrylic or cotton yarn depending on what you chose.
Lay flat on a towel to dry rather than hanging, and slip a balloon or small ball into the hat to help the dome hold its shape while it dries.
Store folded flat in a drawer away from direct sun, and reshape the ruffle brim gently with your fingers after storage if it has flattened.
Assembly
- Step 1 Wet blocking makes a real difference with this set. Soak both finished pieces in cool water with a small amount of wool wash for 15 minutes. Gently press out excess water without wringing. Lay flat on a clean towel or blocking mat and shape to the finished dimensions.
- Step 2 For the hat, insert a balloon or small ball to help it hold its dome shape while drying. Allow to dry completely before wearing or photographing.
- Step 3 After blocking, review all French knots and tighten any that may have loosened. Secure on the wrong side if needed.
Easy to get wrong
Losing the moss stitch pattern mid-round
Place a stitch marker at the start of each round so you can confirm which stitch comes next instead of guessing after a break.
French knots that loosen after blocking
Wrap the embroidery needle twice and pull the working yarn through slowly, then check every knot after blocking and tighten any that look loose before calling the hat finished.
Ankle cuff rows losing their ribbed look
Work consistently in the back loop only for all six cuff rows, since mixing in a full stitch even once flattens the ribbing effect.
Between the songs
- The real satisfaction is in the moss stitch body of the hat, that alternating texture that gives the navy yarn actual depth instead of flat single crochet. Adding the French knots afterward is almost meditative, dotting white seeds across the dome until it reads unmistakably as a blueberry. The three-leaf cluster sewn to the crown gives you a little sculptural payoff for a small amount of yarn and time. On the pants, working the ankle cuffs in back loop only creates ribbing without any special stitch, and seaming the two legs together before joining the waistband is the moment the whole piece starts to look like something a baby will actually wear.
Listener questions
Can I make the hat without the leaf cluster?
Yes, the hat still reads as a blueberry with just the moss stitch dome, French knots, and ruffle brim. The leaf cluster is a quick addition but not essential to the overall look.
Do I need two different hook sizes?
Yes, the pattern calls for a US G-6 for the main fabric and a US E-4 for the ruffle brim and ribbing. The smaller hook keeps those sections snug against the larger stitches around them.
What if my gauge doesn't match exactly?
Since this is a newborn-sized set, swatching first really does matter here. If your moss stitch or single crochet swatch comes up different from the 18 stitches and 20 rows over 4 inches given, adjust your hook size until it matches.
How do the suspender straps attach to the pants?
The straps are made separately and then attached in a crossed position at the back, fastening in front with the two wooden buttons. This gives the pants that classic overall-style closure.
Why block the pieces before adding French knots?
I actually suggest reviewing the French knots after blocking, since the wet blocking process can loosen embroidery slightly. Tightening them at the end keeps the seeds looking crisp in the finished photos.
Original pattern: https://crochr.com/blueberry-baby-hat-and-pants-set-free-crochet-pattern/
About the Author

Marisol QuinteroWho runs Crochet Obsessed, why a stitch count sits at the end of every round, how a pattern gets written here, and the things this site will never do.
More Patterns
- IntermediateNo. 01

Rose Granny Square Tote Crochet Pattern
Rose granny square tote crochet pattern made from 18 dimensional rose squares for a sturdy, romantic everyday bag.
- IntermediateNo. 02
Tropical octopus baby blanket crochet pattern with appliqués
Tropical octopus baby blanket crochet pattern: a cream filet base with coral and turquoise octopus appliqués, leaves, and…
- IntermediateNo. 03
Sunny lemon couple amigurumi crochet pattern
Sunny lemon couple amigurumi crochet pattern with embroidered slices and safety eyes for a cheerful handmade shelf pair.


