- LevelIntermediate
- Time5-7 hours per piece
- Hook6 mm
- YarnWorsted
About This Pattern
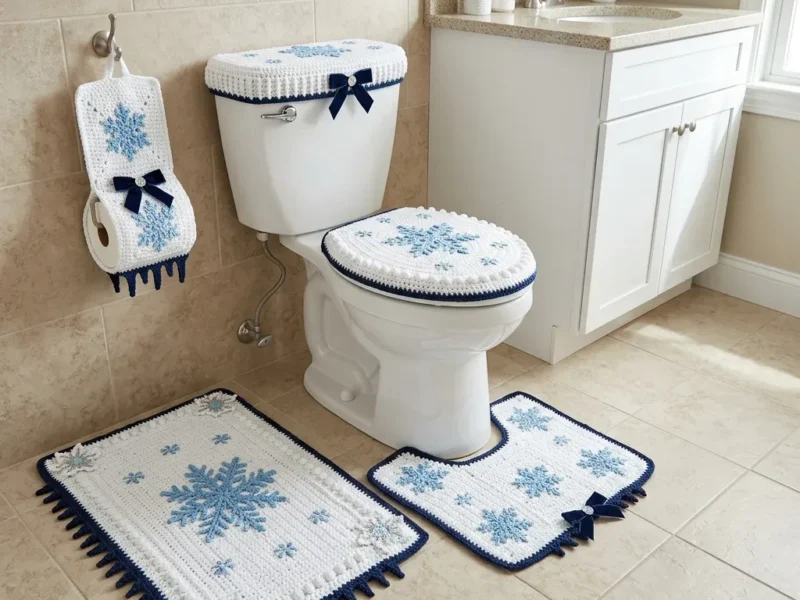
This set has that crisp, quiet feeling of a snowy morning before anyone else is awake. White fabric, navy edges, and little sky blue snowflakes scattered across the surface like they drifted there on their own. It is a cozy project with a clean, almost architectural payoff.
Your hands will spend most of their time in two modes: building ovals from a chain foundation and laying slip stitches on top of finished fabric. You will join new colors cleanly at seams, work continuous rounds without a join point, and fold a simple rectangle into a tidy pocket. None of it is hard, but all of it rewards patience.
Picture it finished: a toilet lid cover and tank lid cover in matching white with navy trim, a contour rug hugging the base, a rectangular bath mat nearby, and a toilet paper holder with its own small snowflake. The whole room suddenly looks intentional instead of thrown together.
- Start the lid covers by chaining a foundation and working continuous oval rounds with increases at both ends.
- Add a side gusset strip worked flat in rows to match the perimeter of each oval.
- Seam the gusset to the top oval, then work a contrast border around the joined edge.
- Shape the toilet lid cover's U-shaped cutout before finishing its border.
- Work the contour rug and rectangular bath mat flat in rows, then add their borders and bobble edging.
- Fold and seam the rectangle for the toilet paper holder into a simple pocket shape.
- Add surface slip stitch snowflakes in sky blue across each finished piece.
- Finish with bow and brad attachments where the pattern calls for them, then weave in every end.
On the desk
- Main Color (MC): White, approximately 1,200 yards (1,097 m) of worsted weight yarn (CYCA #4)
- Contrast Color A (CA): Navy, approximately 300 yards (274 m) of worsted weight yarn (CYCA #4)
- Contrast Color B (CB): Sky Blue, approximately 150 yards (137 m) of worsted weight yarn (CYCA #4), used for surface embroidery only
- Option 1: Lion Brand Pound of Love (100% acrylic, 1,020 yards per 16 oz skein) in White (MC) and Navy (CA). Purchase 2 skeins white, 1 skein navy. For sky blue, use Lion Brand Vanna’s Choice in Colonial Blue or Baby Blue.
- Option 2: Red Heart Super Saver (100% acrylic, 364 yards per 7 oz skein) in White (MC) and Soft Navy (CA). Purchase 4 skeins white, 1 skein navy. For sky blue, use Red Heart Super Saver in Soft Teal or Pale Blue.
- Option 3: Caron Simply Soft (100% acrylic, 315 yards per 6 oz skein) in White (MC) and Navy (CA). Purchase 4 skeins white, 1 skein navy. For sky blue, use Caron Simply Soft in Soft Blue.
- Choose a smooth, washable worsted weight yarn with good stitch definition. Avoid fluffy or textured yarns as they will obscure the snowflake surface detail.
- US Size J-10 (6 mm) for main fabric
- US Size I-9 (5.5 mm) for border rounds if border feels loose
- Stitch markers, at least 6
- Yarn needle for weaving and embroidery
- Scissors
- Measuring tape
- 5 rhinestone brads or shank buttons, approximately 12 mm
- Sewing needle and matching thread for attaching bows and brads
- Poly-fill fiberfill or foam cut-to-fit, approximately 0.5 in (1.3 cm) thick, for toilet lid cover and tank lid cover (optional but shown in finished set)
- Safety pins or locking stitch markers for seaming
Stitch shorthand
- beg — beginning
- BLO — back loop only
- ch — chain
- ch-sp — chain space
- cont — continue
- CB — sky blue yarn (contrast color B)
- CA — navy yarn (contrast color A)
- dec — decrease
- hdc — half double crochet (yarn over, insert hook, pull up loop, yarn over, draw through all 3 loops)
- inc — increase (2 sc in same stitch)
- MC — main color (white)
- pm — place marker
- rem — remaining
- rep — repeat
- rnd — round
- RS — right side
- sc — single crochet (insert hook, pull up loop, yarn over, draw through both loops)
- sc2tog — single crochet two together (decrease): insert hook in next st, pull up loop, insert hook in following st, pull up loop, yarn over, draw through all 3 loops on hook. (1 st decreased)
- sk — skip
- sl st — slip stitch (insert hook, pull up loop, draw directly through loop on hook)
- sm — slip marker
- sp — space
- ss — surface slip stitch (see Special Stitches)
- st(s) — stitch(es)
- t-ch — turning chain
- WS — wrong side
- yo — yarn over
Snowflake bathroom set: lid covers, rugs and holder
Top Oval
Foundation: With MC and J-10 hook, ch 22.
Step by step: Join CA with standing sc.
- Round 1
Starting in the 2nd ch from hook, sc 20 across to last ch. Work 3 sc in last ch (corner). Rotate work. Sc 19 back along the opposite side of the foundation chain. Work 2 sc in the first ch (same ch where you began). Do not join. Place marker. (44 sc)Ch 1, turn. Sc across. (90 sc) Rep Row 2 until piece measures 30 in (76 cm) from foundation edge. This is approximately 150 rows at gauge.
- Round 2
Sc 20. Inc in next 2 sts. Sc 19. Inc in next 2 sts. Pm. (48 sc)
- Round 3
Sc 20. Inc in next st. Sc 1. Inc in next st. Sc 19. Inc in next st. Sc 1. Inc in next st. (52 sc)
- Round 4
Sc 20. Inc in next st. Sc 3. Inc in next st. Sc 19. Inc in next st. Sc 3. Inc in next st. (56 sc)
- Round 5
Sc 20. Inc in next st. Sc 5. Inc in next st. Sc 19. Inc in next st. Sc 5. Inc in next st. (60 sc)
- Round 6
Sc 20. Inc in next st. Sc 7. Inc in next st. Sc 19. Inc in next st. Sc 7. Inc in next st. (64 sc)
- Round 7
Sc 20. Inc in next st. Sc 9. Inc in next st. Sc 19. Inc in next st. Sc 9. Inc in next st. (68 sc)
- Round 8
Sc 20. Inc in next st. Sc 11. Inc in next st. Sc 19. Inc in next st. Sc 11. Inc in next st. (72 sc)Sl st in each st around. Fasten off. Checkpoint: Tank lid cover should measure approximately 7 in wide by 19 in long (18 cm by 48 cm).
- Round 9
Sc 20. Inc in next st. Sc 13. Inc in next st. Sc 19. Inc in next st. Sc 13. Inc in next st. (76 sc)
- Round 10
Sc around, no increases. (76 sc) Fasten off. This is the TOP oval panel. Set aside. Make a second identical oval for the BOTTOM panel.
Checkpoint: Each oval should measure approximately 14 in wide by 17 in long (35.5 cm by 43 cm).
Side Gusset
With MC and J-10 hook, ch 8.
- Round 1
Sc in 2nd ch from hook, sc across. (7 sc)
- Round 2
Ch 1, turn. Sc across. (7 sc) Rep Row 2 until gusset strip measures the full perimeter of the oval (approximately 52 in / 132 cm). Fasten off.
Lid Cover Border
Join CA at the back seam with a standing sc.
- Round 1
Sc around entire outer edge of the assembled cover. (Approximately 76 sc)
- Round 2
Sl st in each sc around. Fasten off.
Main Pattern
- Round 1
Starting in 2nd ch from hook, sc 36 across. Work 3 sc in last ch. Rotate. Sc 35 back. Work 2 sc in first ch. Pm. (76 sc)
- Round 2
Sc 36. Inc in next st. Sc 1. Inc in next st. Sc 35. Inc in next st. Sc 1. Inc in next st. (80 sc)
- Round 3
Sc 36. Inc in next st. Sc 3. Inc in next st. Sc 35. Inc in next st. Sc 3. Inc in next st. (84 sc)
- Round 4
Sc 36. Inc in next st. Sc 5. Inc in next st. Sc 35. Inc in next st. Sc 5. Inc in next st. (88 sc)
- Round 5
Sc 36. Inc in next st. Sc 7. Inc in next st. Sc 35. Inc in next st. Sc 7. Inc in next st. (92 sc)
- Round 6
Sc around, no increases. (92 sc)
- Round 7
Sc around. (92 sc)
- Round 8
Sc around. (92 sc)
Left Arm
- Round 1
of Left Arm: With MC, attach yarn at the left outer corner of the last row. Ch 1. Sc 30 across the left 30 sts. (30 sc)
- Round 2
through 12 of Left Arm: Ch 1, turn. Sc 30 across. (30 sc each row) Work 11 more rows (12 rows total on arm), measuring approximately 2.5 in (6 cm).
Right Arm
With MC, attach yarn at stitch 61 (the first stitch of the right arm, right of center cutout).
- Round 1
of Right Arm: Sc 30 across to outer right edge. (30 sc)
- Round 2
through 12 of Right Arm: Ch 1, turn. Sc 30 across. (30 sc) Work 11 more rows (12 rows total).
Checkpoint: After completing both arms, the rug should resemble a wide U-shape. The full piece width should be 20 in (51 cm), arm length from the cutout junction should be approximately 2.5 in (6 cm).
Main Pattern
- Round 1
(RS): Sc in 2nd ch from hook, sc across. (90 sc)
- Round 2
Ch 1, turn. Sc across. (90 sc) Rep Row 2 until piece measures 24 in (61 cm) from foundation. Do not fasten off.
Main Pattern
- Round 1
(RS): Sc in 2nd ch from hook, sc across. (31 sc)
- Round 2
Ch 1, turn. Sc across. (31 sc) Rep Row 2 until piece measures 20 in (51 cm) from foundation. This will fold in half to create a 10-in-tall (25 cm) pocket approximately 7 in wide (17.5 cm).
Snowflake Embroidery on Lid Cover
Center large snowflake: Work on top oval panel. The large snowflake spans approximately 4 in (10 cm) in diameter. Using the surface slip stitch method with CB:
Arm 1: Locate center of oval. Work SS from center outward 8 sts to the top (12 o’clock direction). Fasten off.
Arm 2: Re-enter center, work SS 8 sts toward bottom (6 o’clock). Fasten off.
Arm 3: Re-enter center, work SS 8 sts toward left (9 o’clock). Fasten off.
Arm 4: Re-enter center, work SS 8 sts toward right (3 o’clock). Fasten off.
Arm 5: Re-enter center, work SS 4 sts diagonally toward 10 o’clock. Fasten off.
Arm 6: Re-enter center, work SS 4 sts diagonally toward 4 o’clock. Fasten off.
Arm 7: Re-enter center, work SS 4 sts diagonally toward 8 o’clock. Fasten off.
Arm 8: Re-enter center, work SS 4 sts diagonally toward 2 o’clock. Fasten off.
Branch accents (on each of the 4 main arms): At 4 sts out from center on each main arm, work SS 2 sts to each side perpendicularly. This gives a classic 6-pointed snowflake look. Fasten off after each branch pair.
Small snowflakes (4 of them): Scattered 3 in (7.5 cm) from center in 4 diagonal directions. Each small snowflake has 4 main arms of 3 SS each and no branches.
Bow and Brad Attachment
Sew one navy ribbon bow to the front bottom edge of the lid cover (front center). Sew a rhinestone brad through the bow knot center into the fabric. Secure brad prongs on WS.
Snowflake Embroidery
Center one large snowflake (same construction as lid cover snowflake) in the center of the tank cover rectangle. Add 2 small snowflakes flanking the center snowflake, each placed approximately 4 in (10 cm) to either side of center.
Bow Attachment
Sew one bow to the front center edge of the tank cover. Sew rhinestone brad through bow knot.
Creating the U-Shaped Cutout
The cutout is centered on one short edge (this will be the back of the rug, placed closest to toilet base).
Step 1: With RS facing, identify the center 30 stitches of the last row worked (stitches 31 through 60 of the 90-st row).
Step 2: You will now work around the outside of the U-shape only. The left arm has 30 sts, the right arm has 30 sts, and the front width has 90 sts.
Border for Contour Rug
- Round 1
Join CA with standing sc at any corner.
- Round 2(240)
Border Round 1: Sc around the entire perimeter of the rug including around the inside U-shaped cutout edge. Work 3 sc in each outer corner. Work sc2tog at each inner corner of the U-shape (where arm meets the cutout). (Approximately 220 to 240 sc around entire perimeter.)
- Round 3
Border Round 2: Sl st in each st around. Fasten off.
Bobble Edging on Contour Rug
Join CA at the back inner curve of the U-shape. Work Bobble Edging across the bottom straight edge of the rug and along the two outer side edges of the arms. Skip the front (toilet-facing) straight edge and inner U-curve edge which remain plain. Work one bobble in every other stitch along designated edges.
Snowflake Embroidery
Center large snowflake in the field of the rug, approximately 8 in (20 cm) from front edge and centered side to side. Add 2 small snowflakes flanking the center, placed 5 in (12.5 cm) to either side of center snowflake. Add 2 more small snowflakes near the top of each arm.
Bow Attachment
Sew one bow with rhinestone brad to the front outer edge of the rug, centered between the two arms.
Border for Bath Mat
- Round 1
Join CA with standing sc at any corner.
- Round 2(488)
Border Round 1: Work sc evenly around entire perimeter. Work 3 sc in each corner. When working sc along the row-end edges (sides), work 1 sc per row end. Along the top and bottom edges, work 1 sc per st. (Approximately 488 sc total.)
- Round 3
Border Round 2: Sl st in each st around. Fasten off.
Bobble Edging on Bath Mat
Join CA at any corner. Work Bobble Edging around the entire outer perimeter, one bobble in every other stitch.
Snowflake Embroidery
Center one large snowflake in the center of the mat. For the large central snowflake, extend each main arm to 12 SS (instead of 8) to scale up proportionally for the larger field.
Surround with 4 medium snowflakes (6 arms each, 5 SS per arm, no branches) placed diagonally 6 in (15 cm) from center.
Bow Attachment
Sew one bow with rhinestone brad to the lower left corner of the mat, approximately 2 in (5 cm) from edges.
Seaming
Fold piece in half (RS out) so the two short edges meet at the top. The fold becomes the bottom of the pocket. Seam the two side edges using sl st seam with MC. Leave the top open for inserting paper roll.
Top Opening Finish
Front top edge: Join CA, ch 1, sc 31 across. Sl st. Fasten off.
Back top edge: Join CA, ch 1, sc 31 across. Sl st. Fasten off.
Icicle Fringe at Bottom
At the bottom fold of the pocket, join CA at the right corner of the bottom edge.
Icicle 1: Ch 12, sl st in 2nd ch from hook, sl st in each ch back to fabric edge. Sl st in next st along edge.
Icicle 2: Ch 10, sl st in 2nd ch from hook, sl st in each ch back. Sl st in next st.
Icicle 3: Ch 8, sl st in 2nd ch from hook, sl st in each ch back. Sl st in next st.
Icicle 4: Ch 6, sl st in 2nd ch from hook, sl st in each ch back. Sl st in next st.
Icicle 5: Ch 8, sl st in 2nd ch from hook, sl st in each ch back. Sl st in next st.
Icicle 6: Ch 10, sl st in 2nd ch from hook, sl st in each ch back. Sl st in next st.
Icicle 7: Ch 12, sl st in 2nd ch from hook, sl st in each ch back. Sl st in next st.
This creates 7 graduated icicle points across the bottom. Rep this 7-icicle sequence across the full bottom edge, or space icicles every 4 to 5 stitches.
Hang Loop
Join CA at top back center. Ch 20. Sl st back to same stitch. Fasten off.
Snowflake Embroidery
Work one large snowflake centered on the front face of the cover. Add 2 small snowflakes flanking it, one upper left and one lower right.
Bow Attachment
Sew one bow with rhinestone brad to the front face, at the center just above the top row of CA border.
Where it goes
- A matching lid cover and tank cover set that turns a plain toilet into a styled focal point.
- A contour rug placed at the base of the toilet, paired with the rectangular bath mat near the sink or tub.
- A fabric toilet paper holder that keeps a spare roll tidy on a shelf or windowsill.
- A full coordinated bathroom refresh that pairs well with navy or sky blue towels and a white shower curtain.
Color ideas
- Classic navy and white Work every oval, rug, and the holder body in MC white, trim all borders and edging rounds in CA navy, and embroider every snowflake in CB sky blue.
- Soft blue tonal Keep the main fabric of each piece in MC white, but swap the border rounds to CB sky blue instead of navy, and work the snowflake embroidery in CA navy for contrast.
Care
Hand wash the acrylic pieces in cool water, squeezing gently rather than wringing, since all the suggested yarns are machine-washable acrylic but hold their shape better when handled softly.
Lay every piece flat on a towel to air dry, especially the lid covers, which need to dry completely flat before you insert any poly-fill or foam.
Store folded flat in a drawer or on a shelf rather than hung, so the oval shaping and bobble edging keep their blocked dimensions over time.
Assembly
- Step 1 Step 1: Weave in all yarn ends using a yarn needle, securing tails at least 2 in (5 cm) into the fabric. Trim close.
- Step 2 Step 2: Wet blocking: Fill a basin with cool water. Submerge each piece and gently squeeze (do not wring). Remove and roll in a towel to absorb excess water. Lay flat on a blocking mat. Pin to finished dimensions using rust-proof blocking pins. Allow to dry completely (12 to 24 hours).
- Step 3 Step 3: For the toilet lid and tank lid covers, allow to dry flat before attempting to fit over the actual lid.
- Step 4 Step 4: Once dry, attach all bows and rhinestone brads using a sewing needle and matching navy thread.
- Step 5 Step 5: Do a final surface inspection of all snowflake embroidery. Gently tug any loose SS arms and re-secure yarn tails on WS.
Easy to get wrong
Uneven oval shaping
Place a stitch marker at each end of the oval before you start increasing so both sides grow at the same rate. Check that your sc counts match on each end before moving to the next round.
Gusset strip wrong length
Measure the actual perimeter of your finished oval rather than trusting the pattern's estimate, since gauge differences add up over that many stitches. Work the gusset strip until it truly matches before fastening off.
Snowflake embroidery pulls too tight
Work the surface slip stitch snowflakes with relaxed tension so the fabric underneath does not pucker or cup. Lay the piece flat as you go and check it periodically against the table.
Listener questions
Can I skip the foam or fiberfill insert in the lid covers?
Yes, the insert is optional and only shown for a padded look in the finished photos. The cover will still fit and function with just the two crocheted layers seamed together.
Do I need to join at the end of every round?
No, the toilet lid and tank lid covers are worked in continuous rounds without joining, which is part of what keeps the oval shaping smooth. Just place a marker at the start of each round so you can track where you are.
What if my gauge does not match exactly?
Gauge matters most for the lid covers since they need to fit a standard elongated toilet seat and standard tank lid. If your swatch runs tight, try the US I-9 hook for the main fabric instead of the J-10.
Can I embroider the snowflakes before assembling the pieces?
It is easier to work the surface slip stitch snowflakes after each piece is fully assembled and blocked, since the finished dimensions and seams give you a stable surface. Working on an unblocked or unseamed piece can distort the placement.
How do the bows and brads attach?
They are sewn on using a sewing needle and matching thread, placed after the snowflake embroidery and borders are complete. The brads or shank buttons add a bit of weight and sparkle at roughly 12 mm each.
Original pattern: https://crochetwithmia.com/blue-snowflake-bathroom-set-free-crochet-pattern/
About the Author

Marisol QuinteroWho runs Crochet Obsessed, why a stitch count sits at the end of every round, how a pattern gets written here, and the things this site will never do.
More Patterns
- IntermediateNo. 01

Rose Granny Square Tote Crochet Pattern
Rose granny square tote crochet pattern made from 18 dimensional rose squares for a sturdy, romantic everyday bag.
- IntermediateNo. 02
Tropical octopus baby blanket crochet pattern with appliqués
Tropical octopus baby blanket crochet pattern: a cream filet base with coral and turquoise octopus appliqués, leaves, and…
- IntermediateNo. 03
Sunny lemon couple amigurumi crochet pattern
Sunny lemon couple amigurumi crochet pattern with embroidered slices and safety eyes for a cheerful handmade shelf pair.


