- LevelIntermediate
- Time8-10 Hours
- Hook6.5 mm
- YarnBulky
About This Pattern
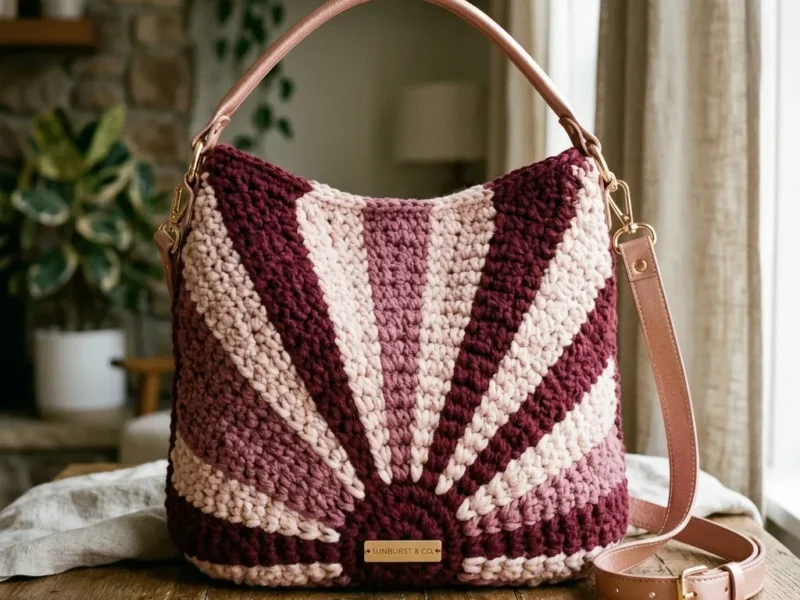
The Berry Blush Sunburst Hobo Bag is a two-panel crochet purse built entirely from single crochet worked in the back loop only, which transforms the simplest stitch into a deeply ridged, corduroy-like texture radiating outward like sun rays. Worked in a rich trio of Deep Burgundy, Blush Rose, and Cream Blush, the color changes create a bold sunburst that looks far more intricate than it actually is. This one is perfect for crocheters who love a project that photographs beautifully and gets compliments the moment it's slung over a shoulder.
You'll be working two identical circular panels from a magic ring outward through 20 rounds, managing three colors with clean color changes and carrying strands along the wrong side to avoid long floats. The back loop only technique is the star here, giving the finished piece its signature ridged texture, so patience with consistent tension matters more than complicated stitchwork. Expect somewhere between 8 and 10 hours total, including the crucial wet blocking stage that shapes each panel into a perfect 14.5-inch circle before assembly.
Once blocked flat and seamed together with the hardware, you get a substantial round hobo bag with a soft, structured drape and a satisfying tactile ridged surface you'll want to keep touching. Finished with a tan crossbody strap, gold-tone D-rings, and swivel hooks, it reads as a polished, boutique-quality accessory rather than a homemade project. It makes a wonderful gift for the fashion-forward friend in your life, or a rewarding centerpiece to add to your own handmade wardrobe.
- Start each panel with a magic ring and build outward in back loop only single crochet through 20 rounds.
- Change colors between Deep Burgundy, Blush Rose, and Cream Blush at the two-loop stage to form the radiating sunburst bands.
- Carry unused colors along the wrong side, twisting them every few stitches to keep the back neat and float-free.
- Repeat the entire process to crochet a second identical panel so you have a matching pair.
- Wet block both panels, pinning each into a true circle and letting them dry fully before handling them further.
- Confirm both blocked panels lie flat without cupping before moving into assembly.
- Seam the two panels together following the assembly steps, leaving the top open to form the bag body.
- Attach the gold-tone D-rings and connect the adjustable crossbody strap to complete the finished hobo bag.
Materials
Yarn (Bulky Weight, Category 5)
- Color A (Deep Burgundy): approximately 220 yards / 201 meters
- Color B (Blush Rose): approximately 140 yards / 128 meters
- Color C (Cream Blush): approximately 140 yards / 128 meters
- Look for a tightly spun, smooth cotton or cotton-blend bulky yarn for the clearest stitch definition. Avoid fuzzy or bouclé yarns as they will obscure your beautiful sunburst pattern.
Yarn Suggestions
- Lion Brand Wool-Ease Thick and Quick in Fisherman (C), Dusty Pink (B), and Cranberry (A)
- Paintbox Yarns Simply Chunky in Soft White (C), Dusty Rose (B), and Wine Red (A)
- We Are Knitters The Chunky in Natural (C), Rose (B), and Bordeaux (A)
Hook
- US size K / 6.5 mm crochet hook (or size needed to meet gauge)
Notions
- Stitch markers (at least 6)
- Yarn needle / tapestry needle
- Scissors
- 1 tan or camel leather-look top handle, approximately 12 inches long with gold-tone D-rings or swivel snaps
- 1 adjustable tan or camel crossbody strap, approximately 48 inches long with gold-tone buckle and swivel snap hooks
- 2 gold-tone D-rings or rectangular rings (1 inch width)
- 1 small gold-tone rectangular label plate (optional), approximately 1.5 by 0.5 inches
- Strong upholstery thread or waxed linen thread in tan
- Hand-sewing needle
- Lining fabric (optional but recommended): approximately 0.5 yard of cotton canvas
Crochet Abbreviations
- BLO
- back loop only (insert hook into only the back loop of the stitch)
- ch
- chain
- Color A
- deep burgundy yarn
- Color B
- blush rose yarn
- Color C
- cream blush yarn
- inc
- increase (2 sc in same stitch)
- MC
- magic ring
- rnd
- round
- sc
- single crochet (insert hook, yarn over, pull up loop, yarn over, pull through both loops)
- sl st
- slip stitch
- st(s)
- stitch(es)
Berry Blush Sunburst Hobo Bag Crochet Pattern
Panel (Make 2 Identical)
Pattern Notes You will make two identical circular panels worked from the center outward. Both panels use the same chart of rounds, creating mirror-image sunbursts on the front and back of your bag. After blocking both panels, you will seam them together on three sides, leaving the top open. The sunburst has 8 rays alternating between Color C (cream blush) and Color B (blush rose), separated by Color A (deep burgundy) background sections. When the bag is assembled, the magic ring origin sits at the lower center, and the rays fan upward toward the top opening. Do not turn between rounds. The right side always faces you. Join each round with a slip stitch to the first stitch, then chain 1 before working the next round. The chain 1 does not count as a stitch.
- Round 1
With Color A, make a magic ring. Chain 1 (does not count as st). Work 8 sc into the ring. Pull ring closed tightly. Sl st to first sc to join. (8 sc)Step by step Magic Ring (MC): Make a loop with your yarn by crossing the tail end over the working yarn. Insert your hook through the center of the loop, yarn over with the working yarn, and pull up a loop. Chain 1 to secure. Work your stitches into the center of the ring, then pull the tail end firmly to close the hole before joining the round.
- Round 2
Chain 1. Working in BLO throughout: work 2 sc in each st around. Sl st to join. (16 sc)Step by step Back Loop Only Single Crochet (BLO sc): Insert your hook into the back loop only of the indicated stitch. That is the loop farthest from you as you work. Yarn over, pull up a loop. Yarn over, pull through both loops on hook. This creates the ridged texture you see in the finished bag.
- Round 3
Chain 1. [Work 2 sc in next st (inc), sc in next st] 8 times. Sl st to join. (24 sc)
- Round 4
Chain 1. [Inc in next st, sc in next 2 sts] 8 times. Sl st to join. (32 sc)Color Introduction Note: The sunburst rays begin emerging from Round 5. With 32 stitches, each section occupies 4 stitches. The sequence around one full revolution is: Color A (1 st), Color C (2 sts), Color A (1 st), Color A (1 st), Color B (2 sts), Color A (1 st), repeating 4 times. This gives 8 rays total: 4 in Color C and 4 in Color B.
- Round 5
Chain 1. [Sc in 1 st in Color A, change to Color C, inc in next st (2 sc in Color C), change to Color A, sc in 1 st in Color A, sc in 1 st in Color A, change to Color B, inc in next st (2 sc in Color B), change to Color A, sc in 1 st in Color A] 4 times. Sl st to join. (40 sc total: 24 sc in Color A, 8 sc in Color C, 8 sc in Color B)
Step by step Color Change in Single Crochet: To change colors at the end of a stitch, work your sc until you have two loops on your hook. Drop the current color to the wrong side. Pick up the new color, yarn over with the new color, and pull through both loops. The new color is now set. Carry unused colors loosely along the wrong side, twisting the carried yarn around the working yarn every 3 to 4 stitches to prevent long floats.
- Round 6
Chain 1. [Sc 1 in Color A, change to Color C, sc 2 in Color C, inc in next Color C st (3 sc in Color C), change to Color A, sc 1 in Color A, sc 1 in Color A, change to Color B, sc 2 in Color B, inc in next Color B st (3 sc in Color B), change to Color A, sc 1 in Color A] 4 times. Sl st to join. (48 sc total: 24 sc in Color A, 12 sc in Color C, 12 sc in Color B)Gauge Check: After Round 6, the circle should measure approximately 4 inches / 10 cm in diameter, per the pattern's gauge (14 sc by 16 rows = 4 inches / 10 cm in BLO sc with a US K / 6.5 mm hook, blocked and lying flat). A tighter gauge produces a stiffer, smaller bag; a looser gauge creates a drapier, larger bag — check your gauge before continuing.
- Round 7
Chain 1. [Sc 1 in Color A, change to Color C, sc 3 in Color C, inc in next st in Color C (4 sc in Color C), change to Color A, sc 1 in Color A, sc 1 in Color A, change to Color B, sc 3 in Color B, inc in next st in Color B (4 sc in Color B), change to Color A, sc 1 in Color A] 4 times. Sl st to join. (56 sc total: 24 sc in Color A, 16 sc in Color C, 16 sc in Color B)
- Round 8
Chain 1. [Sc 2 in Color A, change to Color C, sc 4 in Color C, inc in next st in Color C (5 sc in Color C), change to Color A, sc 2 in Color A, change to Color B, sc 4 in Color B, inc in next st in Color B (5 sc in Color B), change to Color A] 4 times. Sl st to join. (64 sc total: 24 sc in Color A, 20 sc in Color C, 20 sc in Color B)
- Round 9
Chain 1. [Sc 2 in Color A, change to Color C, sc 5 in Color C, inc in next st in Color C (6 sc in Color C), change to Color A, sc 2 in Color A, change to Color B, sc 5 in Color B, inc in next st in Color B (6 sc in Color B), change to Color A] 4 times. Sl st to join. (72 sc total: 24 sc in Color A, 24 sc in Color C, 24 sc in Color B)
- Round 10
Chain 1. [Sc 2 in Color A, change to Color C, sc 6 in Color C, inc in next st in Color C (7 sc in Color C), change to Color A, sc 2 in Color A, change to Color B, sc 6 in Color B, inc in next st in Color B (7 sc in Color B), change to Color A] 4 times. Sl st to join. (80 sc total: 24 sc in Color A, 28 sc in Color C, 28 sc in Color B)
Checkpoint 1: Your circle should measure approximately 7 inches / 17.5 cm in diameter. Lay it flat and measure across the center.
- Round 11
Chain 1. [Sc 2 in Color A, change to Color C, sc 7 in Color C, inc in next st in Color C (8 sc in Color C), change to Color A, sc 2 in Color A, change to Color B, sc 7 in Color B, inc in next st in Color B (8 sc in Color B), change to Color A] 4 times. Sl st to join. (88 sc total: 24 sc in Color A, 32 sc in Color C, 32 sc in Color B)
- Round 12
Chain 1. [Sc 3 in Color A, change to Color C, sc 8 in Color C, inc in next st in Color C (9 sc in Color C), change to Color A, sc 3 in Color A, change to Color B, sc 8 in Color B, inc in next st in Color B (9 sc in Color B), change to Color A] 4 times. Sl st to join. (96 sc total: 28 sc in Color A, 36 sc in Color C, 36 sc in Color B)
- Round 13
Chain 1. [Sc 3 in Color A, change to Color C, sc 9 in Color C, inc in next st in Color C (10 sc in Color C), change to Color A, sc 3 in Color A, change to Color B, sc 9 in Color B, inc in next st in Color B (10 sc in Color B), change to Color A] 4 times. Sl st to join. (104 sc total: 28 sc in Color A, 40 sc in Color C, 40 sc in Color B)
- Round 14
Chain 1. [Sc 3 in Color A, change to Color C, sc 10 in Color C, inc in next st in Color C (11 sc in Color C), change to Color A, sc 3 in Color A, change to Color B, sc 10 in Color B, inc in next st in Color B (11 sc in Color B), change to Color A] 4 times. Sl st to join. (112 sc total: 28 sc in Color A, 44 sc in Color C, 44 sc in Color B)
- Round 15
Chain 1. [Sc 3 in Color A, change to Color C, sc 11 in Color C, inc in next st in Color C (12 sc in Color C), change to Color A, sc 3 in Color A, change to Color B, sc 11 in Color B, inc in next st in Color B (12 sc in Color B), change to Color A] 4 times. Sl st to join. (120 sc total: 28 sc in Color A, 48 sc in Color C, 48 sc in Color B)
- Round 16
Chain 1. [Sc 4 in Color A, change to Color C, sc 12 in Color C, inc in next st in Color C (13 sc in Color C), change to Color A, sc 4 in Color A, change to Color B, sc 12 in Color B, inc in next st in Color B (13 sc in Color B), change to Color A] 4 times. Sl st to join. (128 sc total: 32 sc in Color A, 52 sc in Color C, 52 sc in Color B)
Checkpoint 2: Your circle should measure approximately 11.5 inches / 29 cm in diameter. The sunburst rays should be clearly visible and distinct.
- Round 17
Chain 1. [Sc 4 in Color A, change to Color C, sc 13 in Color C, inc in next st in Color C (14 sc in Color C), change to Color A, sc 4 in Color A, change to Color B, sc 13 in Color B, inc in next st in Color B (14 sc in Color B), change to Color A] 4 times. Sl st to join. (136 sc total: 32 sc in Color A, 56 sc in Color C, 56 sc in Color B)
- Round 18
Chain 1. [Sc 4 in Color A, change to Color C, sc 14 in Color C, inc in next st in Color C (15 sc in Color C), change to Color A, sc 4 in Color A, change to Color B, sc 14 in Color B, inc in next st in Color B (15 sc in Color B), change to Color A] 4 times. Sl st to join. (144 sc total: 32 sc in Color A, 60 sc in Color C, 60 sc in Color B)
- Round 19
Chain 1. [Sc 4 in Color A, change to Color C, sc 15 in Color C, inc in next st in Color C (16 sc in Color C), change to Color A, sc 4 in Color A, change to Color B, sc 15 in Color B, inc in next st in Color B (16 sc in Color B), change to Color A] 4 times. Sl st to join. (152 sc total: 32 sc in Color A, 64 sc in Color C, 64 sc in Color B)
- Round 20
Chain 1. [Sc 5 in Color A, change to Color C, sc 16 in Color C, inc in next st in Color C (17 sc in Color C), change to Color A, sc 5 in Color A, change to Color B, sc 16 in Color B, inc in next st in Color B (17 sc in Color B), change to Color A] 4 times. Sl st to join. (160 sc total: 40 sc in Color A, 68 sc in Color C, 68 sc in Color B)Checkpoint 3: Your circle should measure approximately 14.5 inches / 37 cm in diameter. Fasten off all colors, leaving a long tail in Color A (approximately 36 inches) for seaming. Weave in all other ends securely on the wrong side.
Make the second panel identically.
Assembly Instructions
- Step 1 Round 1 of Edging:
- Step 2 With Color A and RS facing, join yarn with a sl st to any stitch along the top opening edge. Chain 1. Work 1 sc in BLO into each st around the entire opening, working into both the front panel edge and the back panel edge as separate stitches. Sl st to join. (80 sc total around opening)
- Step 3 Rounds 2 and 3 of Edging:
- Step 4 Chain 1. Sc in BLO in each st around. Sl st to join. (80 sc)
- Step 5 Fasten off and weave in end.
Important Notes
- 💡 Use a US size K / 6.5mm hook, or size up or down slightly to make sure your gauge produces a panel that blocks out to that 14.5-inch diameter target.
- 💡 Place a stitch marker at the start of each round before you begin working in the back loop only — with 20 rounds per panel, it's easy to lose track without one.
- 💡 Keep all three colors (A, B, and C) untangled in separate small bowls or yarn bobbins while working color changes, since you'll be dropping and picking up colors frequently.
- 💡 Make both panels before you begin any blocking, so you can pin them side by side and confirm they match in size and shape before assembly.
- 💡 Invest in rust-proof pins specifically for the blocking stage — regular pins can leave orange rust stains on your beautifully blocked burgundy and blush panels.
- 💡 If you're adding the optional cotton canvas lining, cut and baste it in place before attaching the D-rings and strap hardware so your stitching stays hidden inside the seam.
- 📏 Gauge: 14 single crochet stitches by 16 rows equal 4 inches / 10 cm, worked in back-loop-only single crochet with a US K / 6.5 mm hook, blocked and lying flat. For the circular panel, after Round 6 the circle should measure approximately 4 inches / 10 cm in diameter. Gauge matters here — a tighter gauge produces a stiffer, smaller bag, and a looser gauge creates a drapier, larger bag, so check your gauge before diving in.
- 📏 Finished Size: Approximately 14 inches wide by 12 inches tall (35.5 cm by 30.5 cm) at the center front, not including the top handle. The strap drop is approximately 9 inches for the top handle and adjustable from 18 to 24 inches for the crossbody strap.
Common Mistakes and Fixes
- Accidentally crocheting into both loops
Before each round, pause and consciously locate the back loop — the one farthest from you — and insert your hook only there. Checking your first few stitches of every round keeps the ridge pattern consistent throughout all 20 rounds.
- Pulling the magic ring closed
After working your first round into the ring, tug the tail end firmly until the center hole disappears completely, then join the round before moving on.
- Leaving long, loose floats
Twist the unused color around the working yarn every 3 to 4 stitches as instructed, and keep the carried strands snug against the back of the work so they don't peek through to the right side.
- Skipping or rushing the wet blocking
Fully submerge each panel, gently squeeze (never wring), pin the outer edge into a true circle with rust-proof pins on a blocking mat, and allow the full 12 to 24 hours to dry before touching the panels again.
- Changing colors incorrectly
Always change color at the two-loops-on-hook stage: yarn over and pull through with the new color so the last pull-through defines the new shade cleanly.
- Choosing a fuzzy or bouclé yarn
Stick with a tightly spun, smooth cotton or cotton-blend bulky yarn, such as the suggested Wool-Ease Thick and Quick or Paintbox Simply Chunky, for crisp, visible stitch texture.
Variations
- This sunburst formula is incredibly easy to remix once you understand the color-change rhythm. For a moodier autumn version, try Color A in a deep mustard, Color B in burnt terracotta, and Color C in cream — Wool-Ease Thick and Quick in Barley, Pumpkin, and Fisherman would nail that palette. For a cool-toned option, swap in navy, dusty teal, and cream using Paintbox Yarns Simply Chunky. Want a monochrome, minimalist look? Use three tonal shades of the same color family so the sunburst rings read as subtle shadow-and-highlight bands instead of high contrast. To make a smaller crossbody clutch version, stop the panel rounds a few rounds earlier so each panel finishes at roughly 11-12 inches instead of 14.5 inches before blocking, adjusting your strap length to match the smaller silhouette. For an oversized weekend tote, add extra rounds to each panel before starting the assembly steps, and consider stepping up to a US N/P hook with a super bulky yarn for extra drape. Swap the tan crossbody strap for a woven guitar-style strap for a bohemian look, or a chain-and-leather strap for something dressier. If you want to lean into the seasons, a version in cream, sage, and blush reads soft and springlike, while burgundy, forest green, and cream feels rich and wintery. You could also experiment with a four-color version, breaking the sunburst into finer bands, just be sure to keep floats short by twisting carried yarn every 3 to 4 stitches so your wrong side stays neat under the lining fabric.
- I adore this bag because it proves that basic single crochet can look absolutely showstopping when you play with the back loop only technique. Watching those BLO ridges stack up round after round, radiating out from the magic ring in bands of Deep Burgundy, Blush Rose, and Cream Blush, is genuinely mesmerizing. There's something so satisfying about carrying three colors up the wrong side and twisting them every few stitches, then seeing the sunburst pattern emerge like magic without ever touching a complicated stitch. The wet blocking step feels like the big reveal moment, pinning your slightly wonky circle into a crisp 14.5-inch disc and watching it dry into a flat, professional-looking panel. Assembling the two panels with the gold D-rings and swivel-hook strap turns into something that genuinely looks store-bought. This is the kind of pattern I recommend when you want a project that feels impressive to finish but never actually gets frustrating along the way, and it's endlessly giftable too.
Frequently Asked Questions
Why does my back loop only single crochet look different from the photos?
The BLO texture only shows up clearly when you consistently work into just the back loop, never both loops, of every stitch. Double-check your hook placement on a few test rounds if your ridges look flat or uneven.
Is wet blocking really necessary, or can I skip it?
Wet blocking is essential for this pattern — it's what shapes each panel into a flat, true 14.5-inch circle that lies smoothly instead of cupping or ruffling. Skipping this step will make assembly difficult and the finished bag look uneven.
How do I keep my three colors from tangling while working the sunburst rounds?
Carry each unused color loosely along the wrong side and twist it around the working yarn every 3 to 4 stitches to secure it without creating long floats. Working with small yarn bobbins or butterflies for each color also helps prevent tangling.
Do I have to add the lining fabric?
No, the cotton canvas lining is optional but recommended for extra structure and to hide the wrong-side color carries and seams. If you skip it, just make sure your color changes are neat since the wrong side may be more visible.
Original pattern: https://crochetwithmia.com/berry-blush-sunburst-hobo-bag-free-crochet-pattern/
About the Author

Marisol QuinteroWho runs Crochet Obsessed, why a stitch count sits at the end of every round, how a pattern gets written here, and the things this site will never do.
More Patterns
- IntermediateNo. 01

Slouchy everyday beanie worked flat in half double crochet
Crochet beanie pattern for a slouchy everyday look worked flat with hdc rows, then seamed into a soft,…
- IntermediateNo. 02
Crochet amigurumi doll with dress, shoes, and hat
Crochet amigurumi doll pattern with dress, shoes, and hat details for a soft, huggable keepsake you build one…
- IntermediateNo. 03
Chunky moss stitch crochet sweater with raglan-free shoulders
Chunky crochet sweater pattern using moss stitch, worked flat with a 10mm hook for a soft, fast, cool-weather…


