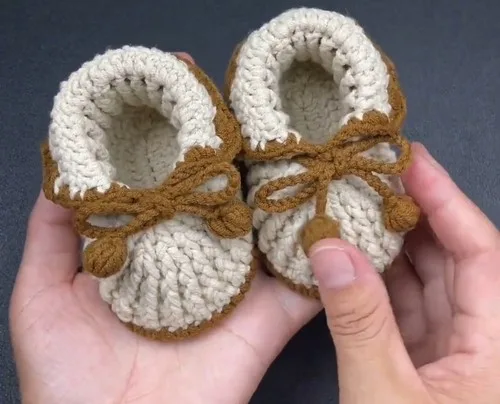
- LevelBeginner
- Time4-6 hours
- YarnWorsted
About This Pattern
There is something unhurried about this one. I think of it as a Sunday-morning make, the kind you pick up with coffee still warm and a playlist you already know by heart. The shapes are small, the rounds are short, and nothing about it asks you to rush toward the finish.
Finished, these booties sit on a shelf or a diaper bag like a small promise. They are soft enough to tuck beside a onesie, sturdy enough to survive a car seat buckle fumbling nearby. Someone will pick them up just to turn them over in their hands.
I like a pattern that teaches as it goes, and this is one of mine. The toe shaping, the post-stitch ribbing, the little drawstring finish; by the last round you are not the same beginner who chained 12 to start.
- Chain a short foundation and work double crochet increases around both ends to shape the sole and toe.
- Build a second sole round with more increases at the toe and heel curves to round out the shape.
- Start the shoe body with a double crochet round that decreases gently at both ends.
- Work several rounds alternating front post and back post double crochet to build a ribbed shoe wall.
- Mark the toe area, then decrease over the following rounds to taper the shoe body toward the front.
- Attach new yarn at the heel, work rows of double crochet, then a single crochet border and a decorative edge.
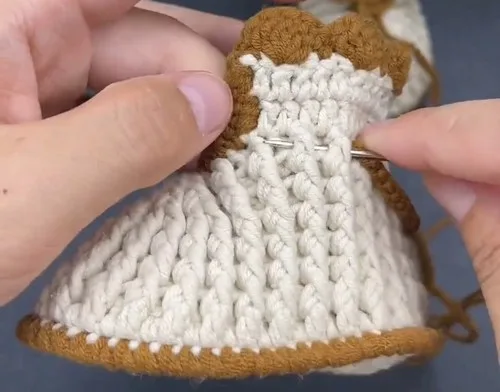
- Weave the drawstring through the front post double crochets to gather and close the bootie.
On the desk
- Suitable for babies aged 0 to 12 months.
- Beginner-friendly and does not differentiate between left and right foot.
Stitch shorthand
- ch — chain
- st — stitch
- sl st — slip stitch
- sc — single crochet
- hdc — half double crochet
- dc — double crochet
- inc — increase
- dec — decrease
Beginner crochet baby booties with a simple drawstring tie
Shoe Sole
- Round 1
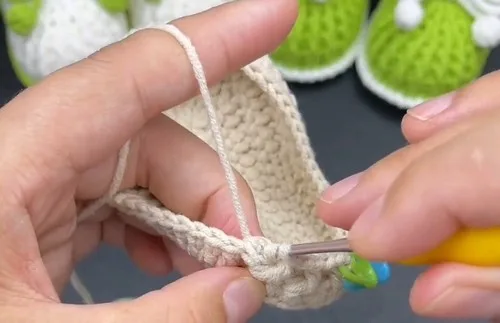
Create a slip knot and chain 12; 3 chain stitches, then 2 double crochets in the same stitch; 1 double crochet in each of the next 10 stitches; 7 double crochets in the next stitch to form the toe; 1 double crochet in each of the next 10 stitches; 3 double crochets in the same stitch; Slip stitch to join.
- Round 2
3 chain stitches, 1 double crochet in the same stitch; 2 double crochets in each of the next 2 stitches; 1 double crochet in each of the next 10 stitches; 2 double crochets in each of the next 3 stitches, 1 double crochet, 2 double crochets in each of the next 3 stitches; 1 double crochet in each of the next 10 stitches; 2 double crochets in each of the last 3 stitches; Slip stitch to join.
- Round 3
1 chain stitch, 1 single crochet in the same stitch; 1 single crochet, then 2 single crochets in the next stitch; repeat twice more; 1 single crochet in each of the next 3 stitches; 1 half double crochet in each of the next 3 stitches; 1 double crochet in each of the next 4 stitches; (2 double crochets in the next stitch, 1 double crochet) repeat six times, then 2 double crochets in the next stitch; 1 double crochet in each of the next 4 stitches; 1 half double crochet in each of the next 3 stitches; 1 single crochet in each of the next 3 stitches; (2 single crochets in the next stitch, 1 single crochet) repeat three times; Slip stitch to join.
Shoe Body
- Round 1
1 chain stitch, 1 double crochet in the same stitch; 1 double crochet in each stitch around, decreasing at both ends; Slip stitch to join.
- Round 2
3 chain stitches, then alternate front post and back post double crochets around.
- Rounds 3–4
Repeat the alternating front and back post pattern for two more rounds.Mark the toe area for decreases.
- Round 5
Continue alternating front and back post double crochets, decreasing at the toe area.
- Round 6
Repeat the decrease round.
- Round 7
Decrease all stitches together at the toe.
Heel
- Round 1
Attach yarn and create two rows of double crochet.
- Round 2
Change color and create a border of single crochet.
- Round 3
Create a decorative edge.
Drawstring
Create a small ball at each end of the drawstring chain.
- Round 1
Chain 100-105 stitches.
More shots
Where it goes
- A soft first-shoe option for a newborn who is not yet walking, paired with a matching knit hat.
- A gift set item, bundled with a simple baby blanket for a baby shower.
- A nursery shelf display, lined up next to other small handmade baby items for decoration.
- A photo-session prop, worn briefly over socks for portrait sessions at home.
Color ideas
- Classic contrast Keep the Shoe Sole and Shoe Body in navy, then change to white for the Heel border and decorative edge, with a white drawstring.
Care
Hand wash the finished booties in cool water with a gentle soap, since small baby items pick up spills fast and deserve a gentle touch.
Lay the booties flat to dry on a towel rather than hanging them, so the post stitch ribbing keeps its shape instead of stretching.
Store a finished pair in a soft pouch or drawer rather than a stuffed basket, so the toe shaping does not get flattened between wears.
Assembly
- Step 1 Weave the drawstring through the front post double crochets.
Easy to get wrong
Losing track of front post and back post
Pause at the start of each round in the Shoe Body and check whether you are working around the front or back of the previous post stitch. A quick stitch marker on the first post of each round keeps the rib pattern lined up.
Skipping the toe increases in Round 1
The seven double crochets in one stitch are what create the toe curve, so count them out loud as you work. If the sole lies flat without curling at the toe, recount before moving to Round 2.
Forgetting to mark the toe before decreasing
The Shoe Body decrease rounds only work if you know which end is the toe, so place a marker there as the pattern notes suggest. Decreasing at the wrong end will skew the whole shoe shape.
Between the songs
- The toe shaping is the real trick worth learning: a single stitch holds seven double crochets, and watching a flat round fold itself into a shoe shape is genuinely satisfying. Then the front post and back post double crochet rounds give the shoe body a ribbed, textured wall that looks far more advanced than it actually is to work. The heel brings in a clean color change and a decorative edge, so you practice finishing details on a small scale. Weaving the drawstring through those post stitches at the end ties the whole technique list together. It is a short project that quietly teaches sole shaping, post stitches, color changes, and finishing in one sitting.
Listener questions
Is this bootie pattern really the same for both feet?
Yes, the notes confirm it does not differentiate between left and right foot. You simply make two identical booties and they work for either foot.
What age range does this bootie size fit?
The pattern is written for babies aged 0 to 12 months. If you need a different size, you would need to adjust the foundation chain and round counts yourself.
How do the front post and back post stitches change the look?
Alternating front post and back post double crochet across the Shoe Body rounds creates a raised, ribbed texture rather than a flat surface. It is what gives the shoe body its structured, sock-like appearance.
Why does the Heel use a color change?
The pattern calls for attaching a new color at the Heel to create a border of single crochet and a decorative edge. It is a nice chance to add contrast without committing to a multicolor project throughout.
What is the drawstring actually for?
The assembly step has you weave the drawstring through the front post double crochets around the shoe body. Pulling it gathers the opening snugly around a baby's ankle to help the bootie stay on.
Original pattern: https://crocheteverything.com/crochet-baby-booties-pattern-for-beginners-step-by-step-guide/
About the Author

Marisol QuinteroWho runs Crochet Obsessed, why a stitch count sits at the end of every round, how a pattern gets written here, and the things this site will never do.
More Patterns
- IntermediateNo. 01

Rose Granny Square Tote Crochet Pattern
Rose granny square tote crochet pattern made from 18 dimensional rose squares for a sturdy, romantic everyday bag.
- IntermediateNo. 02
Tropical octopus baby blanket crochet pattern with appliqués
Tropical octopus baby blanket crochet pattern: a cream filet base with coral and turquoise octopus appliqués, leaves, and…
- IntermediateNo. 03
Sunny lemon couple amigurumi crochet pattern
Sunny lemon couple amigurumi crochet pattern with embroidered slices and safety eyes for a cheerful handmade shelf pair.


