- LevelIntermediate
- Time4-6 Hours
- Hook6.5 mm
- YarnBulky
About This Pattern
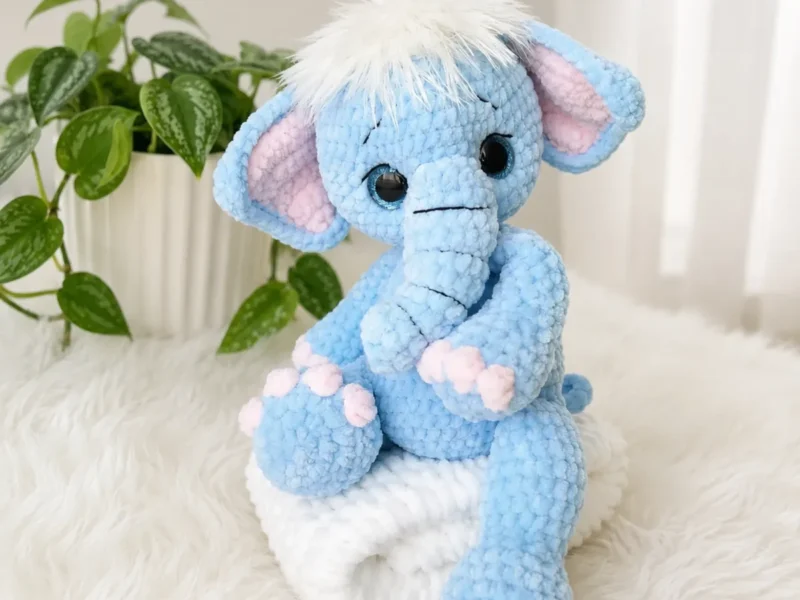
This baby elephant amigurumi is the kind of pattern that makes you fall in love with a project from the very first magic ring. Worked up in plush chenille yarn, it comes together with big floppy ears, a curling trunk, and tiny stitched toe details that give it real personality. It's an especially lovely make for anyone stitching for a nursery, a baby shower gift, or just adding a soft new friend to their amigurumi shelf.
You'll spend most of your time working continuous spiral rounds through the legs, arms, body, and trunk, with stitch markers keeping every round honest as you increase and decrease your way into shape. The ears break from the spiral rhythm entirely, worked flat in rows with a turning chain, so you get a nice mix of techniques in one project. Expect roughly 4-6 hours total, making this a comfortable weekend project for an intermediate crocheter who's used to shaping amigurumi pieces.
When all the pieces are stuffed, assembled, and given their sparkly safety eyes, you're left with a plush, substantial elephant with a soft chenille texture that begs to be squeezed. The moveable head attachment means the finished elephant can tilt and turn, giving it a surprisingly lifelike, expressive quality. It's sturdy enough for cuddling, sweet enough for a keepsake, and makes an outstanding handmade gift for a baby or elephant enthusiast of any age.
- Crochet two legs from the base up in continuous spiral rounds, shaping and stuffing each one as you go.
- Work two arms the same spiral way, keeping a stitch marker moving so the rounds stay lined up.
- Build the body in one continuous spiral, increasing and decreasing to create its rounded shape before stuffing.
- Shape the trunk separately in its own spiral rounds, letting the stitch pattern create its gentle curve.
- Crochet the head in continuous rounds, then set the sparkly safety eyes before closing and stuffing it.
- Attach the head to the body using the moveable joint hardware so it can tilt and turn.
- Sew the legs, arms, ears, and trunk onto the body and head, then weave in any remaining ends.
Materials
Yarn
- Bulky weight / CYCA #6 chenille or plush yarn in main color (MC) and contrast color (CC) for inner ears and toe details; white or cream fur yarn for hair accent
Hook
- US K-10.5 / 6.5 mm (adjust down if fabric shows gaps)
Safety eyes
- 2 sparkly safety eyes, 18–24 mm
Stuffing
- Polyester fiberfill
Joint disk set
- 1 set for moveable head attachment
- Stitch markers
- Yarn needle / tapestry needle
- Scissors
Crochet Abbreviations
- BLO
- Back Loop Only
- ch
- Chain
- dc
- Double Crochet
- dec
- Decrease (invisible decrease)
- inc
- Increase (2 sc in same stitch)
- MR
- Magic Ring
- sc
- Single Crochet
- sl st
- Slip Stitch
- SM
- Stitch Marker
- st / sts
- Stitch / Stitches
Baby Elephant Amigurumi: Free Crochet Pattern
Legs — Make 2
- Round 1
6 sc in MR. (6)
- Round 2
inc in each st around. (12)
- Round 3
inc in each st around. (24)
- Round 4
[BLO + Toes]: Work entire round in BLO: 10 sc, (3-dc bobble in same st, 2 sc) × 4, 2 sc. (24)3-dc bobble (toe): [Yo, insert hook, pull up loop, yo, draw through 2 loops] 3 times in the same stitch; yo, draw through all 4 loops on hook.
- Round 5
24 sc. (24)
- Round 6
(6 sc, dec) × 3. (21)
- Round 7
(5 sc, dec) × 3. (18)
- Round 8
(4 sc, dec) × 3. (15)
- Round 9
(3 sc, dec) × 3. (12)
- Round 10
12 sc. (12)
- Round 11
(3 sc, inc) × 3. (15)
- Round 12
(4 sc, inc) × 3. (18)
- Round 13-17
18 sc. (18)
- Round 18
(dec, 4 sc) × 3. (15)
- Round 19
(dec, 3 sc) × 3. (12)Stuff leg firmly with fiberfill. Make a shifting sl st if needed to reposition the round start before closing.
- Round 20
Work 6 sc through both layers to close. Fasten off.
Arms — Make 2
- Round 1
8 sc in MR. (8)
- Round 2
inc in each st around. (16)
- Round 3
[BLO + Fingers]: Work entire round in BLO: 5 sc, (3-dc bobble in same st, 1 sc) × 4, 3 sc. (16)
- Round 4-5
16 sc. (16)
- Round 6
(2 sc, dec) × 4. (12)
- Round 7-8
12 sc. (12)
- Round 9
is different for each arm — read both versions before proceeding. Left Arm — Rnd 9: 8 sc, 4 sl st. (12)Right Arm — Rnd 9: 4 sc, 4 sl st, 4 sc. (12)
The 4 sl sts must sit on the side of the arm facing the body. Use a shifting sl st to align the round start if needed. - Round 10-16
12 sc. (12)
- Round 17
(dec, 4 sc) × 2. (10)Stuff arm with fiberfill. Make a shifting sl st if needed.
- Round 18
Work 5 sc through both layers to close. Fasten off.
Body
- Round 1
6 sc in MR. (6)
- Round 2
inc in each st around. (12)
- Round 3
inc in each st around. (24)
- Round 4
(3 sc, inc) × 6. (30)
- Round 5
(4 sc, inc) × 6. (36)
- Round 6
(5 sc, inc) × 6. (42)
- Round 7
42 sc. (42)
- Round 8
[Join Legs]: 6 sc joining left leg, (inc, 4 sc) × 3, inc, 6 sc joining right leg, (4 sc, inc) × 2, 4 sc. (48)
- Round 9-10
48 sc. (48)
- Round 11
(6 sc, dec) × 6. (42)
- Round 12
42 sc. (42)
- Round 13
6 sc, (dec, 3 sc) × 3, dec, 8 sc, dec, 5 sc, dec, 2 sc. (36)
- Round 14
36 sc. (36)
- Round 15
(4 sc, dec) × 6. (30)
- Round 16
30 sc. (30)
- Round 17
(3 sc, dec) × 6. (24)
- Round 18
24 sc. (24)
- Round 19
[Join Arms]: 2 sc, 5 sc joining left arm, 7 sc, 5 sc joining right arm, 5 sc. (24)
- Round 20
24 sc. (24)
- Round 21
(2 sc, dec) × 6. (18)
- Round 22
18 sc. Insert joint disk into body at this stage. (18)
- Round 23
dec × 9. (9)
- Round 24
dec × 3. Fasten off.
Ears — Make 2 (One Piece per Color per Ear)
Each ear is two flat pieces joined together: one in MC and one in CC. Work both pieces identically.
Foundation: Ch 7. Starting from 2nd ch from hook:
- Round 2
6 sc, ch 1, turn.
- Round 3
1 sc, inc, 4 sc, ch 1, turn.
- Round 4
7 sc, ch 1, turn.
- Round 5
1 sc, inc, 5 sc, ch 1, turn.
- Round 6
8 sc, ch 1, turn.
- Round 7
1 sc, inc, 6 sc, ch 1, turn.
- Round 8
1 sc, inc, 5 sc, inc, 1 sc, ch 1, turn.
- Round 9
1 sc, inc × 2, 8 sc, ch 1, turn.
- Round 10
1 sc, inc, 9 sc, inc, 1 sc, ch 1, turn.
- Round 11
15 sc.Place MC and CC pieces together with wrong sides facing. Work a sc edging border around the entire perimeter, joining both layers as you go.
Trunk
- Round 1
6 sc in MR. (6)
- Round 2
(1 sc, inc) × 3. (9)
- Round 3
9 sunken sc. (9)Sunken sc: Insert hook into the stitch one round below the current working stitch, pull loop up to working height, and complete as a normal sc. This creates the ridged, segmented texture along the trunk.
- Round 4
9 sc. (9)
- Round 5
9 sc. (9)
- Round 6
9 sl st. (9)
- Round 7
(2 sc, inc) × 3. (12)
- Round 8
12 sc. (12)
- Round 9
12 sl st. (12)
- Round 10
12 sc. (12)
- Round 11
12 sc. (12)
- Round 12
12 sl st. (12)
- Round 13
(5 sc, inc) × 2. (14)
- Round 14
14 sc. (14)
- Round 15
14 sl st. (14)
- Round 16
7 sc, 7 sl st. (14)
- Round 17
7 sc, 7 sl st. Fasten off. Do not stuff. Set aside for integration into the head.
Head
- Round 1
6 sc in MR. (6)
- Round 2
inc in each st around. (12)
- Round 3
inc in each st around. (24)
- Round 4
(3 sc, inc) × 6. (30)
- Round 5
(4 sc, inc) × 6. (36)
- Round 6
(5 sc, inc) × 6. (42)
- Round 7
(6 sc, inc) × 6. (48)
- Round 8
[Begin joining trunk]: 13 sc, inc × 3, 4 sc, 7 sc joining trunk, 4 sc, inc × 3, 14 sc. (54)
- Round 9
[Continue joining trunk]: 23 sc, 7 sc along trunk stitches only, 24 sc. (54)
- Round 10
13 sc, dec × 3, 15 sc, dec × 3, 14 sc. (48)There must be exactly 4 sc on each side between the trunk base and the 3-dec group.
- Round 11-14
48 sc. (48)
- Round 15
(6 sc, dec) × 6. (42)
- Round 16
(5 sc, dec) × 6. (36)
- Round 17
(4 sc, dec) × 6. (30)
- Round 18
30 sc. (30)Insert safety eyes now. Attach head to body via joint disk, inserting the post through the magic ring of the head. Stuff head firmly with fiberfill.
- Round 19
(3 sc, dec) × 6. (24)
- Round 20
(2 sc, dec) × 6. (18)Apply surface tightening indentations for cheek and muzzle shaping now, before the opening becomes too small to reach inside.
- Round 21
(1 sc, dec) × 6. (12)
- Round 22
dec × 6. Fasten off.
Assembly Instructions
- Step 1 Legs and arms are joined directly into the body during their respective rounds — confirm each limb is stuffed, closed, and correctly oriented before beginning those body rounds.
- Step 2 Secure the joint disk: thread the post through the magic ring at the top of the body, then lock it in place from inside the body with the washer and locking disk. The head should rotate smoothly.
- Step 3 The trunk requires no separate sewing — it is fully integrated into the head.
- Step 4 Place MC and CC ear pieces together, wrong sides facing. Join with sc edging all around. Sew one ear to each side of the head just above and behind the eye line using whipstitch and the yarn tail.
- Step 5 For the hair, cut lengths of fur yarn, fold each piece in half, and use your hook to pull the fold through a stitch at the top of the head. Thread the ends through the loop and pull snug. Repeat across the crown. Trim evenly.
- Step 6 Crochet or twist a small tail and sew it to the lower back of the body.
- Step 7 Using a yarn needle and a length of darker yarn, embroider eyebrows, eyelid lines, and horizontal ridges along the trunk.
- Step 8 Weave in all ends.
Important Notes
- 💡 Chenille yarn is soft but sheds fuzz easily while you work — keep a lint roller nearby and try not to frog too many rounds, since ripping out chenille repeatedly can wear down the fibers.
- 💡 Because the recommended 6.5mm hook can leave slight gaps in bulky yarn, size down to a 6mm if your stitches look loose, and always check that your fiberfill isn't peeking through before moving to the next round.
- 💡 Move your stitch marker up every single round without exception in the legs, arms, body, and trunk — these are worked in continuous spirals, and it's very easy to lose your place in solid-color chenille.
- 💡 Stuff firmly but in stages, especially in the trunk and legs, adding small amounts of fiberfill as you complete a few rounds rather than waiting until the piece is fully closed.
- 💡 When working the two-color ears, weave in your contrast color tail immediately after the color change rather than waiting until the end, since chenille strands can be trickier to secure invisibly later.
- 💡 Test the moveable head joint hardware on scrap fabric or the wrong side of a piece first to make sure you understand how it locks together before attaching it permanently to your finished head and body.
- 📝 This pattern is written in US crochet terminology.
- 📝 All 3D pieces (legs, arms, body, trunk, and head) are worked in continuous spirals — do not join rounds; only the ears are worked in flat rows with a ch 1 turn at the end of each row.
- 📝 The trunk is integrated directly into the head in Rnds 8–9 — do not fasten off the trunk before reaching that step; insert the safety eyes before closing the head, as noted in the Head instructions. Gauge is not critical, but your fabric must be tight enough that stuffing does not show through — drop down one hook size if needed.
Common Mistakes and Fixes
- Losing track of the round in
Place a stitch marker in the first stitch of every round and physically move it up each time you complete a round — don't rely on counting stitches alone, since chenille yarn's texture makes stitches harder to see clearly.
- Confusing the flat-row ear construction
Remember the ears are the one piece worked in turned rows with a ch 1 at the end of each row, not continuous rounds — check your work at the end of each row for the turning chain before continuing.
- Overstuffing or understuffing
Stuff the trunk firmly but in small pinches as you go, checking the curve against the pattern's shaping before closing it off, rather than stuffing all at once at the end.
- Gapping stitches because the hook is
If you notice visible holes between stitches, drop down half a hook size from the recommended 6.5mm — chenille yarn especially benefits from a snugger gauge to fully hide the fiberfill.
- Placing the safety eyes before
Insert the eye posts loosely first and hold the head up at a distance to check symmetry and expression before pushing the washers on permanently, since safety eyes cannot be repositioned once secured.
- Losing the contrast color placement
Keep your CC yarn tail visible and tie a small scrap-yarn tag to mark exactly where each color change happens, especially since chenille yarn can make color transitions harder to spot at a glance.
Variations
- One of the easiest ways to make this elephant your own is to play with the contrast color in the ears and toe details — try a soft pink CC against a gray MC for a classic look, or swap in a pastel lavender or mint for a more whimsical nursery vibe. Bernat Baby Blanket or Chenille Basic are both great bulky yarn substitutes if you can't find your usual go-to, since they hold up well to the fiberfill stuffing and keep that plush, huggable feel. For a fun seasonal twist, work the ears and toe accents in a warm rust and cream combo for an autumn-themed elephant, or try icy blues and silvers for a winter version — no need to change stitch counts, just swap colors round by round. If you want a mini version, consider dropping down to a DK weight yarn and a 4mm hook, which will naturally shrink every round's stitch count proportionally and give you a pocket-sized elephant perfect for a keychain or ornament (just expect to work more rounds relative to the piece size since your stitches are smaller). Going bigger works too — sizing up to a super bulky yarn with a 9mm hook creates a giant floor-pillow-style elephant, though you'll want extra stuffing and possibly an extra round or two on the body to keep proportions balanced. You could also swap the fur yarn hair accent for a fuzzy pom-pom tail tip, or add tiny yarn toenails in a fourth accent color for extra charm. For a special-occasion gift, embroider the baby's initial or birth month flower onto the belly before stuffing the body piece.
- I adore how much personality this little elephant packs into just five main pieces. Working the legs, arms, body, and trunk in continuous spirals is so satisfying once you get into the rhythm — no joining, no seams, just smooth rounds that grow right before your eyes with the help of a stitch marker. The trunk is honestly my favorite part; watching it curl into shape round by round feels like sculpting with yarn. Then the ears give your hands a nice change of pace, worked flat with a turn-and-chain rhythm that feels almost meditative after all that spiral work. I love that each ear uses two colors, so you get that soft pop of contrast peeking out from inside. And of course, setting those sparkly 18-24mm safety eyes is always my favorite moment in any amigurumi project — it's the instant the whole thing comes alive. Add the moveable head joint and you've got a finished elephant that can nod and tilt, which somehow makes it feel so much more like a real, huggable little creature rather than just a stuffed shape.
Frequently Asked Questions
What yarn weight and hook size does this baby elephant pattern use?
This pattern calls for bulky weight (CYCA #6) chenille or plush yarn worked with a US K-10.5 / 6.5mm hook. If you notice gaps in your stitches, sizing down slightly gives a tighter, more polished fabric.
Do I need to join at the end of each round?
No — the legs, arms, body, trunk, and head are all worked in continuous spirals without joining, so you just keep crocheting round after round. Only the ears are worked flat in rows with a ch 1 turn.
How do I keep track of my rounds without joining?
Place a stitch marker in the first stitch of each round and move it up every time you start a new one. This is essential since the piece is worked in a continuous spiral with no clear round marker otherwise.
Can I use a different yarn if I don't have chenille or plush yarn?
Yes, any bulky weight yarn will work, though chenille or plush yarn gives the elephant its signature soft, velvety texture. Just be sure to match your hook size to your chosen yarn to avoid gaps in the stitches.
What size safety eyes should I buy for this pattern?
The pattern calls for 18-24mm sparkly safety eyes, which give the elephant an expressive, endearing look. Choose a size within that range based on how large or small you'd like the finished face to appear.
Original pattern: https://amigurumicorner.com/baby-elephant-amigurumi/
About the Author

Marisol QuinteroWho runs Crochet Obsessed, why a stitch count sits at the end of every round, how a pattern gets written here, and the things this site will never do.
More Patterns
- IntermediateNo. 01

Slouchy everyday beanie worked flat in half double crochet
Crochet beanie pattern for a slouchy everyday look worked flat with hdc rows, then seamed into a soft,…
- IntermediateNo. 02
Crochet amigurumi doll with dress, shoes, and hat
Crochet amigurumi doll pattern with dress, shoes, and hat details for a soft, huggable keepsake you build one…
- IntermediateNo. 03
Chunky moss stitch crochet sweater with raglan-free shoulders
Chunky crochet sweater pattern using moss stitch, worked flat with a 10mm hook for a soft, fast, cool-weather…


