- LevelIntermediate
- Time4-6 hours
- Hook4.5 mm
- YarnWorsted
About This Pattern
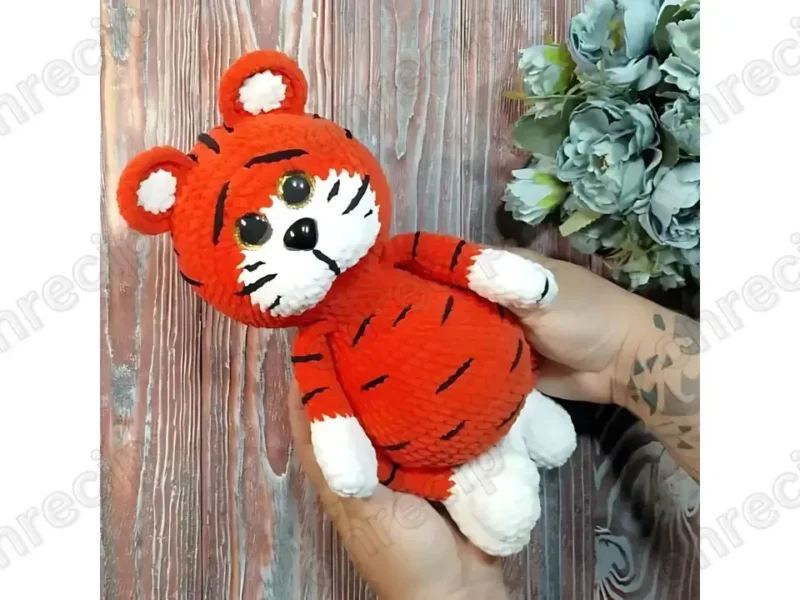
This little tiger has a soft, round-cheeked calm to it, the kind of face that looks curious rather than fierce. Working the orange body against white ear panels gives the whole thing a gentle, storybook feel. It is a project that asks you to slow down on the details, not rush the shaping.
Finished and stuffed, this cub sits well on a shelf, a windowsill, or tucked into a reading nook. The plush yarn gives it a huggable weight that holds its shape without going stiff. It is the kind of maker's-own piece that ends up claiming a permanent spot on a bed or a desk.
Skill level: medium. All parts are crocheted separately and then sewn together. The finished toy measures about 27 cm once assembled and stuffed.
- Start the head with a small chain and build it outward through steady increase rounds until the shape rounds into a muzzle.
- Keep working the head through its increase and straight rounds, shifting the row start partway through to keep the shaping even.
- Set the safety eyes and toy nose into the head before you close it up, so you can check the expression while it is still open.
- Stuff the head firmly as you work the later rounds so the face holds its shape once it is sealed.
- Crochet the ears in two colors, then hold the white and orange pieces together and single crochet around the edge to join them.
- Make both legs separately, increasing steadily from a small ring up to their full width before stuffing.
- Thread black yarn onto a needle and embroider the whiskers, eyebrows, and stripes onto the finished orange pieces.
- Sew the ears and legs onto the head and body, checking the tiger sits evenly before you weave in the last ends.
On the desk
- Plush yarn in orange and white colors
- Crochet hook 4.0-4.5 mm
- Black yarn for embroidering whiskers, eyebrows, and stripes
- Safety eyes 18 mm
- Toy nose 17×13 mm
- Stuffing for toys
- Needle
- Scissors
Stitch shorthand
- KA — amigurumi ring
- ch — chain stitch
- sl st — slip stitch
- sc — single crochet
- inc — increase
- dec — decrease
- (…) x n — repeat n times
Amigurumi tiger cub crochet pattern with plush ears
Head
White yarn: Chain 6
- Round 1
2 inc, 3 sc, 4 inc, 3 sc, 2 inc (24)
- Round 2
(1 sc, inc) x 2 times, 3 sc, (1 sc, inc) x 4 times, 3 sc, (1 sc, inc) x 2 times (30)
- Round 3
(4 sc, inc) x 6 times (36)
- Round 4
36 sc + 10 sc (shift the beginning of the row) (36)
Orange yarn:
- Round 5
(5 sc, inc) x 6 times (42)
- Round 6
3 sc, (6 sc, inc) x 5 times, 3 sc (48)
- Round 7
(7 sc, inc) x 6 times (54)
- Round 8
4 sc, (8 sc, inc) x 5 times, 4 sc (60)9th-16th rows: 60 sc (60)
- Round 17
(8 sc, dec) x 6 times (54)
- Round 18
(7 sc, dec) x 6 times (48)
- Round 19
(6 sc, dec) x 6 times (42)
- Round 20
(5 sc, dec) x 6 times (36)
- Round 21
(4 sc, dec) x 6 times (30)
- Round 22
(3 sc, dec) x 6 times (24)
- Round 23
(2 sc, dec) x 6 times (18)
- Round 24
(1 sc, dec) x 6 times (12)
- Round 25
6 dec (tighten the opening and hide the yarn)
Ears (2 pieces)
Make 2White yarn:
- Round 1 (White)
6 sc (6)
- Round 2 (White)(12)
6 inc (12) (fasten off with sl st and cut)
Orange yarn:
- Round 1 (Orange)
6 sc (6)
- Round 2 (Orange)
6 inc (12)
- Round 3 (Orange)
(holding the white and orange pieces together, wrong sides facing) (1 sc, inc) x 6 times (18)
- Round 4 (Orange)
(turn work, make a chain for lifting, and crochet) 16 sc (16) fasten off with sl st and leave a tail for sewing
Legs (2 pieces)
Make 2- Round 1
6 sc (6)
- Round 2
6 inc (12)
- Round 3
(1 sc, inc) x 6 times (18)
- Round 4
(2 sc, inc) x 6 times (24)
- Round 5
1 sc, (3 sc, inc) x 5 times, 2 sc (30)6th-8th rows: 30 sc (30)
- Round 9
9 sc, 6 dec, 9 sc (24)
- Round 10
6 sc, 6 dec, 6 sc (18)
- Round 11
3 sc, 6 dec, 3 sc (12)
- Round 12
12 sc (12)
Where it goes
- A soft companion for a child's bed or reading corner, paired with a couple of other amigurumi animals for a small shelf zoo.
- A handmade gift for a baby shower, sized and weighted for little hands to hold.
- A desk or bookshelf accent for anyone who likes a bit of plush character next to their plants and books.
- A donation piece for a hospital or shelter drive that welcomes handmade stuffed toys.
Color ideas
- Classic tiger Orange plush yarn for the head, legs, and outer ear panels, with white for the inner ear panels and black embroidery for whiskers, eyebrows, and stripes.
- Soft cub A paler blush-orange for the head and legs, cream instead of white for the inner ears, and black kept only for the eyebrows and whisker dots so the stripes read more subtly.
Care
Hand wash the plush yarn pieces gently in cool water, since the safety eyes and toy nose are not made for a washing machine.
Reshape the head and legs by hand while the toy is still damp, easing the stuffing back into a round shape before it dries.
Let it air dry fully away from direct heat, then store it upright on a shelf so the ears keep their joined seam crisp.
Easy to get wrong
Losing track of the row shift on the head
Mark the new starting stitch with a scrap of yarn each time the beginning of the row shifts, so the shaping stays lined up round after round.
Joining the ear pieces with right sides together
Double check you are holding the white and orange ear pieces wrong sides facing before you single crochet them together, or the seam will show on the outside.
Embroidering stripes before stuffing is finished
Finish stuffing and closing each piece first, then embroider the whiskers, eyebrows, and stripes so the surface is firm and your stitches sit evenly.
Between the songs
- There is real satisfaction in the head shaping here, where the increase pattern shifts each round to build a rounded, believable muzzle instead of a plain ball. The two-tone ears are the standout technique: crocheting a white panel, an orange panel, then holding them wrong sides together and single crocheting around the edge to join them in one clean round. That trick alone is worth learning for other animal amigurumi. Add the embroidered whiskers, eyebrows, and stripes over the finished orange yarn, and you get a face and coat that feel hand-drawn rather than stitched, which is the payoff for taking the extra time with a needle at the end.
Listener questions
How do I keep the ear join from looking messy?
The trick is holding the white and orange ear pieces wrong sides together before single crocheting around the edge, which tucks the seam neatly between the two layers. Working that round slowly and keeping tension even makes the biggest difference.
When do I insert the safety eyes and nose?
Place them while the head is still open, partway through the rounds, so you can hold the piece up and check the expression before stuffing fully. Once the head is closed, it is much harder to adjust their position.
Do I need to be confident with embroidery for the stripes?
Basic straight stitches and small lines are all you need for the whiskers, eyebrows, and stripes. If you are new to embroidery, practice the stripe placement on a scrap of orange yarn first.
How firmly should I stuff the head and legs?
Stuff firmly enough that the head holds a round shape and the legs feel solid when the tiger stands or sits. Underfilled pieces tend to look lumpy once the safety eyes and embroidery are added.
Original pattern: https://onrecip.com/free-amigurumi-cute-tiger-crochet-pattern/
About the Author

Marisol QuinteroWho runs Crochet Obsessed, why a stitch count sits at the end of every round, how a pattern gets written here, and the things this site will never do.
More Patterns
- IntermediateNo. 01

Rose Granny Square Tote Crochet Pattern
Rose granny square tote crochet pattern made from 18 dimensional rose squares for a sturdy, romantic everyday bag.
- IntermediateNo. 02
Tropical octopus baby blanket crochet pattern with appliqués
Tropical octopus baby blanket crochet pattern: a cream filet base with coral and turquoise octopus appliqués, leaves, and…
- IntermediateNo. 03
Sunny lemon couple amigurumi crochet pattern
Sunny lemon couple amigurumi crochet pattern with embroidered slices and safety eyes for a cheerful handmade shelf pair.


