- LevelIntermediate
- Time4-6 Hours
- Hook8 mm
- YarnWorsted
About This Pattern
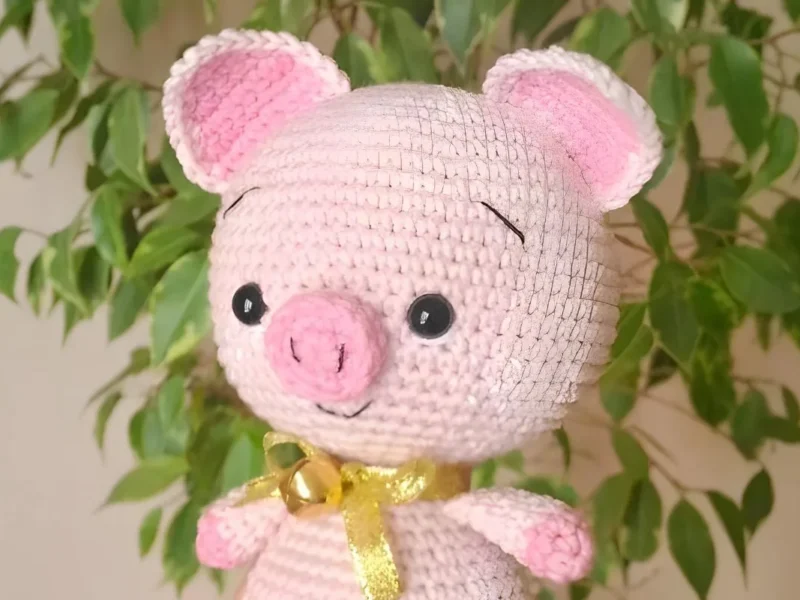
This amigurumi piggy is one of those patterns that makes you smile the whole time you're crocheting it. With just a head and a body worked up in a handful of rounds, you get a plump, rosy-cheeked little pig with an unmistakably cute snout and bright secured eyes that give it real personality. It's the kind of quick-build amigurumi that's perfect for anyone who loves farm animals, wants a fast finish, or is building a barnyard collection alongside their other crochet critters.
Even though the round count is short, this pattern packs in classic amigurumi techniques — magic ring starts, strategic increases to shape the rounded head and body, and hand embroidery in black and white thread to bring the face to life. It's best suited to confident beginners or intermediate crocheters who've made at least one or two amigurumi before, since shaping a recognizable snout and keeping tension even takes a little practice. Expect to spend somewhere around 4 to 6 hours total, including stuffing, assembly, and embroidering the details.
The finished piggy comes out to a sweet 16 cm tall, small enough to sit in your palm but substantial enough to feel huggable and gift-worthy. With its secured 8mm eyes, embroidered features, and optional ribbon or tambourine accent, it has that polished, boutique-toy look while still feeling warm and handmade. Tie a little ribbon around its neck and it's ready to become a shelf companion, a baby shower gift, or a cheerful addition to any amigurumi farm.
- Begin the head with a magic ring and work the first round of single crochets to form a tight, seamless top.
- Increase evenly through the second round to round out the head and shape the distinctive pig snout.
- Insert and secure the 8mm safety eyes on the head, adjusting placement before stuffing fully.
- Stuff the head firmly in small pinches, working fiberfill into every curve for a smooth, full shape.
- Start the body with its own magic ring and work the single round to create the base shape.
- Stuff the body just like the head, keeping the fill even so it sits nicely against the head.
- Whip stitch the head onto the body to join the two pieces into one solid toy.
- Embroider the nostrils and any extra facial details with black and white cotton thread, then finish with an optional ribbon or tambourine accent.
Materials
- A bit of black and white cotton thread for embroidery
- Hook № 2
- Eyes 8 mm on secure mount
- Long needle
- Scissors
- Ribbon and tambourine for decoration
- Toy size: 16 cm
Crochet Abbreviations
- ch
- chain
- st
- stitch
- sl st
- slip stitch
- sc
- single crochet
- hdc
- half double crochet
- dc
- double crochet
- inc
- increase
- dec
- decrease
- mr
- magic ring
- fo
- finish off
Amigurumi Piggy Crochet Pattern – Free & Adorable
Head
Light pink yarn:
- Round 1
6 Sat in the Amigurumi ring ( 6 ) 2nd row: pr * 6 times ( 12 ) 3 row: ( 1 Sat, pr ) * 6 times ( 18 )4 row: 1 Sat, pr, ( 2 Sat, pr ) * 5 times, 1 Sat ( 24 )
5 row: ( 3 Sat, pr ) * 6 times ( 30 )6 row: 2 Satn, pr, ( 4 Sat, pr ) * 5 times, 2 Sat ( 36 )7 row: ( 5 Sat, pr ) * 6 times ( 42 )8 row: 3 Sat, pr, ( 6 Sat, pr ) * 5 times, 3 Sat ( 48 )9 row: ( 7 Sat, pr ) * 6 times ( 54 )10 row: 54 Sat 11 row: 4 Sat, pr, ( 8 Sat, pr ) * 5 times, 4 Sat ( 60 )12-19 row: 60 Sat ( 8 rows )20 row: 4 Sat, UB, ( 8 Sat, UB ) * 5 times, 4 Satn ( 54 )21 row: 54 Sat - Round 22
( 7 Sat, UB ) * 6 times ( 48 ) 23 row: 3 Sat, UB, ( 6 Sat, UB ) * 5 times, 3 Satn ( 42 )24 row: ( 5 Sat, UB ) * 6 ( 36 )
25 row: 2 Satn, UB, ( 4 Sat, UB ) * 5 times, 2 Satn ( 30 )Insert the eyes between 16 and 17 rows at a distance of 9 Satins from each other. Getting started fill your head.26 row: ( 3 Sat, UB ) * 6 times ( 24 )27 row: 1 Sat, Ub, ( 2 Sat, UB ) * 5 times, 1 Sat ( 18 )Fill your head. Leave a long stitch thread.
Piglet Bright pink yarn:
Body
6 row: knit 15 Sat on the first leg, then 15 Sat on the second ( 30 )
7 row: 30 Sat 8 row: ( 4 Sat, pr ) * 6 times ( 36 )
9 row: ( 5 Sat, pr ) * 6 times ( 42 )
10-15 rows: 42 Sat ( 6 rows )
16 row: ( 12 Satn, Ub ) * 3 times ( 39 )
17 row: ( 11 Sat, UB ) * 3 times ( 36 )
18 row: ( 4 Sat, UB ) * 6 times ( 30 )
- Round 19
30 Satn 20 row: ( 3 Sat, UB ) * 6 times ( 24 ) 21 row: 24 Sat 22 row: ( 2 Sat, UB ) * 6 times ( 18 )23rd row: 18th Sat Cut the thread, hide. Fill the part with a hollofiber.
Important Notes
- 💡 Use a Hook № 2 exactly as called for — a smaller hook keeps your stitches tight enough that stuffing won't peek through on this compact 16 cm toy.
- 💡 Since the pattern is worked in just 2 rounds for the head and 1 for the body, place a stitch marker at the start of every round so you never lose count on these fast-moving sections.
- 💡 Secure the 8mm safety eyes before you stuff the head fully — it's much easier to adjust spacing on a softer, less-stuffed piece.
- 💡 Keep a bit of both black and white cotton thread on hand and pre-cut short lengths before you start embroidering so you're not fumbling with a full skein on such a tiny surface.
- 💡 Stuff in small increments rather than one big handful — this keeps the rounded head and body shape smooth instead of lumpy, especially important on a piece this size.
- 💡 If adding the optional ribbon or tiny tambourine decoration, attach it after the head and body are fully assembled so it doesn't get in the way of your seaming needle.
Common Mistakes and Fixes
- Starting the head with a loose magic ring, leaving a visible hole at the very top.
Pull the tail yarn firmly after your first round of single crochets and give it an extra tug before weaving in the end so the ring closes completely flat.
- Losing track of which round you're on since the head only has 2 rounds and the body just 1, making it easy to over- or under-work a round.
Use a stitch marker in the first stitch of every round and count stitches before moving to the next round to make sure your totals match the pattern exactly.
- Sewing the safety eyes symmetrically without accounting for the snout's placement, resulting in a lopsided or cross-eyed piggy face.
Insert the eyes loosely first, hold the head up at arm's length, and adjust the spacing and height relative to where the snout will sit before locking the washers in place.
- Under-stuffing the head and body, leaving the piggy floppy and the stitches visibly loose over the polyfill.
Stuff firmly in small pinches, working the fiberfill into the increases and curves with the tip of your needle so the shape stays round and full even after squeezing.
- Embroidering the nostrils and facial details with thread that's too thick or pulled too tight, causing the cotton snout fabric to pucker.
Use a fine cotton embroidery thread split into 2 strands, work small satin or straight stitches, and keep tension gentle so the surrounding stitches stay smooth.
- Attaching the head to the body before securing all embroidery and eyes, making it awkward to reach the small parts with a needle afterward.
Complete all embroidery and eye placement on the head first, then whip stitch it neatly onto the body as the final assembly step for full needle access throughout.
Variations
- This little piggy is begging for a color makeover! Try a soft blush pink like Vanna's Choice in Pink or Scheepjes Catona in Old Rose for that classic piglet look, or go bold with a lilac or dusty blue for a whimsical, storybook feel. For a spotted piggy, work small patches of a contrasting color into the body rounds using the intarsia or fair isle color-change technique — even a few random black or brown spots add tons of charm. If you want a mini keychain version, drop down to a 2.5mm hook with a fingering weight cotton like DMC Petra, which will shrink the whole toy to about half size — perfect for bag charms or party favors. Going bigger? Size up to a worsted or chunky yarn like Bernat Blanket with a 4-5mm hook to create a huggable 25-30 cm nursery-ready piggy, though you'll want to add a few extra increase rounds to keep the proportions balanced. For themed variations, swap the plain thread embroidery for a tiny embroidered flower crown for spring, or crochet a little curly tail accent in a metallic gold thread for a festive touch. You could also felt small chenille yarn ears onto the head for a fuzzier, farmhouse-style finish, or embroider tiny freckles across the snout for extra personality. If you're making a set, crochet the whole piggy family — a big mama pig and two or three miniature piglets using the same pattern at different gauges — tied together with the same ribbon color for a coordinated farmyard display that looks amazing on a shelf or in a gift basket.
- I adore this pattern because it proves that big personality doesn't need a lot of rounds — just two for the head and one for the body, and suddenly you've got the cutest little pig staring back at you. The magic ring start keeps the top of the head perfectly tight and seamless, which matters a ton on a piece this small where every stitch shows. Working the increases to round out that snout is genuinely satisfying; you can watch the shape emerge stitch by stitch. Setting the 8mm safety eyes is my favorite moment in any amigurumi build, and here it's what truly brings the piggy to life before you've even picked up your embroidery needle. Adding the black and white thread details for the nostrils and any extra facial features lets you customize the expression — sleepy, cheeky, or wide-eyed and curious, it's entirely up to your needle. And because the finished toy is only 16 cm, it stitches up fast enough to gift on a whim, but still feels like a real handcrafted keepsake once that ribbon or tiny tambourine is tied on.
Frequently Asked Questions
What yarn weight works best for this amigurumi piggy?
A worsted weight cotton yarn paired with the recommended Hook № 2 gives you tight, stuffing-proof stitches perfect for this 16 cm toy. Cotton also holds its shape well, which helps the head and body rounds stay crisp.
Can I make this pattern without safety eyes?
Yes, you can embroider the eyes instead using black cotton thread in small satin stitches, which also makes the toy safer for very young children. Just plan the eye placement carefully before stitching since embroidery is harder to reposition than safety eyes.
Why is the body only worked in 1 round?
The body round is worked as a continuation piece that's typically started with a larger stitch count or joined directly to the head assembly, keeping the overall toy compact and quick to finish. It's intentional — this piggy is designed to be a fast, satisfying make.
How much stuffing will I need for a 16 cm piggy?
You'll only need a small handful of polyester fiberfill given the toy's compact size, but firm, even stuffing in small pinches is more important than quantity. Focus on filling the snout and rounded head first, then move to the body.
What's the best way to attach the ribbon or tambourine decoration?
Tie the ribbon around the neck seam where the head meets the body after both pieces are fully assembled and stuffed. If adding a tiny tambourine, secure it to the ribbon or directly to a front leg area with a few small stitches for stability.
Original pattern: https://onrecip.com/amigurumi-free-piggy-crochet-pattern/
About the Author

Marisol QuinteroWho runs Crochet Obsessed, why a stitch count sits at the end of every round, how a pattern gets written here, and the things this site will never do.
More Patterns
- IntermediateNo. 01

Slouchy everyday beanie worked flat in half double crochet
Crochet beanie pattern for a slouchy everyday look worked flat with hdc rows, then seamed into a soft,…
- IntermediateNo. 02
Crochet amigurumi doll with dress, shoes, and hat
Crochet amigurumi doll pattern with dress, shoes, and hat details for a soft, huggable keepsake you build one…
- IntermediateNo. 03
Chunky moss stitch crochet sweater with raglan-free shoulders
Chunky crochet sweater pattern using moss stitch, worked flat with a 10mm hook for a soft, fast, cool-weather…


