- LevelIntermediate
- Time4-6 hours
- Hook1.5 mm
- YarnWorsted
About This Pattern
There is something quiet and companionable about this little bear as it grows round by round in your lap. It is not flashy work. It is the kind of project where you settle into a chair, turn on something low in the background, and watch a shape appear from a single strand.
Your hands stay busy but never rushed here. You are counting increases and decreases, pinching stitches closed, tucking in fiberfill until it feels just full enough. There is a rhythm to joining the legs into the body that rewards patience more than speed.
Once it is finished, this bear sits well anywhere a shelf needs a little warmth, a nursery needs a friendly face, or a gift needs a handmade edge. It holds its shape on its own, no propping required. It looks equally at home tucked into a bookshelf or perched on a bed.
- Start each piece with a magic ring or small round, then increase steadily to build the initial circle shape.
- Work straight rounds of single crochet to grow the head or body to its needed height before shaping again.
- Stuff the head about three-quarters full with fiberfill so it holds a soft but stable round shape.
- Flatten the top opening and single crochet through both layers to close it cleanly and invisibly.
- Crochet one leg fully, fasten off, then crochet the second leg without fastening off.
- Join both legs into one continuous round to form the start of the body, placing a stitch marker to track the new beginning.
- Continue shaping the body with decrease rounds like the four-single-crochet-and-decrease repeat to taper it toward the neck.
- Finish with safety eyes and a hand-embroidered nose using the finer cotton yarn for the final details.
On the desk
- YarnArt Jeans yarn (55% cotton, 45% acrylic, 50 g/160 m)
- 1.5 mm crochet hook
- 4 mm safety eyes or black beads
- YarnArt Iris yarn (100% cotton, 20 g/138 m) for embroidering a nose
- Sewing needle
- Scissors
- Stitch marker
- Fiberfill
Stitch shorthand
- sc — single crochet
- inc — increase
- dec — decrease
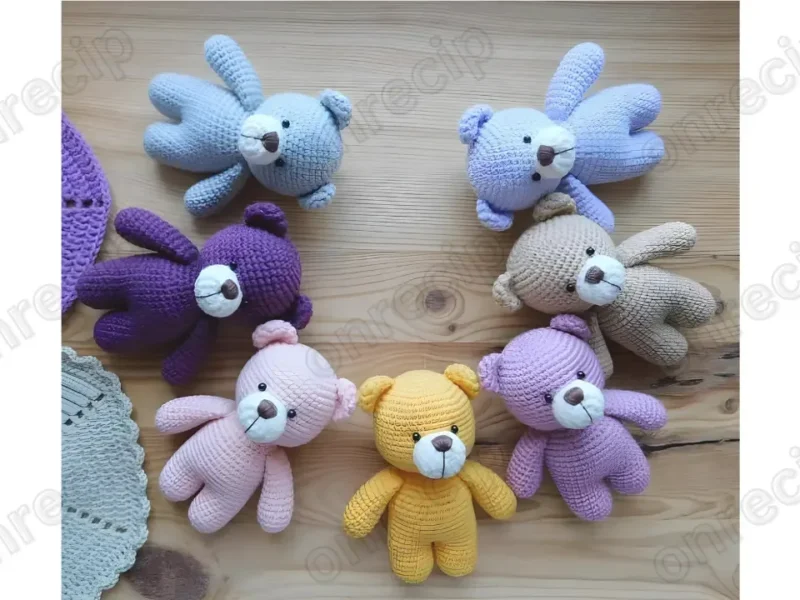
Amigurumi little bear crochet pattern with joined legs
R 2
- Round 1(12)
(inc) repeat 6 times [12]
- Rounds 3–12
12 sc (10 rows) Stuff wuth fiberfill 3/4 full. Fold the top opening flat and 5 sc through both sides.Fasten off and leave a long tail for sewing.
Legs and body
R 3
- Round 1(18)
(1 sc, inc) repeat 6 times [18]
- Rounds 4–9
18 sc (6 rows) Fasten off. Crochet the second leg, do not fasten off. Join the legs and crohet the body:
- Round 10
18 sc on the 1st leg, 18 sc on the 2nd leg [36] Place a stitch marker to mark beginning of the row.
Pay attention to the next rows will begin on the back of the body.
R 21
- Round 1(30)
(4 sc, dec) repeat 6 times [30]
R 23
- Round 1(24)
(3 sc, dec) repeat 6 times [24]
- Round 24
(2 sc, dec) repeat 6 times [18] Fasten off and leave a long tail for sewing. Ready to Learn More? Open the next page for Further Guidance!
Pages: 1 2
R 1
6 sc in magic ring [6]
R 1
6 sc in magic ring [6]
Where it goes
- A nursery shelf companion that pairs nicely with soft blankets and other amigurumi animals in the same room.
- A handmade gift for a baby shower, paired with a knit cap or a small board book.
- A desk or windowsill decoration that adds a soft, textured contrast to plants and ceramics nearby.
- A first toy for a toddler, sturdy enough for hugging thanks to the firmly stuffed body and joined legs.
Color ideas
- Classic honey bear Work the head, body, and legs in a warm honey-brown YarnArt Jeans, then embroider the nose in a contrasting dark brown YarnArt Iris.
- Soft oatmeal and cream Crochet the body and legs in oatmeal, keep the head in the same shade for a seamless look, and stitch the nose in a deeper cream-brown Iris yarn for gentle contrast.
Care
Hand wash the finished bear in cool water since the body is worked in a cotton-acrylic blend that resists stretching but still deserves gentle handling.
Lay it flat to dry rather than hanging it, which keeps the stuffed shape from sagging out of round.
Store it away from direct sunlight to keep both the Jeans yarn body and the Iris yarn embroidery from fading over time.
Easy to get wrong
Losing track after the leg join
Place your stitch marker exactly where the pattern indicates once both legs are joined into one round. The rows shift to working on the back of the body right after, so losing this marker makes it easy to twist the piece.
Overstuffing before closing the top
Stuff the head only three-quarters full before flattening and closing the opening with single crochet through both layers. Overstuffing makes it hard to fold the opening flat and can distort the seam.
Fastening off the first leg incorrectly
Remember that the first leg gets fastened off, but the second leg does not, since you need an active loop to join them. Mixing this up means re-attaching yarn where the pattern expects continuous stitching.
Between the songs
- What I love about this bear is the leg-to-body join, where you crochet one leg, set it aside, crochet the second, and then unite both into a single round that becomes the torso. That single moment turns two small shapes into one sturdy little body, and it is genuinely satisfying to watch happen. The stitch marker placement matters here too, since the rows shift to working on the back of the body afterward, so you are paying attention in a way that keeps the project interesting. Add in the safety eyes and the embroidered nose worked in a separate cotton yarn, and you get a face with real personality by the time you are done. It is a pattern that teaches shaping through simple increases and decreases without ever feeling repetitive.
Listener questions
What weight yarn does this bear use
It uses YarnArt Jeans, a cotton-acrylic blend in a fine weight, worked with a small 1.5 mm hook for tight, tidy stitches. The nose embroidery uses a separate all-cotton YarnArt Iris yarn for contrast in texture.
Can I use black beads instead of safety eyes
Yes, the materials list gives both as options, so either 4 mm safety eyes or black beads will work for the face. Beads are a good substitute if the bear is meant for display rather than for a very young child.
Why does the pattern mention working on the back of the body
Once the legs are joined into one round, the stitch marker resets your sense of direction, and later rows are worked from the back side of the piece. This keeps the shaping and any visible increases lining up correctly as the body tapers.
How full should I stuff the head
The pattern calls for stuffing the head about three-quarters full with fiberfill before closing the top. This keeps the shape soft and round without making the closing seam hard to sew flat.
Do I need to fasten off between the two legs
You fasten off after finishing the first leg, but the second leg is left unfastened so you can join both directly into one continuous round for the body. This join is what forms the base of the torso in a single seamless step.
Original pattern: https://onrecip.com/amigurumi-little-bear-free-crochet-pattern/
About the Author

Marisol QuinteroWho runs Crochet Obsessed, why a stitch count sits at the end of every round, how a pattern gets written here, and the things this site will never do.
More Patterns
- IntermediateNo. 01

Slouchy everyday beanie worked flat in half double crochet
Crochet beanie pattern for a slouchy everyday look worked flat with hdc rows, then seamed into a soft,…
- IntermediateNo. 02
Crochet amigurumi doll with dress, shoes, and hat
Crochet amigurumi doll pattern with dress, shoes, and hat details for a soft, huggable keepsake you build one…
- IntermediateNo. 03
Chunky moss stitch crochet sweater with raglan-free shoulders
Chunky crochet sweater pattern using moss stitch, worked flat with a 10mm hook for a soft, fast, cool-weather…


