- LevelIntermediate
- Time4-6 hours
- Hook2 mm
- YarnWorsted
About This Pattern
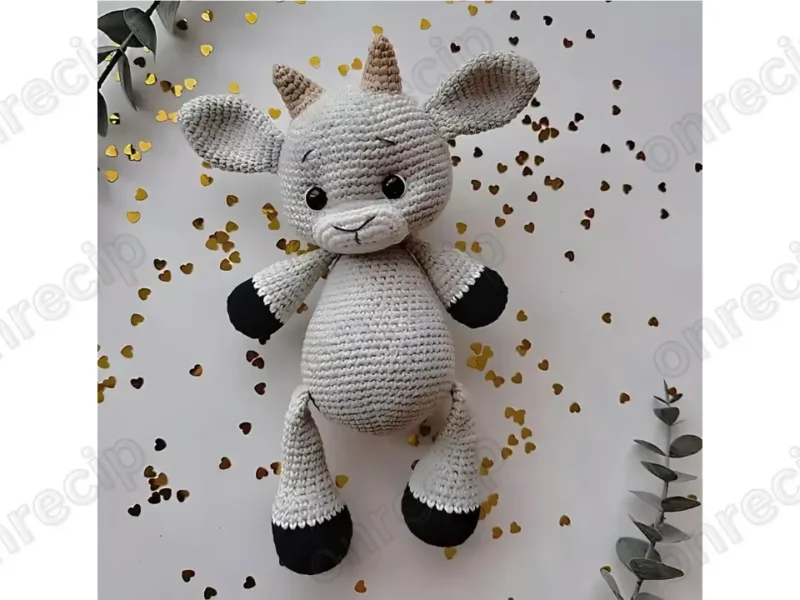
There is something so cheerful about a baby goat, and this little one carries that same bright, curious energy in yarn form. The rounded head and small muzzle give it an expression before you have even added the eyes. It is the kind of make that feels playful from the very first round.
Your hands will spend most of this project working small, steady increases, building the head out from a magic ring into a full round shape over many rounds. The muzzle comes together separately and gets sewn on, so you are practicing placement as much as stitching. Fingers get quiet and focused during the horn rounds, since those pieces are tiny and quick.
Set on a shelf or tucked among other amigurumi animals, this goat kid brings a soft, homemade warmth to a room. It has the kind of face that makes people pick it up and smile. A small stitched detail like the shaping line above the muzzle gives it real personality up close.
- Start the head at the crown and increase steadily outward until you reach the full rounded shape.
- Set the head aside once its rounds are complete and turn your attention to the smaller pieces.
- Crochet the muzzle in a few flat rows, starting with a chain and increasing at the sides to shape it.
- Make the horns using the same magic ring start, increasing gently to shape each small piece.
- Fold each ear piece in half and single crochet the edges together for a natural curve.
- Sew the finished muzzle onto the head, positioning it before adding the toy eyes.
- Add a shaping stitch in gray thread above the muzzle to connect the two eye areas.
- Stuff the head firmly and attach the ears and horns once the face is set.
On the desk
- YarnArt Jeans yarn in light gray (49), white (01), beige (48), and black (53)
- Embroidery thread for eyebrows and nose
- Crochet hook 1.5-2 mm
- Toy eyes 10 mm
- Toy stuffing
- Stitch markers
- Pins
- Needle for sewing parts
- Scissors
Stitch shorthand
- MR — magic ring
- sl st — slip stitch
- ch — chain
- sc — single crochet
- inc — increase
- dec — decrease
- (…) x n — repeat n times
Amigurumi goat kid: a small crochet friend to make
Head
- Round 1(6)
6 in MR
- Round 2
6 inc (12)
- Round 3
(1 sc, inc) x 6 (18)
- Round 4
(2 sc, inc) x 6 (24)
- Round 5
(3 sc, inc) x 6 (30)
- Round 6
(4 sc, inc) x 6 (36)
- Round 7
(5 sc, inc) x 6 (42)
- Round 8
(6 sc, inc) x 6 (48)
- Round 9
(7 sc, inc) x 6 (54)
- Round 10
(8 sc, inc) x 6 (60)
- Round 11
(9 sc, inc) x 6 (66)
- Rounds 12–25(66)
12-25th rounds: 66 sc (14 rounds)Insert the eyes between the 19th and 20th rows, 10 sc apart.
- Round 26
(9 sc, dec) x 6 (60)
- Round 27
(8 sc, dec) x 6 (54)
- Round 28
(7 sc, dec) x 6 (48)
- Round 29
(6 sc, dec) x 6 (42)
- Round 30
21 dec (21)
- Round 31
5 sc, dec, 5 sc, dec, 5 sc, dec (18)Cut the thread and hide it. Shape the face to your liking. Embroider the whites of the eyes and eyebrows.
Muzzle
- Row 1
ch 8
- Row 2
from the second chain from the hook, 7 sc, 3 sc in one, 6 sc
- Row 3
2 inc, 5 sc; 3 inc, 5 sc, 1 inc
- Row 4
(1 sc, inc) x 2, 5 sc, (1 sc, inc) x 3, 5 sc, 1 sc, inc
- Row 5
(inc, 2 sc) x 2, 5 sc, (inc, 2 sc) x 3, 5 sc, inc, 2 sc, sl stLeave a long thread for sewing. Sew the muzzle on. Use gray thread to make a shaping stitch above the muzzle from one eye to the other.
Horns (2 pieces)
Make 2- Round 1(4)
4 in MR
- Round 2
(1 sc, inc) x 2 (6)
- Round 3
(2 sc, inc) x 2 (8)
- Round 4
(3 sc, inc) x 2 (10)
- Round 5
(4 sc, inc) x 2 (12)
- Round 6
(5 sc, inc) x 2 (14)
- Round 7
(6 sc, inc) x 2 (16)Sl st. Leave a long thread for sewing.
Ears (2 pieces)
Make 2- Round 1(6)
6 in MR
- Round 2
6 inc (12)
- Round 3(12)
12 sc
- Round 4
(1 sc, inc) x 6 (18)
- Rounds 5–6(18)
18 sc (2 rounds)
- Round 7
(2 sc, inc) x 6 (24)
- Rounds 8–9(24)
24 sc (2 rounds)
- Round 10
(2 sc, dec) x 6 (18)
- Rounds 11–13(18)
18 sc (3 rounds)
- Round 14
(1 sc, dec) x 6 (12)
- Rounds 15–16(12)
12 sc (2 rounds)Fold in half and crochet 5 sc together. Leave a long thread for sewing.
Where it goes
- A shelf companion for a nursery or kid's bedroom, especially alongside other small farm-animal amigurumi.
- A handmade gift for someone who collects stuffed animals or crochet toys.
- A soft addition to a play basket, paired with other amigurumi animals for imaginative play.
- A little desk or windowsill piece that adds a handmade touch to a workspace.
Color ideas
- Cream and beige goat Work the head and body in white or light gray yarn, then use beige for the muzzle and horns so they read as a natural contrast.
- Light gray and black goat Crochet the head in light gray, keep the muzzle in beige, and use black yarn for smaller contrast details, plus embroidery thread for the nose and eyebrows.
Care
Hand wash the finished goat gently in cool water if it needs cleaning, since toy stuffing and small sewn parts do better without a machine cycle.
Reshape the head and ears while still damp, easing the muzzle and horns back into position, then let it air dry fully before handling.
Store it upright on a shelf rather than pressed into a box, so the ears keep their folded curve and the stuffing stays even.
Easy to get wrong
Rushing the head shaping rounds
Keep the increases evenly spaced across each round so the head grows into a smooth sphere rather than a lumpy or lopsided shape. Count your stitches at the end of each round before moving on.
Sewing the muzzle on crooked
Pin or hold the muzzle in place and check it from the front before sewing, since it sets the whole facial expression. Adjust its angle slightly until the toy eyes will sit level once placed.
Skipping the embroidered eyebrow line
The gray shaping stitch above the muzzle, worked from one eye to the other, is what gives the face its gentle, alert look. Take a few extra minutes with the embroidery thread rather than leaving the face plain.
Between the songs
- What I love here is how much character comes from just a few extra pieces. The muzzle is worked separately in its own short set of rows, then sewn onto the head, which teaches you real control over amigurumi assembly. The horns are worked in the round from a magic ring too, so you get repeated practice with that opening technique at a tiny scale. Adding a shaping stitch in gray thread above the muzzle, from eye to eye, is a small embroidery touch that changes the whole face. The ears fold in half and get single crocheted together, a satisfying finishing move that gives them natural floppiness instead of a flat, stiff shape.
Listener questions
What size hook do I need for this pattern?
The materials list calls for a crochet hook between 1.5 and 2 mm, which is a fine gauge suited to close, tight stitches. That small hook size is what keeps the stuffing from peeking through.
Do I need special eyes for the face?
Yes, the pattern uses 10 mm toy eyes along with embroidery thread for the eyebrows and nose. The eyes go in after the muzzle is sewn on so you can judge the placement against the finished face.
How many pieces make up the finished goat?
The core parts are the head, the muzzle, and two ears, along with the two horns worked from a magic ring. Each piece is worked separately before being sewn together.
What is the gray shaping stitch above the muzzle for?
It is a small embroidered line worked from one eye to the other using gray thread, sitting just above the sewn-on muzzle. It defines the brow area and gives the goat a more expressive face.
How do I get the ears to curve naturally?
Fold each ear piece in half and single crochet the edges together rather than leaving them flat. This fold is what creates the soft, floppy shape before you sew them onto the head.
Original pattern: https://onrecip.com/free-crochet-amigurumi-goat-kid-pattern/
About the Author

Marisol QuinteroWho runs Crochet Obsessed, why a stitch count sits at the end of every round, how a pattern gets written here, and the things this site will never do.
More Patterns
- IntermediateNo. 01

Slouchy everyday beanie worked flat in half double crochet
Crochet beanie pattern for a slouchy everyday look worked flat with hdc rows, then seamed into a soft,…
- IntermediateNo. 02
Crochet amigurumi doll with dress, shoes, and hat
Crochet amigurumi doll pattern with dress, shoes, and hat details for a soft, huggable keepsake you build one…
- IntermediateNo. 03
Chunky moss stitch crochet sweater with raglan-free shoulders
Chunky crochet sweater pattern using moss stitch, worked flat with a 10mm hook for a soft, fast, cool-weather…


