- LevelIntermediate
- Time4-6 hours
- Hook4.5 mm
- YarnWorsted
About This Pattern
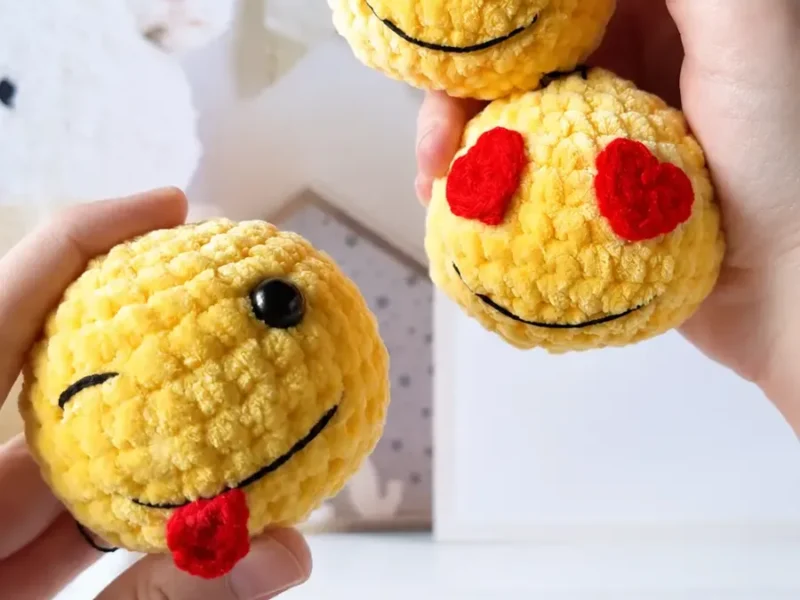
There is something playful about this one, almost like doodling with a hook instead of a pen. Each little yellow sphere turns into a tiny face with its own personality, and I get to decide which expression it wears. It is a quick burst of cheer rather than a long commitment, which is exactly the mood I am after on a lazy afternoon.
Your hands spend most of the time on quiet, steady single crochet rounds, building the ball shape before anything else happens. Then they shift into finer work: threading a bead on, guiding a long needle through stuffed fiber to place a smile or a wink, maybe stitching a tiny crocheted heart. It is a nice mix of simple repetition and careful, close-up detail.
a desk or clipped to a bag, one of these faces catches your eye before you even register why you are smiling. A small cluster of them on a shelf reads like a tiny crowd of characters, each with a different expression. They are compact enough to tuck into a pocket but bold enough to notice from across the room.
- Start by crocheting the round emoji ball base in continuous rounds, increasing steadily to build a smooth sphere shape.
- Pause partway through the final rounds to add fiberfill gradually, keeping the shape even and lump-free as you go.
- Decide which face you are making, since eyes and mouth details change the personality of the finished piece.
- the smiling or winking version, sew on the round black beads at the eye placement before finishing the embroidery.
- the heart-eyes version, crochet the two small hearts separately, then sew or glue them onto the ball.
- Use a long needle to embroider the smile or wink in a single smooth arc so the line stays clean.
- If you want a keychain, weave your ring or ribbon loop through the top center ring before the ball is fully closed.
- Finish stuffing, tie off all embroidery threads inside the body, and close the final round to seal everything neatly.
On the desk
Yarn
- Himalaya Dolphin Baby plush yarn in yellow
Embroidery Thread
- Black Iris cotton thread for embroidering smiles and securing eyes
Detail Yarn
- Pekhorka “Children’s New” (or fine sport weight acrylic yarn) in red for hearts and tongue
Crochet Hook
- Size 4.5 mm (or any size that matches your yarn gauge)
Eyes
- 4 mm round black beads or half-beads
Needle
- Yarn needle and sewing needle for placing eyes
Stuffing
- Fiberfill polyester stuffing
Tools
- Scissors and craft glue (optional for securing embroidered lines)
Finished Size
- Height: Approximately 6 cm (2.4 inches)
Stitch shorthand
- ch — chain stitch
- sc — single crochet
- dc — double crochet
- tr — treble crochet
- sl st — slip stitch
- inc — increase (work 2 sc into the same stitch)
- dec — decrease (work 2 sc together with a common top)
- * — repeat instructions the specified number of times
Amigurumi emoji plush keychains with velvet yarn
Emoji Ball Base
- Round 1
2 ch, work 6 sc into the first ch. (6)
- Round 2
6 inc. (12)
- Round 3
(1 sc, inc)*6. (18)
- Round 4
(2 sc, inc)*6. (24)
- Round 5
(3 sc, inc)*6. (30)
- Round 6
30 sc. (30)
- Round 7
30 sc. (30)
- Round 8
30 sc. (30)
- Round 9
30 sc. (30)
- Round 10
(3 sc, dec)*6. (24)
- Round 11
(2 sc, dec)*6. (18)
- Round 12
(1 sc, dec)*6. (12)
- Round 13
6 dec. (6)Stuff the ball firmly with fiberfill, but do not close the bottom opening yet. You will use this open space to pull through and tie off the thread ends after attaching the facial features. Once all facial details are embroidered and secured, pull the opening tight, secure the thread, and weave in the end.
Smiling Emoji
Base: 1 crocheted emoji ball base.
Eyes: 2 black beads (4 mm diameter).
Details: Black thread for embroidering the smile.
Eye Placement: Sew the two beads between Round 5 and Round 6, spacing them 4 sc apart.
Smile Embroidery: Embroider the smile with a single smooth arc stitch to prevent creases or jagged lines. Position the upper corners of the smile between Round 7 and Round 8.
Finishing: After embroidering the smile and sewing on the eyes, bring all thread ends inside through the bottom opening, tie them securely, and close the opening.
Securing: Since the smile is embroidered in one curved stitch, apply a tiny drop of craft glue along the underside of the thread to keep it held in place. Attach a key ring or cord at the top to complete the keychain.
Heart Eyes Emoji
Base: 1 crocheted emoji ball base.
Eye Details: 2 crocheted hearts in red yarn.
Mouth Details: Black thread for embroidering the smile.
- Round 1
Heart Pattern Ch 4, then work directly into the first chain stitch: 3 dc, 1 tr, 3 dc, 3 ch, and 1 sl st. Fasten off and leave a tail for sewing (or cut the yarn short if gluing).Heart Placement: Sew or glue the two red hearts between Round 3 and Round 7, spacing them 2 to 3 sc apart.
Smile Embroidery: Embroider the smile using the exact same steps and placement as the Smiling Emoji.
Winking Emoji
Base: 1 crocheted emoji ball base.
Eye Details: 1 half-bead (or round bead) for the open eye, black thread for the winking eye and smile.
Tongue Details: 1 crocheted tongue in red yarn.
Eye Placement: Glue or sew the open bead eye between Round 4 and Round 6.
Winking Eye: Embroider the squinted winking eye with a single straight stitch across from the bead eye. Apply a tiny dab of glue along the thread edge to secure the line.
Smile Embroidery: Embroider the curved smile across the lower face following the same technique as the previous emojis.
- Round 1
Tongue Pattern Ch 5, then starting from the third chain from the hook, work 3 dc. Fasten off.Tongue Placement: Sew or glue the tongue directly beneath the center of the embroidered smile.
Where it goes
- Clip one onto a backpack or school bag zipper so it is easy to spot among a pile of similar bags.
- Attach it to a house key or car key ring as a small, cheerful way to tell your keys apart from everyone else's.
- Set a few on a desk or shelf next to other small amigurumi for a tiny collection of expressive faces.
- Pair one with a plain tote bag or pencil case as a quick handmade accent that adds color without much bulk.
Color ideas
- Classic yellow trio Yellow plush yarn for the entire ball base on all three faces, black thread and beads for the smiling and winking eyes, and red yarn reserved only for the hearts on the heart-eyes version.
- Swap the base shade Replace the yellow plush yarn with any other solid plush color for the ball base rounds, then keep the black bead eyes, black thread smile, and red crocheted hearts exactly as given so the facial details still read clearly.
Care
Hand wash gently in cool water if needed, since plush velvet yarn like Himalaya Dolphin Baby can lose its soft nap with rough machine washing.
Reshape the ball gently while damp and let it air dry fully away from direct heat so the fiberfill stays even and round.
Store finished keychains away from sharp keys or rough bag interiors so the plush surface and embroidered details stay smooth over time.
Easy to get wrong
Stuffing too much at once
Add fiberfill in small pinches as you work Round 12 instead of packing it in all at the end. Gradual stuffing keeps the sphere round instead of lumpy or stretched at the seams.
Losing track of the round start
Place a stitch marker in the first stitch of every round since the base is worked in continuous rounds with no slip stitch to mark it. Without a marker it is easy to drift and misplace an increase.
Knots showing through the plush fabric
Tie off embroidery thread ends inside the hollow body before closing Round 13, not on the outside surface. Hidden knots keep the smile or wink looking clean and prevent the thread from working loose.
Between the songs
- What I love here is how much personality comes from so few elements. The ball base is the same every time, worked in continuous rounds with the plush yarn, but the eyes and mouth are what transform it. Sewing on round beads for the smiling face, crocheting those tiny hearts for the heart-eyes version, or planning placement for a wink all feel like the fun part, not an afterthought. Working the embroidery with a long doll needle through the stuffed body is satisfying in a very tactile way, since you are sculpting expression after the shape already exists. And because the base repeats, once you have made one face, the next one goes faster and gives you room to experiment with a different personality.
Listener questions
What type of yarn works best for these emoji plushies?
Super bulky plush or chenille yarn creates a soft, squishy texture that makes these keychains feel like mini plushies. However, you can also use standard worsted weight acrylic yarn with a 3.5 mm hook for a smaller, tighter finish.
How do I attach the safety eyes or beads if I close the body?
It is best to attach beads or embroider details before closing the bottom hole. This allows you to pull thread tails into the bottom opening, knot them securely on the inside, and then pull the final round tight.
Can I glue the hearts and eyes instead of sewing them?
Yes, fabric glue or clear craft glue works well on plush yarn. Make sure to press the piece firmly in place and let it dry completely before handling or hanging the keychain.
How do I stop the embroidered smile from shifting over time?
Using a single long stitch for the curved line gives a clean look. Placing a tiny drop of clear craft glue along the underside of the embroidery thread anchors it to the plush fabric permanently.
Are these emoji keychains safe for young children?
If making these for toddlers or young kids, embroider all facial features with dark thread instead of using small beads or half-beads to prevent potential choking hazards.
Original pattern: https://craftwithnina.com/amigurumi-pattern-cute-emoji-plush-keychains/
About the Author

Marisol QuinteroWho runs Crochet Obsessed, why a stitch count sits at the end of every round, how a pattern gets written here, and the things this site will never do.
More Patterns
- IntermediateNo. 01

Rose Granny Square Tote Crochet Pattern
Rose granny square tote crochet pattern made from 18 dimensional rose squares for a sturdy, romantic everyday bag.
- IntermediateNo. 02
Tropical octopus baby blanket crochet pattern with appliqués
Tropical octopus baby blanket crochet pattern: a cream filet base with coral and turquoise octopus appliqués, leaves, and…
- IntermediateNo. 03
Sunny lemon couple amigurumi crochet pattern
Sunny lemon couple amigurumi crochet pattern with embroidered slices and safety eyes for a cheerful handmade shelf pair.


