- LevelIntermediate
- Time4-6 hours
- Hook3 mm
- YarnWorsted
About This Pattern
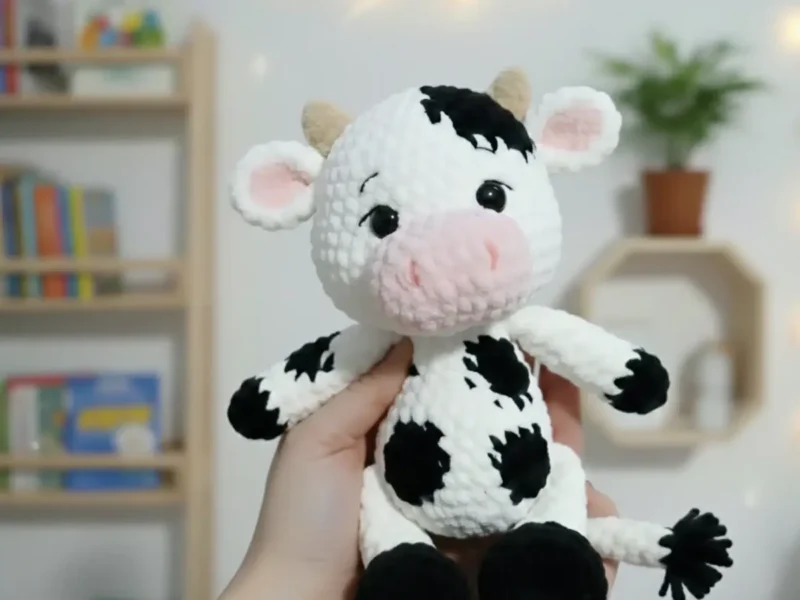
There is something wonderfully calm about this cow. She is not spiky or silly like a lot of amigurumi animals get. She sits with her round muzzle and small horns and just looks content, the kind of toy you make on a quiet afternoon when you want your hands busy but your mind unbothered.
Your hands will spend a lot of time in the increase and decrease rhythm that builds every rounded part, from the arms to the head to the tail. Then they shift gears for the appliqué spots, which ask for patience and a light touch with the sewing needle. It is a project that moves between fast shaping and slow finishing.
Once she is stuffed and her horns are set, this cow settles onto a shelf or a child's bed like she has always belonged there. The pink nose and dark spots give her a bit of personality without any fuss. She reads as handmade and a little bit loved from across the room.
- Build the arms with a magic ring, shaping them with increases and stuffing partway through before closing them off.
- Crochet the tail as a long tube and finish the tip in black, ready for a fluffy tuft later.
- Shape the body and head separately, each growing through rounds of single crochet increases and decreases.
- Make the small muzzle piece and set the pink safety nose into it near its early rounds.
- Crochet a pair of ears and a pair of horns, keeping the horns in the beige yarn for contrast.
- Sew the muzzle onto the head, stuffing as you go, then attach the ears and horns.
- Make several black appliqué spots and stitch them onto the body and head before joining all the limbs and tail.
On the desk
- Cotton black thread for embroidery (COCO Vita Cotton recommended)
- Fiberfill or polyester stuffing material
- 3 mm crochet hook
- Sewing needle
- Safety eyes 11 mm diameter
- Safety nose 21×17 mm (pink)
- this …
- Familiarize yourself with these standard US crochet terms before starting:
- CH – chain
- MR – magic ring
- SC – single crochet
- DC – double crochet
- INC – increase (two single crochet in one stitch)
- DEC – decrease (two single crochet together)
- SL ST – slip stitch
- Complete Pattern Instructions
Crochet with white yarn
- Stuff until the 6th round.
- Chain 2 and start crocheting in the first chain from hook 5sc
- 5inc (10)
- (4sc, 1inc)*2 (12) 4-5. 12sc (2 rounds)
- (4sc, 1dec)*2 (10) 7-8. 10sc (2 rounds)
- (3sc, 1dec)*2 (8) 10-11. 8sc (2 rounds)
- 6sc, 1dec (7)
- 5sc, 1dec (6)
- We will attach the arms to the body later.
Stitch shorthand
- CH — chain
- MR — magic ring
- SC — single crochet
- DC — double crochet
- INC — increase (two single crochet in one stitch)
- DEC — decrease (two single crochet together)
- SL ST — slip stitch
Amigurumi cow plush pattern with spots and horns
Legs
Make 2Start with black color (hooves).
Note: When starting Round 1, you will crochet in an oval shape around the chain foundation. After crocheting on one side of the chain, continue on the opposite side (back loops of the same chain) to complete the oval.
Make shift stitches if needed (the marker is in the center of the heel). I made +2sc.
Change to white color.
Stuff the foot only.
Note!!! The seam is parallel to the foot when folding the leg. Make shift stitches or unravel the excess stitches if needed. I made +1sc.
- Round 1
Chain 6, start crocheting in the second chain from hook: 1inc, 3sc, 3sc in one stitch, continue crocheting on the other side of the chain foundation, 4sc. (12)
- Round 2
2inc, 3sc, 3inc, 3sc, 1inc. (18)
- Round 3
1sc, 1inc, 3sc, (1sc, 1inc)*3, 3sc, (1sc, 1inc)*2. (24)
- Round 4
24sc
- Round 5
(4sc, 3dec)*2, 4sc. (18)
- Round 6
6sc, 3dec, 6sc. (15)
- Round 7
4sc, 3dec, 5sc. (12)
- Round 8
12sc
- Round 9
5sc, 1dec, 5sc. (11)
- Round 10
4sc, 1dec, 5sc. (10)
- Round 11-13
10sc. (3 rounds)
- Round 14
Fold the edges and crochet 5 sc through both loops. Fasten off.
Head
Start crocheting the head from the body; for convenience, count the rounds from the beginning.
Crochet with white color.
If you use safety eyes, install them between rounds 9 and 10. The distance between the eye stems is 8 stitches. The distance between the installed eyes is 6 stitches.
Shape the cheeks when stuffing.
Tighten the remaining 6 loops with the needle.
Attach the eyes between rounds 9 and 10. The distance between the eye stems is 8 stitches. The distance between the installed eyes is 6 stitches.
- Round 1
18inc through the front loops. (36)
- Round 2
(5sc, 1inc)*6. (42)
- Round 3
3sc, 1inc, (6sc, 1inc)*5, 3sc. (48)
- Round 4
(7sc, 1inc)*6. (54)
- Round 5-10
54sc. (6 rounds)
- Round 11
11sc, 5dec, 12sc, 5dec, 11sc. (44)
- Round 12
(9sc, 1dec)*4. (40)
- Round 13
4sc, 1dec, (8sc, 1dec)*3, 4sc. (36)
- Round 14
(4sc, 1dec)*6. (30)
- Round 15
2sc, 1dec, (3sc, 1dec)*5, 1sc. (24)
- Round 16
(2sc, 1dec)*6. (18)
- Round 17
(1sc, 1dec)*6. (12)
- Round 18
6dec. (6)
Muzzle
Start with white color.
Note: This creates an oval shape. After crocheting on one side of the chain, continue on the opposite side (back loops) to complete the oval shape.
Fasten off and break yarn.
- Round 1
Chain 8, start crocheting in the second chain from hook: 1inc, 5sc, 3sc in one stitch, continue crocheting on the other side of the chain foundation, 6sc. (16)
- Round 2
2inc, 5sc, 3inc, 5sc, 1inc. (22)
- Round 3
(1sc, 1inc)*2, 5sc, (1inc, 1sc)*3, 6sc, 1inc. (28)
- Round 4
28sc
- Round 5
28sc, 1 sl st
Ears
Make 2Crochet the first part (inner ear) with pink color.
Crochet the second part (outer ear) with white color but do not cut yarn.
Leave a long yarn tail for sewing.
- Round 1
Chain 2, start crocheting in the first chain from hook: 10 sc, 1 sl st. (inner ear, pink color)
- Round 2
Chain 2, start crocheting in the first chain from hook: 10sc. (outer ear, white color, do not cut yarn)
- Round 3
Put both parts with the wrong sides inward and crochet 10 inc. (20)
- Round 4
20sc
- Round 5
20sc
Arms
Make 2Crochet with white yarn.
Stuff until the 6th round.
- Round 1
5sc
- Round 2
5inc. (10)
- Round 3
(4sc, 1inc)*2. (12)
- Round 4-5
12sc. (2 rounds)
- Round 6
(4sc, 1dec)*2. (10)
- Round 7-8
10sc. (2 rounds)
- Round 9
(3sc, 1dec)*2. (8)
- Round 10-11
8sc. (2 rounds)
- Round 12
6sc, 1dec. (7)
- Round 13
5sc, 1dec. (6)
- Round 14
Flatten together and crochet 3 sc through both loops. Fasten off.
Body
Crochet with white color.
The stitch marker is in the middle on the back.
Start stuffing as you crochet.
Make shift stitches if needed (the marker is in the center on the back). I made +2sc.
- Round 1
7sc
- Round 2
7inc. (14)
- Round 3
(1sc, 1inc)*7. (21)
- Round 4
1sc, 1inc, (2sc, 1inc)*6, 1sc. (28)
- Round 5
(3sc, 1inc)*7. (35)
- Round 6
2sc, 1inc, (4sc, 1inc)*6, 2sc. (42)
- Round 7
41sc, 1sc with the tail together. (42)
- Round 8
1sc with the tail together, 7sc, the left leg-5sc, 16sc, the right leg-5sc, 8sc. (42)
- Round 9-10
42sc. (2 rounds)
- Round 11
2sc, 1dec, (4sc, 1dec)*6, 2sc. (35)
- Round 12-13
35sc. (2 rounds)
- Round 14
(3sc, 1dec)*7. (28)
- Round 15-17
28sc. (3 rounds)
- Round 18
1sc, 1dec, (2sc, 1dec)*6, 1sc. (21)
- Round 19
(5sc, 1dec)*3. (18)
- Round 20
3sc, the arm-3sc, 6sc, the arm-3sc, 3sc. (18)
Horns
Make 2Crochet with beige/light brown yarn.
Stuff lightly as you crochet.
Fasten off and leave a long yarn tail for sewing.
- Round 1
6sc
- Round 2
6sc
- Round 3
(1sc, 1inc)*3. (9)
- Round 4-5
9sc. (2 rounds)
- Round 6
(2sc, 1inc)*3. (12)
- Round 7
12sc
- Round 8
(2sc, 1dec)*3. (9)
- Round 9
9sc
Tail
Crochet with white color.
Change to black color.
- Round 1
4sc
- Round 2-22
4sc. (21 rounds)
- Round 23
4sc
- Round 24
4inc. (8)
- Round 25
8inc. (16)
- Round 26
16sc
- Round 27
Flatten together and crochet 8 sc through both loops. Fasten off.
Black Spots (Appliqués)
You will need to make 4-6 irregular black spots of different sizes to sew onto the body, head, and legs.
Fasten off, leave a long tail. Don't stuff any of the spots.
- Round 1(6)
Large Spot Round 1: 6sc in first chain from hookLarge Spot Round 3: (1sc, 1inc)*6. (18)
Large Spot Round 4: (2sc, 1inc)*6. (24)Large Spot Round 5: 24sc
Large Spot Round 2: 6inc. (12)
- Round 2(6)
Medium Spot Round 1: 6sc in first chain from hookMedium Spot Round 3: (1sc, 1inc)*6. (18)
Medium Spot Round 4: 18sc
Medium Spot Round 2: 6inc. (12)
- Round 3(6)
Small Spot Round 1: 6sc in first chain from hookSmall Spot Round 3: 12sc
Small Spot Round 2: 6inc. (12)
Where it goes
- A soft companion for a child's bed or reading nook, paired with other plush farm animals for a themed shelf.
- A centerpiece for a nursery shelf, sitting alongside soft blocks or a knit blanket in matching white and beige tones.
- A handmade gift for a baby shower or new parent, especially nice next to a set of amigurumi barnyard friends.
- A craft fair or market item, displayed in a small cluster of plush animals in coordinating plush yarn colors.
Color ideas
- Classic dairy cow Work the body, head, arms, ears, and muzzle in white, keep the hooves and appliqué spots in black, use pink for the nose and inner ears, and finish the horns in beige.
- Soft neutral farmhouse Swap the black spots for a smaller number of appliqués (closer to four than six) so more white shows through, keep the beige horns and pink nose as accents, and let the black stay concentrated at the hooves and tail tip.
Care
Hand wash the finished cow in cool water with a mild detergent, since plush baby yarn holds its softness better without a washing machine.
Lay her flat on a towel to air dry rather than using heat, which can flatten the plush texture of the yarn.
Reshape the ears and horns gently while damp, then store her upright on a shelf out of direct sunlight to keep the white yarn from yellowing.
Assembly
- Step 1 We will attach the arms to the body later.
- Step 2 We will attach the legs to the body later.
- Step 3 We will attach the tail to the body later.
- Step 4 The tail has a fluffy black tuft at the end – you can add extra black yarn strands by knotting them through the stitches of the last round to create the tuft effect.
- Step 5 Attach the pink nose between rounds 2 and 3.
- Step 6 Sew the muzzle between rounds 5 and 12. Stuff as you sew it.
- Step 7 Points 1 and 6 are on the bottom of the muzzle between rounds 2 and 3.
- Step 8 Points 2, 3, 4, and 5 are under the eyes.
- Step 9 Insert the needle at point 1, draw it out at point 2, insert the needle at point 3 and draw it out at point 6.
- Step 10 Insert the needle at point 1 and draw it out at point 4. Insert the needle at point 5 and draw it out at point 6.
- Step 11 Repeat one more time. Tighten the thread firmly.
- Step 12 Tie it into a few knots and hide the tail.
- Step 13 Embroider the nostrils on the pink nose with cotton black thread.
- Step 14 Sew the ears in round 10-11 on the sides of the head.
- Step 15 Sew the horns on top of the head between rounds 12-14, spacing them about 6-8 stitches apart.
- Step 16 Sew the black spots irregularly on the head (1-2 spots, including over one eye/forehead).
- Step 17 Sew the black spots irregularly on the body (2-3 large spots).
- Step 18 Sew the black spots irregularly on the legs (small spots on some legs).
- Step 19 Pin the spots first to see the placement before sewing them permanently.
- Step 20 Embroider eyelashes above the eyes with black cotton thread.
- Step 21 Embroider eyebrows above the eyes with black cotton thread (optional, as shown in photo).
- Step 22 Embroider a vertical line under the pink nose with black cotton thread.
- Step 23 Add fluffy black tuft to the tail by knotting black yarn strands through the black end.
- Step 24 Optional: Embroider small smile or mouth details.
Easy to get wrong
Losing the oval shape on the legs
Remember you are crocheting around the chain foundation, not back and forth, so after finishing one side you continue into the opposite side of the same chain to close the oval.
Stuffing the arms too early or too late
Add fiberfill only up to the point noted in the arm rounds, then keep the top rounds unstuffed so the arm lies flatter where it joins the body.
Sewing the muzzle on before placing the nose
Insert the pink safety nose into the muzzle piece while it is still flat, between its early rounds, before you sew the muzzle onto the head and stuff it.
Between the songs
- What makes this cow satisfying is the mix of construction methods packed into one small body. The legs start on a chain foundation you crochet around in an oval, which is a different skill than the usual magic ring start and gives you sturdy, flat-bottomed feet. The appliqué spots are their own tiny project, worked separately in black and then sewn on, so you get to plan her markings instead of leaving them to chance. Attaching the safety eyes, the pink safety nose, and the horns all happen at different stages, which keeps the build varied instead of repetitive. By the time you sew the muzzle on and stuff it as you go, you have practiced shaping, appliqué, and finishing all in one sitting.
Listener questions
Can I use a different plush yarn than the one listed?
Yes, any yarn comparable to a soft baby-weight plush yarn will work well with a 3 mm hook. Just keep in mind the notes about yarn consumption varying with density, so have extra on hand.
Why does the leg start with a chain instead of a magic ring?
The chain foundation lets you build an oval base, which gives the hoof a flatter, more stable bottom than a round magic ring start would. It is a different technique from the rest of the pattern but not a difficult one once you see the oval take shape.
How many black spots should I make?
The pattern gives a range of four to six appliqués, so you can decide based on how spotted you want her to look. Fewer spots leaves more white showing, while more spots gives her a busier, patchier look.
When do I attach the arms, legs, and tail?
Those three pieces are all set aside and attached to the body later, after the main parts are crocheted. This lets you finish shaping and stuffing everything separately before final assembly.
How big will the finished cow be?
Using the recommended yarn and a 3 mm hook, she stands approximately 20-21 cm, or about 7.8 inches, tall. Your gauge and stuffing firmness can shift that slightly.
Original pattern: https://amigurumicorner.com/crochet-cow-pattern-free-amigurumi-tutorial/
About the Author

Marisol QuinteroWho runs Crochet Obsessed, why a stitch count sits at the end of every round, how a pattern gets written here, and the things this site will never do.
More Patterns
- IntermediateNo. 01

Slouchy everyday beanie worked flat in half double crochet
Crochet beanie pattern for a slouchy everyday look worked flat with hdc rows, then seamed into a soft,…
- IntermediateNo. 02
Crochet amigurumi doll with dress, shoes, and hat
Crochet amigurumi doll pattern with dress, shoes, and hat details for a soft, huggable keepsake you build one…
- IntermediateNo. 03
Chunky moss stitch crochet sweater with raglan-free shoulders
Chunky crochet sweater pattern using moss stitch, worked flat with a 10mm hook for a soft, fast, cool-weather…


