- LevelIntermediate
- Time4-6 hours
- Hook2 mm
- YarnSport
About This Pattern
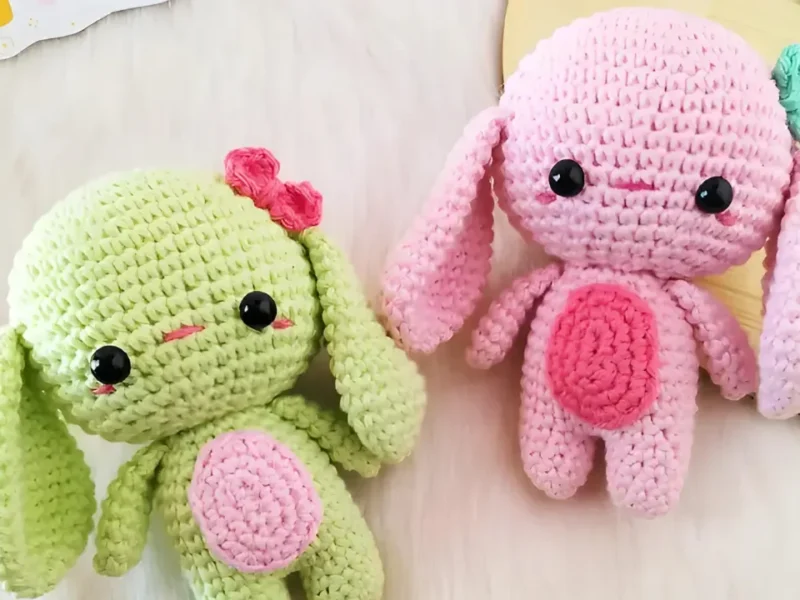
This bunny has that soft, unhurried feeling I love in a weekend project. There's nothing frantic about it, just round after round of single crochet building up into ears, arms, legs and a head that all wait patiently to be joined. It reads as gentle before you've even picked a color.
Your hands stay busy but never rattled. Most of the work is single crochet worked in the round, with increases and decreases doing the quiet job of shaping curves without a single seam showing. The ears ask for a little extra patience since they run longer than the other parts, and that's where you'll feel your rhythm settle in.
Finished, this bunny sits the way a good toy should: a little forward on its haunches, ears up or flopped depending on how you sewed them. It looks right on a shelf next to books, tucked into a kid's arm, or propped on a windowsill catching morning light. It doesn't shout for attention, it just belongs wherever you set it.
- Start the head with a magic ring and increase steadily until it curves into a proper dome shape.
- Insert the safety eyes at the specified point between rounds before closing up the head completely.
- Stuff the head gradually as you work rather than waiting until the last round.
- Crochet both ears separately, working them longer than the other parts before folding and closing them flat.
- Make the arms and legs as quick individual pieces using magic rings and a single increase round.
- Work the body as its own short piece worked in the round.
- Sew every part together, leaving long tails on the ears and arms specifically for that purpose.
- Finish the face with embroidery thread for any details beyond the safety eyes.
On the desk
- Sport weight cotton yarn in light pink, pink and green color.
- 2 mm crochet hook.
- Fiber fill for stuffing.
- A pair of 8 mm safety eyes.
- Tapestry needle.
- Black and pink embroidery thread and needle.
Stitch shorthand
- sc — single crochet
- inc — increase
- dec — decrease
Amigurumi bunny pattern with safety eyes and floppy ears
Head
Using light pink yarn.
Insert 8 mm safety eyes between R13 and R14 with 7 stitches in between.
Start stuffing with fiberfill and continue to stuff as you go.
Stuff firmly and fasten off leaving a long tail for sewing.
Embroider a small line for mouth and blush using pink thread.
- Round 1
6 sc in a magic ring. (6)
- Round 2
Inc x 6. (12)
- Round 3
[Sc, inc] x 6. (18)
- Round 4
[Sc 2, inc] x 6. (24)
- Round 5
[Sc 3, inc] x 6. (30)
- Round 6
[Sc 4, inc] x 6. (36)
- Round 7
[Sc 5, inc] x 6. (42)
- Rounds 8–15
Sc x 42. (42)
- Round 16
[Sc 4, dec] x 7. (35)
- Round 17
[Sc 3, dec] x 7. (28)
- Round 18
[Sc 2, dec] x 7. (21)
- Round 19
[Sc, dec] x 7. (14)
Ears
Make 2Using light pink yarn.
Sc through both the top layers to close. Fasten off leaving a long tail for sewing.
- Round 1
6 sc in magic ring. (6)
- Round 2
Inc x 6. (12)
- Round 3
[Sc, inc] x 6. (18)
- Round 4
[Sc 2, inc] x 6. (24)
- Rounds 5–6
Sc x 24. (24)
- Round 7
[Sc 6, dec] x 3. (21)
- Round 8
Sc x 21. (21)
- Round 9
[Sc 5, dec] x 3. (18)
- Rounds 10–11
Sc x 18. (18)
- Round 12
[Sc 4, dec] x 3. (15)
- Round 13
Sc x 15. (15)
- Round 14
[Sc 3, dec] x 3. (12)
- Round 15
Sc x 12. (12)
- Round 16
[Sc 2, dec] x 3. (9)
Arms
Make 2Using light pink yarn.
Sc through both the top layers to close.
Fasten off leaving a long tail for sewing.
- Round 1
6 sc in magic ring. (6)
- Round 2
[Sc 2, inc] x 2. (8)
- Rounds 3–7
Sc in each st. (8)
Legs
Make 2Using light pink yarn.
Fasten off the first leg but don't cut off the yarn in second one. Stuff the legs and continue to body part.
- Round 1
6 sc in magic ring. (6)
- Round 2
[Sc, inc 2] x 2. (10)
- Rounds 3–5
Sc in each st. (10)
Body
- Round 6
With the second leg, chain 2 and join to the first leg and sc around the first leg (10 sts), sc in the 2 chains (2 sts), sc around the second leg (10 sts) and sc in the other side of 2 chains (2 sts). [24 sts in total]. (24)
- Rounds 7–14
Sc in each st. (24)
- Round 15
[Sc 2, dec] x 6. (18)
Where it goes
- A soft companion for a child's bed or reading nook that pairs nicely with other small stuffed toys on a shelf.
- A nursery decoration set on a dresser alongside board books and a small lamp.
- A handmade gift for a baby shower, paired with a knit blanket or a set of onesies.
- A photo prop for a home studio setup, styled next to woven baskets or linen backdrops.
Color ideas
- Classic blossom Light pink yarn works up the entire bunny, the head, ears, arms, legs and body, while pink embroidery thread adds the mouth and blush details for a soft, monochrome look.
- Accent option Keep the base in light pink throughout, then bring in the green yarn listed in the materials for a small added accent, such as a bow or flower, since this portion of the pattern doesn't spell out its exact use.
Care
Hand wash the finished bunny in cool water since it's made from cotton yarn, which holds its shape well but can felt slightly if machine washed on a hot cycle.
Lay it flat to dry rather than hanging it, so the stuffed head and ears keep their rounded shape instead of stretching under their own weight.
Store it upright or lying on its back on a shelf, away from direct sun, to keep the light pink yarn and pink embroidery details from fading unevenly over time.
Easy to get wrong
Losing count on ear increases
The ears run to 16 rounds with several early increase rounds packed close together, so mark round 1 with a stitch marker and recount before starting round 5. It is easy to drift a round off without noticing until the ear looks uneven.
Placing safety eyes too early
Wait until you've worked enough rounds on the head to see the curve clearly before locking the eyes in place between the specified rounds. Removing and repositioning safety eyes damages the fabric, so test placement with removable stitch markers first.
Under-stuffing before closing seams
Because you stuff the head as you go rather than all at once at the end, it's tempting to add too little early on and end up with a soft, floppy top. Stuff firmly in the earlier rounds so the shape holds once you reach the final decreases.
Between the songs
- What I love here is how much shaping happens using just sc, inc and dec. No fancy stitches, no charts to decode, just the steady logic of increasing every round through the first seven rounds of the head until it domes properly. The ears are the real treat because you work them long, fold them, and stitch through both top layers to close them flat, which gives them that soft, slightly floppy bunny silhouette. Placing the safety eyes between specific rounds with an exact stitch count between them is a small technical moment that pays off the second the face clicks into focus. Stuffing as you go rather than at the end keeps the shape honest the whole way through.
Listener questions
What hook size does this bunny use
It works up on a 2 mm crochet hook, which is small and gives the sport weight cotton a nice tight, dense fabric. That tightness matters here since it keeps the fiberfill from peeking through the stitches.
Why does the pattern use sport weight cotton instead of worsted
Sport weight cotton with a small hook produces a finer, firmer fabric that holds detail well on a piece this size. It also gives the finished bunny a slightly crisp, sturdy feel rather than a plush, loose one.
Can I skip the safety eyes and embroider the face instead
You can use the black and pink embroidery thread listed in the materials to stitch the eyes by hand if you prefer, especially for a piece meant for a very young child. Just plan your placement between the same rounds noted for the safety eyes so the proportions still look right.
Why are the ears so much longer than the arms and legs
The ears run 16 rounds compared to the arms at 7 rounds and the legs at 5 rounds, which gives them the length needed to fold over and close through both top layers for that classic floppy bunny look. It's a deliberate shape choice, not a typo.
How much fiberfill will I need
The pattern doesn't specify an exact amount, just fiberfill for stuffing, so I'd keep a bag on hand and stuff firmly as you go rather than measuring it out ahead of time. The head takes the most since you're stuffing it continuously as you close the rounds.
Original pattern: https://onrecip.com/spring-bunny-free-crochet-pattern/
About the Author

Marisol QuinteroWho runs Crochet Obsessed, why a stitch count sits at the end of every round, how a pattern gets written here, and the things this site will never do.
More Patterns
- IntermediateNo. 01

Slouchy everyday beanie worked flat in half double crochet
Crochet beanie pattern for a slouchy everyday look worked flat with hdc rows, then seamed into a soft,…
- IntermediateNo. 02
Crochet amigurumi doll with dress, shoes, and hat
Crochet amigurumi doll pattern with dress, shoes, and hat details for a soft, huggable keepsake you build one…
- IntermediateNo. 03
Chunky moss stitch crochet sweater with raglan-free shoulders
Chunky crochet sweater pattern using moss stitch, worked flat with a 10mm hook for a soft, fast, cool-weather…


