- LevelIntermediate
- Time4-6 hours
- Hook2.5 mm
- YarnWorsted
About This Pattern
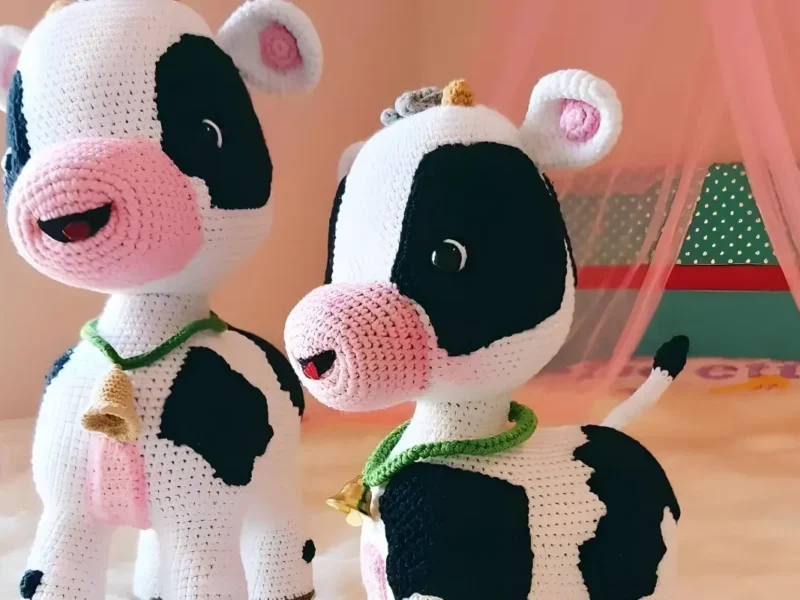
There is something so gentle about this little calf. The white and brown patches give it that just-born farmyard look, the kind of face that makes you want to slow down and pick better colors. It is a project that feels like a quiet Sunday, not a race to the finish.
Your hands will spend real time here: four legs built before the body even starts, two eye patches shaped to frame safety eyes, a muzzle and a set of ears all worked separately before they meet the head. You will join legs by sewing stitches together, then crochet right over that seam to keep going. It asks for patience with small parts and confidence joining them into one shape.
Once assembled, this calf sits sturdy on its four legs, ears out, tiny horns up, ready for a shelf or a kid's bed. Set it beside a lamp or tuck it into a bookshelf gap and it holds its own. It is the kind of piece people pick up and turn over just to see the patches.
- Sew the front and back legs together at the base so all four stand ready to join.
- Begin the body on top of the joined legs, then work Round 12 around all four together to merge them.
- Continue the body rounds evenly upward, then shape the head with its own increases and decreases.
- Make the eye patches, muzzle, horns, and ears as separate small pieces while the head rests.
- Attach the safety eyes into the head, then sew the eye patches around them for the marked face.
- Sew the horns, muzzle, and ears onto the head, followed by the hair and tail pieces.
- Finish by stitching on the various body, neck, and abdominal patches to complete the calf's coat.
On the desk
- Small amount of green yarn for leash
- Small amount of brown yarn for bell
- Small amount of gray yarn for hair
- Hook: 2,5 mm
- Eyes: 12 mm
- A little black and red felt
Stitch shorthand
- ch — chain
- st — stitch
- mr — magic ring
- sc — single crochet
- inc — increase (2 sc in the next st)
- dec — decrease
- ss — slip stitch
- dc — double crochet
- hdc — half double crochet
- BLO — back loop only
- FLO — front loop only
- sc3tog — invisible decrease through 3 stitches
- ( )*6 — repeat whatever is between the brackets the number of times stated
Amigurumi baby calf with patches, horns and ears
Back Legs
Make 2Start with brown color.
Change to white color before Round 9.
Step by step: Start with black color; Fasten off and leave a tail for sewing.
Step by step: Start with pink color.
Step by step: Start with black color.
- Round 1
6 sc in magic ring. (6)
- Round 2
6 inc. (12)
- Round 3
(Sc, inc) x 6. (18)
- Round 4
(2 sc, inc) x 6. (24)
- Round 5
(3 sc, inc) x 6. (30)
- Round 6
Sc in each st from BLO. (30)
- Round 7
13 sc, 2 dec, 13 sc. (28)Step by step: 31 sc, 2 hdc, 2 dc, 2 sc, 4 dc, 6 sc, 6 dc, 2 hdc, ss in the first st. (56).
- Round 8
13 sc, dec, 13 sc. (27)
- Round 9
Sc in each st from BLO. (27)
- Round 10-15
Sc in each st around. (27) (6 rnds)
- Round 16
Dec, 11 sc, 2 inc, 10 sc, dec. (27)
- Round 17-19
Sc in each st around. (27) (3 rnds)
- Round 20
Inc, 10 sc, dec, 2 sc, dec, 9 sc, inc. (27)
- Round 21
Sc, inc, 9 sc, dec, 2 sc, dec, 9 sc, inc. (27)
- Round 22
2 sc, inc, 8 sc, dec, 2 sc, dec, 9 sc, inc. (27)
- Round 23
3 sc, inc, 10 sc, dec, 10 sc, inc. (28)
- Round 24
4 sc, inc, 22 sc, inc. (30)
- Round 25
(4 sc, inc) x 6. (36)
- Round 26-28
Sc in each st around. (36) (3 rnds)
Front Legs
Make 2Start with brown color.
Change to white color before Round 9.
- Round 1
6 sc in magic ring. (6)
- Round 2
6 inc. (12)
- Round 3
(Sc, inc) x 6. (18)
- Round 4
(2 sc, inc) x 6. (24)
- Round 5
(3 sc, inc) x 6. (30)
- Round 6
Sc in each st from BLO. (30)
- Round 7
13 sc, 2 dec, 13 sc. (28)
- Round 8
13 sc, dec, 13 sc. (27)
- Round 9
Sc in each st from BLO. (27)
- Round 10-11
Sc in each st around. (27) (2 rnds)
- Round 12
12 sc, dec, 13 sc. (26)
- Round 13
12 sc, dec, 12 sc. (25)
- Round 14
12 sc, dec, 11 sc. (24)
- Round 15-17
Sc in each st around. (24) (3 rnds)
- Round 18
Dec, 22 sc. (23)
- Round 19
Dec, 21 sc. (22)
- Round 20
10 sc, 2 inc, 10 sc. (24)
- Round 21
Sc in each st around. (24)
- Round 22
10 sc, 2 dec, 10 sc. (22)
- Round 23
Dec, 20 sc. (21)
- Round 24-28
Sc in each st around. (21)
- Round 29
(6 sc, inc) x 3. (24)
- Round 30
(3 sc, inc) x 6. (30)
- Round 31
(4 sc, inc) x 6. (36)
Body
Connect the front legs and back legs by sewing 9 stitches together on each side; there should be 27 stitches on both legs (count 8 sts from the left leg) before starting Round 1.
Round 11 joins the back legs; place a stitch marker here.
After the divider, work Round 12 around all four legs together to form the body.
Round 38 skips 28 sts, leaving 28 sc + 2 ch to continue with the neck.
Fasten off after Round 42; fix the yarn and hide the end.
- Round 1
7 sc from behind the left front leg, 1 hdc, 1 hdc to the junction, 1 hdc from right leg, 7 sc, 1 ch, return. (17)
- Round 2-10
Sc in each st around. (17)
- Round 11
8 sc from behind the left front leg, 1 sc to the junction, 8 sc from right leg.
- Round 12
19 sc from right back leg, 1 sc to the junction, 19 sc from left back leg, 10 sc from body, 19 sc from left front leg, 1 sc to the junction, 19 sc from right front leg, 10 sc from body. (98)
- Round 13-26
Sc in each st around. (98)
- Round 27
58 sc, dec, 16 sc, dec, 20 sc. (96)
- Round 28
(10 sc, dec) x 8. (88)
- Round 29
51 sc, dec, 15 sc, dec, 18 sc. (86)
- Round 30
50 sc, dec, 18 sc, dec, 14 sc. (84)
- Round 31
Sc in each st around. (84)
- Round 32
6 sc, dec, (4 sc, dec) x 4, 6 sc, dec, 44 sc. (78)
- Round 33
4 sc, dec, (3 sc, dec) x 4, 4 sc, dec, 46 sc. (72)
- Round 34
(6 sc, dec) x 3, 48 sc. (69)
- Round 35
(5 sc, dec) x 3, 48 sc. (66)
- Round 36
4 sc, dec, (2 sc, dec) x 3, 4 sc, dec, 42 sc. (61)
- Round 37
6 sc, dec, sc3tog, dec, 48 sc. (57)
- Round 38
4 sc, (sc3tog) x 2, 40 sc, 2 ch, 28 sts skip.
- Round 39
28 sc, 2 sc on the chains. (30)
- Round 40
4 hdc, 20 ss, 6 hdc. (30)
- Round 41
6 sc, 20 ss, 3 sc, 3 hdc.
- Round 42
3 hdc, 3 sc, 1 ss.
Left Eye Patch
Start with black color.
Make 3 eye patches total, using either the left or right version, with one extra for the back of the head.
Fasten off and leave a tail for sewing.
- Round 1
8 sc in magic ring. (8)
- Round 2
8 inc. (16)
- Round 3
(Sc, inc) x 8. (24)
- Round 4
(2 sc, inc) x 8. (32)
- Round 5
(3 sc, inc) x 8. (40)
- Round 6
(4 sc, inc) x 8. (48)
- Round 7
(5 hdc, 2 hdc in the next st) x 8. (56)
- Round 8
6 dc, 6 sc, 4 dc, 2 sc, 4 dc, 2 hdc, 31 sc, ss in the first st. (56)
Head
Start with white color.
Place eyes between round 23 and round 24, leaving 17 sts between them.
Fasten off and leave a long tail for sewing.
- Round 1
9 ch, starting from the 2nd ch st crochet around the chain like: inc, 6 sc, 3 sc in next stitch, 7 sc. (18)
- Round 2
3 sc in same stitch, inc, 6 sc, inc, 3 sc in next stitch, inc, 6 sc, inc. (26)
- Round 3
(Inc, sc) x 2, 7 sc, (inc, sc) x 3, 7 sc, (inc, sc). (32)
- Round 4
2 sc, 2 inc, 2 sc, inc, 8 sc, inc, 2 sc, 2 inc, 2 sc, inc, 8 sc, inc. (40)
- Round 5
Inc, 2 sc, inc, 3 sc, inc, 8 sc, inc, 3 sc, inc, 2 sc, inc, 3 sc, inc, 8 sc, inc, 3 sc. (48)
- Round 6
(Inc, 4 sc) x 2, inc, 8 sc, (inc, 4 sc) x 3, inc, 8 sc, inc, 4 sc. (56)
- Round 7-13
Sc in each st around. (56) (7 rnds)
- Round 14
(Inc, 4 sc) x 3, inc, 10 sc, (inc, 4 sc) x 3, inc, 14 sc. (64)
- Round 15-22
Sc in each st around. (64) (8 rnds)
- Round 23
(Inc, 5 sc) x 3, inc, 12 sc, (inc, 5 sc) x 3, inc, 14 sc. (72)
- Round 24-25
Sc in each st around. (72) (2 rnds)
- Round 26
(Inc, 5 sc) x 3, inc, 16 sc, (inc, 5 sc) x 3, inc, 18 sc. (80)
- Round 27
Sc in each st around. (80)
- Round 28
3 sc, (inc, 5 sc) x 3, inc, 20 sc, (inc, 5 sc) x 3, inc, 19 sc. (88)
- Round 29-31
Sc in each st around. (88) (3 rnds)
- Round 32
3 sc, (dec, 5 sc) x 3, dec, 20 sc, (dec, 5 sc) x 3, dec, 19 sc. (80)
- Round 33
(Dec, 5 sc) x 3, dec, 16 sc, (dec, 5 sc) x 3, dec, 18 sc. (72)
- Round 34
(10 sc, dec) x 6. (66)
- Round 35
(9 sc, dec) x 6. (60)
- Round 36
(8 sc, dec) x 6. (54)
- Round 37
(7 sc, dec) x 6. (48)
- Round 38
(6 sc, dec) x 6. (42)
- Round 39
(7 sc, dec) x 6. (36)
- Round 40
(5 sc, dec) x 6. (30)
- Round 41
Sc in each st around. (30)
Horns
Make 2Start with mustard color.
Leave a tail for sewing.
- Round 1
6 sc in magic ring. (6)
- Round 2
(Sc, inc) x 3. (9)
- Round 3
Sc in each st around. (9)
Muzzle
Start with pink color.
Leave long tail for sewing.
- Round 1
8 ch, starting from the 2nd ch st crochet around the chain like: 6 sc, 3 sc in next stitch, 6 sc. (15)
- Round 2
3 sc in same stitch, 6 sc, 2 inc, 6 sc. (19)
- Round 3
Inc, sc, inc, 6 sc, inc, sc, inc, 6 sc, inc. (24)
- Round 4
(3 sc, inc) x 6. (30)
- Round 5
(4 sc, dec) x 6. (36)
- Round 6-8
Sc in each st around. (36) (3 rnds)
- Round 9
(5 sc, inc) x 6. (42)
- Round 10
Sc in each st around. (42)
- Round 11
(6 sc, inc) x 6. (48)
- Round 12
(14 sc, dec) x 3. (45)
Hair
Start with gray color.
- Round 1
6 sc in magic ring. (6)
- Round 2
Sc in each st around. (6)
- Round 3
(Sc, inc) x 3. (9)
- Round 4
(2 sc, inc) x 3. (12)
- Round 5-7
Sc in each st around. (12) (3 rnds)
- Round 8
(2 sc, dec) x 3. (9)
Short Hair
Make 2Start with gray color.
- Round 1
11 ch, 2 hdc into second stitch, 9 hdc.
Ears
Make 2Start with white color.
Leave a tail for sewing.
- Round 1
6 sc in magic ring. (6)
- Round 2
6 inc. (12)
- Round 3
(Sc, inc) x 6. (18)
- Round 4
(2 sc, inc) x 6. (24)
- Round 5-8
Sc in each st around. (24) (4 rnds)
- Round 9
(6 sc, dec) x 3. (21)
- Round 10
(5 sc, dec) x 3. (18)
- Round 11
(4 sc, dec) x 3. (15)
- Round 12
(3 sc, dec) x 3. (12)
- Round 13-14
Sc in each st around. (12) (2 rnds)
Tail
Start with black color.
Change to white color before Round 7.
- Round 1
5 sc in magic ring. (5)
- Round 2
Sc in each st around. (5)
- Round 3
5 inc. (10)
- Round 4-5
Sc in each st around. (10)
- Round 6
3 dec, 4 sc. (7)
- Round 7-18
Sc in each st around. (7)
Overflow
Start with green color.
- Round 1
76 ch, starting from the 2nd ch st: 75 hdc.
- Round 2
2 ch, return, 75 hdc.
Bell
Start with yellow color.
- Round 1
6 sc in magic ring. (6)
- Round 2
6 inc. (12)
- Round 3-4
Sc in each st around. (12) (2 rnds)
- Round 5
(3 sc, inc) x 3. (15)
- Round 6
Sc in each st around. (15)
- Round 7
(4 sc, inc) x 3. (18)
- Round 8
Sc in each st around. (18)
- Round 9
(2 sc, inc) x 6 from FLO, ss. (24)
- Round 10
24 reverse sc in each st around. (24)
Abdominal Patch
Start with pink color.
- Round 1
6 ch, starting from the 2nd ch: 4 hdc, return, 1 ch. (4)
- Round 2-8
4 hdc, return, 1 ch. (4) (7 rnds)
- Round 9
Hdc in each stitch around the piece (2 sc to sts in the corner). (28)
Body Patches
Start with black color.
Fasten off and leave a tail for sewing.
- Round 1
10 ch, starting from the 2nd ch: 9 sc, 3 ch, return.
- Round 2
Starting from the 2nd ch: 11 sc, 3 ch, return.
- Round 3
Starting from the 2nd ch: 13 sc, 1 ch, return.
- Round 4
13 sc, 3 ch, return.
- Round 5
Starting from the 2nd ch: 15 sc, 3 ch, return.
- Round 6
Starting from the 2nd ch: 17 sc, 1 ch, return.
- Round 7
15 sc, 1 ch, return.
- Round 8
15 sc, 1 ch, return.
- Round 9
1 skip, 14 sc, 1 ch, return.
- Round 10
1 skip, 13 sc, 1 ch, return.
- Round 11
1 skip, 10 sc, 5 ch, return.
- Round 12
Starting from the 2nd ch: 14 sc, 1 ch, return.
- Round 13
14 sc, 4 ch, return.
- Round 14
Starting from the 2nd ch: 14 sc, 1 ch, return.
- Round 15
14 sc, 1 ch, return.
- Round 16
1 skip, 10 sc, 1 ch, return.
- Round 17
1 skip, 9 sc, 1 ch, return.
- Round 18
1 skip, 8 sc, 1 ch, return.
- Round 19
1 skip, 7 sc, 1 ch, return.
- Round 20
1 skip, 6 sc, ss.
Small Patches
Make 2Start with black color.
- Round 1
8 sc in magic ring, ss. (8)
Neck Patch
Start with black color.
Leave a tail for sewing.
- Round 1
15 ch, starting from the 2nd ch: 14 sc, 1 ch, return.
- Round 3-8
14 sc, 1 ch, return. (6 rnds)
- Round 9
4 sc, 2 dc, 3 dc same in st, dc, 2 hdc, 6 sc, 2 hdc, dc, 3 dc same in st, 2 dc, hdc, 3 sc, hdc, 3 dc same in st, dc, 2 hdc, 6 sc, 2 hdc, 2 dc, 3 dc same in st, ss (in stitches around the piece).
Left Front Patch
Start with black color.
Leave a tail for sewing.
- Round 1
6 ch, starting from the 2nd ch: 5 sc, 1 ch, return.
- Round 2
5 sc, 3 ch, return.
- Round 3
Starting from the 2nd ch: 7 sc, 1 ch, return.
- Round 4
7 sc, 3 ch, return.
- Round 5
Starting from the 2nd ch: 9 sc, 3 ch, return.
- Round 6
Starting from the 2nd ch: 11 sc, 3 ch, return.
- Round 7
Starting from the 2nd ch: 13 sc, 1 ch, return.
- Round 8
13 sc, 1 sc, return.
- Round 9
1 skip, 10 sc, 1 ch, return.
- Round 10
1 skip, 8 sc, 1 ch, return.
- Round 11
1 skip, 6 sc, 1 ch, return.
- Round 12
1 skip, 4 sc, ss.
Where it goes
- Set it on a child's shelf alongside other soft farm-animal amigurumi for a cozy barnyard scene.
- Give it as a handmade companion for a nursery, paired with a knit blanket in matching white and brown.
- Use it as a photo prop on a windowsill with a small potted plant for texture contrast.
- Bring it to a craft fair table as a display piece next to smaller amigurumi to show scale and detail.
Color ideas
- Classic dairy calf White (955) as the main body and head, brown (907) on the legs from the base up through the early rounds, brown eye patches, muzzle, and body patches, with black (960) hooves and horns in 950.
- Soft pink accent calf White (955) as the base body and head, pink (932) swapped in for the patches and ear linings instead of brown, keeping the legs and horns in the standard brown and black for contrast.
Care
Hand wash the finished calf in cool water since it is worked in Lanaso Alara acrylic yarns, which hold their shape better without agitation.
Lay it flat to dry rather than hanging, so the stuffed legs and body do not stretch out of shape.
Store it stuffed and upright on a shelf, away from direct sun, to keep the white sections from yellowing over time.
Assembly
- Step 1 Connect the front legs and back legs by sewing 9 stitches together on each side; there should be 27 stitches on both legs (count 8 sts from the left leg).
- Step 2 Place safety eyes on the head between round 23 and round 24, leaving 17 stitches between them.
- Step 3 Sew the left and right eye patches around the eyes (leave a tail for sewing on each).
- Step 4 Sew the horns onto the head (leave a tail for sewing).
- Step 5 Sew the muzzle onto the head (leave long tail for sewing).
- Step 6 Sew the ears onto the head (leave a tail for sewing).
- Step 7 Sew the ear patches onto the ears.
- Step 8 Sew the hair and short hair pieces onto the head.
- Step 9 Fasten off the head after Round 41 and use the long tail for sewing to attach the head to the body.
- Step 10 Sew the tail onto the back of the body.
- Step 11 Sew the bell onto the leash (Overflow piece).
- Step 12 Sew the abdominal patch onto the body.
- Step 13 Sew the body patches onto the body.
- Step 14 Sew the small patches and big patches onto the body.
- Step 15 Sew the neck patch onto the neck.
- Step 16 Sew the left front patch onto the body.
Easy to get wrong
Uneven leg color change
Change from brown to white on the exact round noted for each leg so all four legs match in height before joining.
Loose leg-to-body seam
Sew the legs together firmly at the base before starting Round 12, since a loose join will show once the body rounds pull the shape taut.
Eyes placed off-center
Count the stitches between the eyes carefully when placing the safety eyes so the eye patches sit level once sewn on.
Between the songs
- What I love here is how many small techniques stack into one calf. You work magic rings for the legs, ears, and horns, use increases and decreases to shape the head and muzzle, and then color-change from brown to white partway up each leg for that dappled look. The body starts flat-ish, joining four separately made legs with sewing before you crochet Round 12 around all of them at once, which is a genuinely satisfying moment. Adding eye patches, ear patches, a neck patch, and body patches afterward turns a plain shape into something with real personality. It rewards anyone who likes piecing a project together rather than working one long tube.
Listener questions
Do I need to finish all four legs before starting the body?
Yes, all four legs are worked and set aside first, then sewn together at the base before the body begins. This gives the calf its standing shape from the very first body round.
What size hook does this pattern use?
The whole calf is worked with a 2.5 mm hook. Keeping your tension consistent with that hook size helps all the pieces match up when you sew them together.
Why are there so many small patches?
The patches are what give this calf its dappled, realistic coat rather than a flat single color. Each one, from the abdominal patch to the small and big body patches, is worked separately then sewn on.
Can I use a different eye size than 12 mm?
The pattern is written around 12 mm safety eyes and the eye patches are shaped to frame that size. A different size will still work, but check the fit against the head before sewing the patches down.
In what order should I attach the head details?
Place the safety eyes first, then sew on the eye patches, followed by the horns, muzzle, and ears. Working in that order keeps the face symmetrical before the rest of the details go on.
Original pattern: https://onrecip.com/crochet-pattern-tutorial-free-amigurumi-cute-calf-pattern/
About the Author

Marisol QuinteroWho runs Crochet Obsessed, why a stitch count sits at the end of every round, how a pattern gets written here, and the things this site will never do.
More Patterns
- IntermediateNo. 01

Slouchy everyday beanie worked flat in half double crochet
Crochet beanie pattern for a slouchy everyday look worked flat with hdc rows, then seamed into a soft,…
- IntermediateNo. 02
Crochet amigurumi doll with dress, shoes, and hat
Crochet amigurumi doll pattern with dress, shoes, and hat details for a soft, huggable keepsake you build one…
- IntermediateNo. 03
Chunky moss stitch crochet sweater with raglan-free shoulders
Chunky crochet sweater pattern using moss stitch, worked flat with a 10mm hook for a soft, fast, cool-weather…


