- LevelIntermediate
- Time3-5 Hours
- YarnWorsted
About This Pattern
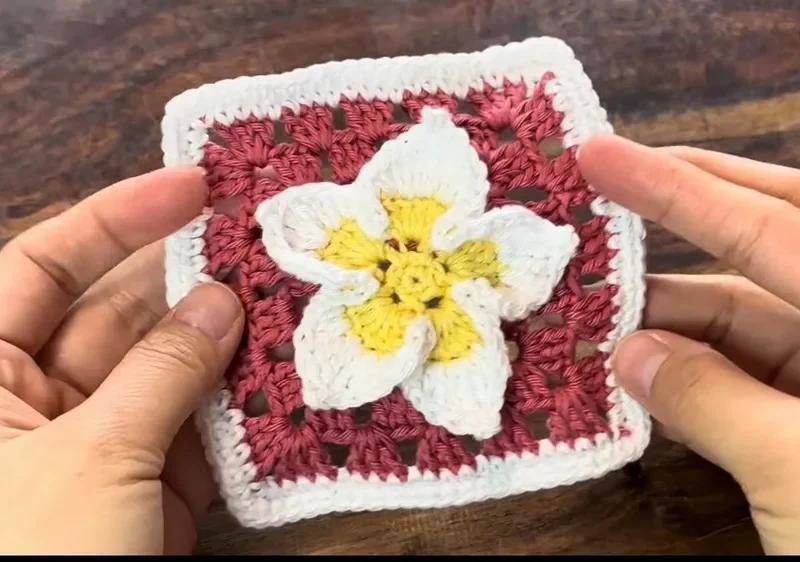
This 3D Frangipani Flower Granny Square transforms the classic granny square into something truly show-stopping — a raised, sculptural bloom inspired by the fragrant tropical flower found in leis and island gardens. Unlike a flat motif, this pattern builds actual dimension into the petals, giving you a textured centerpiece rather than a simple layered square. It's perfect for crocheters who love their granny squares to have a little drama, and for anyone dreaming of a tropical-themed blanket, pillow, or wall hanging.
The star technique here is working new stitches directly into a marked stitch from a previous round, which lifts the petals up and away from the base rather than keeping everything flat. You'll also build out chain-4 spaces repeated around the round to form the petal foundations before shaping them. This calls for an intermediate comfort level with stitch markers and reading rounds carefully, since precision in stitch placement is what gives the flower its 3D lift. Expect roughly 3 to 5 hours from first chain to final slip stitch, depending on your yarn weight and hook speed.
The finished frangipani square works beautifully as a single statement piece or repeated across a blanket for a garden-like effect. Its dimensional petals give it a soft, huggable texture that flat granny squares simply can't match, making it wonderfully tactile as well as pretty to look at. Because it's compact and quick to whip up, it also makes a lovely handmade gift — stitch a handful of them onto a tote bag, cushion cover, or gift them individually as tropical-themed coasters for someone who loves flowers and beach vibes alike.
- Start the base round and place a stitch marker to keep track of your working stitch throughout.
- Attach new yarn into the marked stitch, then chain 1 and single crochet to anchor the next round.
- Chain 4 and repeat this around the stitch until you've created five even chain spaces for the petals.
- Continue working the remaining rounds to build up the layered petal structure stitch by stitch.
- Join each round neatly with a slip stitch to the very first stitch to keep your rounds seamless.
- Work through all eleven rounds of the main pattern, watching the petals begin to take shape.
- Follow the two assembly steps to lift and shape the petals into their finished 3D form.
- Weave in all yarn ends and gently steam-block the flower so the petals hold their raised shape.
Materials
- Yarn of your choice
- Crochet hook compatible with your yarn
- Stitch marker
- Scissors
Crochet Abbreviations
- ch
- chain
- st
- stitch
- sl st
- slip stitch
- sc
- single crochet
- dc
- double crochet
- mr
- magic ring
3D Frangipani Flower Granny Square Crochet Pattern
Main Pattern
- Round 1(5)
Making a Magic Ring: Wrap the yarn around your fingers twice to make a magic ring. Chain 1 (this counts as a single crochet). Work 5 single crochets into the ring. Tighten the ring by pulling the tail end. Slip stitch to the first single crochet to close the round.
- Round 2
Creating Chain Spaces: Chain 1 (does not count as a stitch). Make a single crochet in the same stitch. Chain 3, repeat this in each stitch around. Join with a slip stitch to the first single crochet, creating 5 chain spaces.
- Round 3(5)
Adding Petals: Slip stitch into the first chain space, then chain 3. Make 5 double crochets into the chain space. Chain 3, then slip stitch into the same chain space. Repeat this step in each chain space around to create petals.
- Round 4
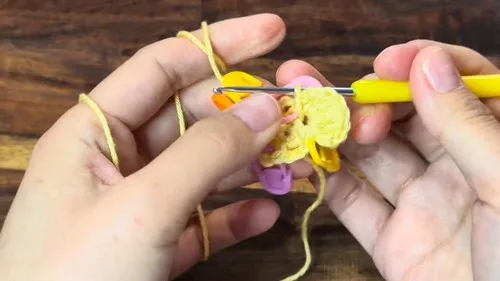
Expanding the Pattern: Insert the hook into a marked stitch, attach new yarn, chain 1 then single crochet. Chain 4, repeat in each stitch around to create 5 new chain spaces. Join with a slip stitch to the first stitch.
- Round 5(8)
Filling Chain Spaces: Chain 1, in the next chain space do 8 single crochets. Repeat in each chain space around. Join with a slip stitch to the first single crochet.
- Round 6(8)
Creating More Chain Spaces: Slip stitch in the next stitch, chain 1 then single crochet in the same stitch. Chain 4, skip 4 stitches, single crochet in the next stitch. Repeat around to create a total of 8 chain spaces.
- Round 7
Creating Circular Chain Spaces: Chain 1, work a single crochet then chain 5 in the same chain space. Repeat this process around, adjusting the last space as necessary to fit the pattern.
- Round 8(3)
Crocheting Corners: Chain 3 (counts as a double crochet), then add an additional chain. In each chain-5 space: Work 3 double crochets, chain 3, 3 double crochets. Continue around, finishing with a slip stitch to join.
- Round 9
Final Round Pre-Petals: Follow the same pattern as round 8, maintaining the stitch counts and incorporating chain spaces as directed.
- Rounds 10-11(3)
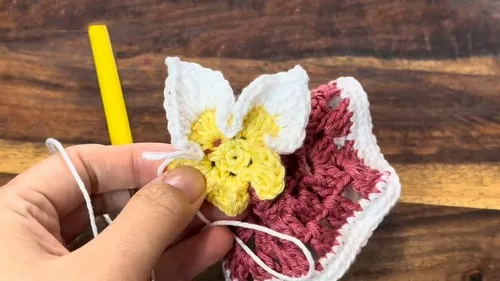
Single Crochet and Adding Edge Petals: Work two rounds of single crochets, placing 3 single crochets in the second of each corner stitch. For the final layer of petals, go back to the instructions described in Round 3 and apply them at each corner of the square.
More photos
Assembly Instructions
- Step 1 Cut the yarn, weave in any loose ends.
- Step 2 Optionally, block your granny square to size.
Important Notes
- 💡 Choose a hook that matches your yarn weight snugly — a slightly smaller hook than the yarn label suggests will help the chain-4 petal spaces hold their shape and stand up in 3D rather than flopping flat.
- 💡 Keep a spare stitch marker on hand at all times, since you'll need one to mark the working stitch for attaching new yarn and another to track your five chain-4 repeats as you go.
- 💡 Work in good light when inserting your hook into the marked stitch — this step is easy to fumble if you can't clearly see which loop you're working into, especially with darker yarn colors.
- 💡 If you're using two colors (petals and center), leave short yarn tails rather than cutting close, so you have enough length to weave in securely without the join popping loose later.
- 💡 Block your finished flower gently with steam or a light spray of water and let it dry flat-to-shape — this helps the 3D petals hold their lifted curve permanently instead of relaxing back down over time.
- 💡 Since this pattern builds up over eleven rounds, resist the urge to rush the final rounds — the last couple of rounds are where the dimensional shaping really happens, so slow down and check your stitch placement.
Common Mistakes and Fixes
- Losing track of which stitch is marked
Place your stitch marker the moment you finish the previous round, not later — this way you never have to hunt for the correct starting point when it's time to insert your hook and attach new yarn.
- Chaining unevenly when creating
Count your chains out loud each time and use a second stitch marker to mark every completed chain-4 space, so you can visually confirm you have exactly five evenly spaced repeats before moving on.
- Forgetting to chain 1 before single
Read that opening instruction as one linked motion — insert hook, attach yarn, chain 1, then single crochet — and practice it slowly the first time so it becomes automatic on later rounds.
- Joining the round with a regular slip
Insert your hook under both loops of the very first stitch of the round, pull the yarn through snugly but not too tight, and gently tug the seam flat with your fingers before continuing.
- Skipping the assembly steps
Always follow through the two assembly steps at the end, which are what shape the flat rounds into the actual raised, 3D frangipani form — the pattern isn't complete without them.
Variations
- This pattern is endlessly customizable once you get the hang of the base rounds. For a classic frangipani look, try white or cream petals with a sunny yellow center — Vanna's Choice in Cream or Bright Yellow works beautifully and holds its shape for the petal shaping. Want something bolder? Swap to coral, hot pink, or deep fuchsia petals with a golden center for a hibiscus-inspired twist, using a soft worsted like Soft or Scheepjes Merino Soft for extra drape in the petals. To change the size, simply size your hook up or down — a larger hook (like a J/6.0mm) with a bulky yarn will give you an oversized statement flower perfect for a pillow front, while a smaller hook (like a D/3.25mm) with fingering or sport weight yarn creates a delicate mini version ideal for earrings or bookmark embellishments. Since the pattern repeats the chain-4 spacing five times around, keep that repeat consistent even if you scale the yarn weight, and just adjust your starting round count if you want extra petal layers for a fuller bloom. For themed variations, consider a rainbow gradient where each of the five petal repeats uses a different shade for an ombré tropical effect, or work the entire flower in variegated yarn for a naturally blended, sunset-inspired bloom. Autumn crafters might love a burnt orange and burgundy version for a fall floral wreath, while a monochrome white-on-white version with subtle texture makes an elegant addition to a bridal or home decor piece. However you style it, this square adapts beautifully to whatever palette or scale your project calls for.
- I adore this pattern because it takes something as familiar as a granny square and gives it real, touchable dimension. Working into a marked stitch to attach new yarn and build the petals feels almost like sculpting rather than simple stitching — you can watch the flower lift right off the base as you go. The chain-4 spaces repeated five times around the round create the perfect petal foundation, and there's something so satisfying about watching those loose chains transform into structured, layered petals. It's a wonderful confidence-builder if you've done basic granny squares but want to push into more textured, sculptural crochet. I also love that it only uses one main pattern piece with eleven rounds, so it never feels overwhelming, but the result looks far more impressive than the effort required. Whether you're making one as a coaster or dozens for a blanket, that final slip stitch join always makes me grin — it's proof that a few simple rounds can create something that looks like it belongs in a botanical garden.
Frequently Asked Questions
What yarn weight works best for this 3D frangipani flower?
Worsted weight yarn gives the most balanced result, holding its shape well for the 3D petals without being too bulky. You can go finer for a delicate mini flower or bulkier for a statement piece, just size your hook accordingly.
How long does one frangipani granny square take to make?
Most crocheters can complete one square in about 3 to 5 hours, including the two assembly steps that shape the petals. Working several in a batch tends to go faster once you're familiar with the marked-stitch technique.
Do I need to know special stitches to make this pattern?
No special stitches beyond single crochet, chains, and slip stitches are required, but you do need to be comfortable inserting your hook into a specifically marked stitch. This precision is what gives the flower its raised, dimensional look.
Can I use this square for a full blanket, not just a single motif?
Absolutely — many crocheters repeat this frangipani square dozens of times to create a tropical-themed floral blanket. Just be consistent with your yarn weight and hook size across all squares so they finish the same size.
Why does my flower look flat instead of 3D?
This usually happens when the chain-4 spaces are worked too loosely or the assembly steps are skipped. Tighten your tension slightly on those chains and be sure to complete both assembly steps, which are what lift the petals into their dimensional shape.
Original pattern: https://crocheteverything.com/how-to-crochet-3d-frangipani-flower-granny-square-pattern/
About the Author

Marisol QuinteroWho runs Crochet Obsessed, why a stitch count sits at the end of every round, how a pattern gets written here, and the things this site will never do.
More Patterns
- IntermediateNo. 01

Slouchy everyday beanie worked flat in half double crochet
Crochet beanie pattern for a slouchy everyday look worked flat with hdc rows, then seamed into a soft,…
- IntermediateNo. 02
Crochet amigurumi doll with dress, shoes, and hat
Crochet amigurumi doll pattern with dress, shoes, and hat details for a soft, huggable keepsake you build one…
- IntermediateNo. 03
Chunky moss stitch crochet sweater with raglan-free shoulders
Chunky crochet sweater pattern using moss stitch, worked flat with a 10mm hook for a soft, fast, cool-weather…


