- LevelIntermediate
- Time4-6 hours
- Hook3 mm
- YarnWorsted
About This Pattern
There is something cheerful about a coaster shaped like a cat face waiting under your mug. This piece has that light, doodle-on-a-napkin energy, but built in sturdy cotton stitches. I think of it as a small joke you get to keep making every morning when you set down your coffee.
Your hands stay busy with a steady rhythm of single crochet and increases, round after round, until the flat circle starts to hold its shape. Then you shift gears to build the ears separately, working small and tight before joining them to the main piece. It is the kind of project where your fingers learn the pattern of the increases almost before your brain catches up.
Set on a side table or a kitchen counter, this cat coaster reads as a tiny, friendly object rather than a statement piece. It works alone under a single cup or in a stack of two or three, each one a slightly different color. Either way, it turns a plain surface into something someone will pick up and smile at.
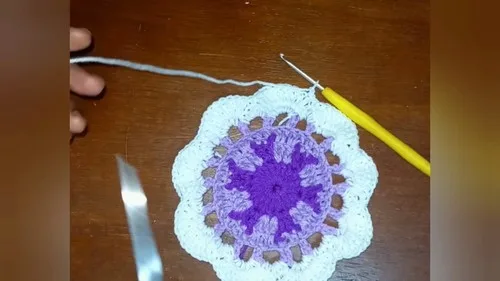
- Start with a magic ring and work the first small round of single crochet stitches, closing with a slip stitch.
- Build outward round by round, increasing evenly so the circle grows flat instead of curling.
- Alternate plain stitches and increases as the pattern instructs to widen the coaster gradually.
- Keep working successive rounds, increasing the spacing between increases each time to hold a flat shape.
- Set the main coaster piece aside once the rounds are complete.
- Make a separate magic ring for the ears and work them as their own small increasing rounds.
- Attach the finished ear pieces to the main coaster body once both are complete.
- Weave in any loose yarn ends so the finished coaster has a clean, secure back.
On the desk
- Cotton yarn (You can choose different colors)
- Crochet hook size: 3mm
- Sewing needle and yarn (for attaching ears/components, weaving in ends, and optional decorative details)
Stitch shorthand
- SC — single crochet
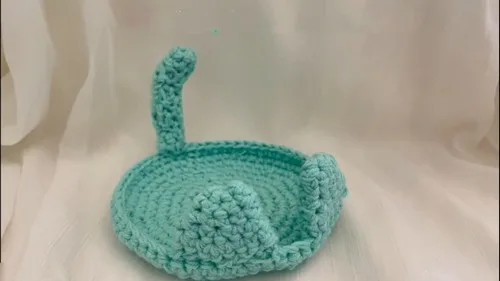
Crochet cat coaster pattern with cute ears and face
Base of Cat Coaster
Start: Make a magic ring.
- Round 1(7)
Chain 1 for height, then 7 SC into the magic ring. Close round with a slip stitch into the first SC.Increase in each stitch, totaling 14 SC.
- Round 2(14)
For Round 2: Chain 1. Make 2 SC in each stitch around (14 SC total). Close with a slip stitch.Alternate one SC and an increase in each stitch to reach 21 SC.
- Round 3(21)
Chain 1. 1 SC in the first stitch, 2 SC (an increase) in the next stitch. Repeat - around for a total of 21 SC. Close round with a slip stitch.Continue this pattern, increasing the number of stitches between increases in each successive round. Additional rounds are worked by increasing the number of SCs gradually to shape the coaster.
- Additional Rounds
Maintain the pattern of increasing SCs to achieve a flat, circular shape. Progressively, there should be 28 SC, 35 SC, 42 SC, and so on, each round, increasing as needed to maintain a flat disc until the desired size is reached for the coaster base.
Ears and Other Components
For ears and details, smaller components are created separately and attached later. For the ears and any additional decorative parts:
Start: With a magic ring.
- Round 1(6)
SC 6 into the magic ring for the starting of an ear or another component. Close round with a slip stitch.Step by step: Follow instructions specific to each part, typically increasing stitches in successive rounds to get the desired shape and size. Continue with the specific increase pattern mentioned in your instructions to complete the shape of the ears or other components.
Ensure all parts are securely attached. Weave in any loose ends for a clean finish.
You may opt to add texture or additional decorative elements with a sewing needle and yarn based on personal preference.
More shots
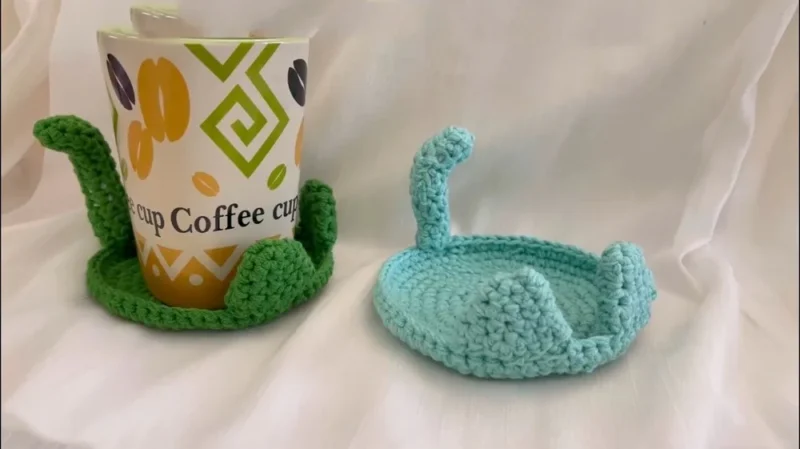
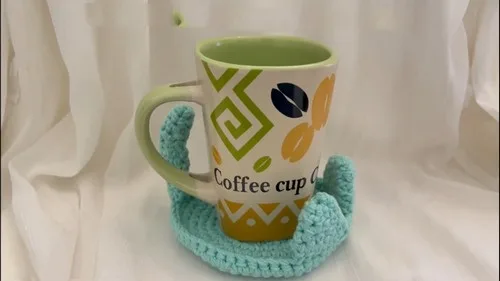
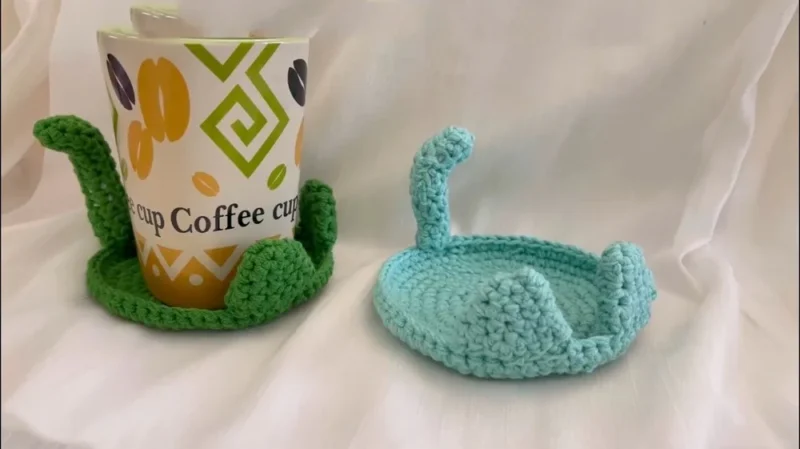
Where it goes
- Set one under a mug at your desk to protect papers from condensation rings while you work.
- Group two or three in different colors on a coffee table as a casual, low-key decor touch.
- Give a single coaster as a small handmade addition tucked alongside a card or a bag of coffee.
- Use it as a coaster for a houseplant saucer on a windowsill to catch drips.
Color ideas
- Classic tabby Work the main body rounds in a warm gray or brown, then make the ears in the same color for a single-tone cat, letting the shape do the work.
- Two-tone contrast Crochet the main coaster rounds in one solid color, then work the ear components in a contrasting color so they stand out clearly once attached.
Care
Hand wash the finished coaster in cool water since it is worked in cotton yarn, which holds up well to gentle washing but can shrink slightly in hot water.
Lay it flat to dry on a towel rather than hanging it, so the flat circular shape does not stretch out of round.
Store coasters flat in a drawer or stacked in a small basket to keep the ears from getting bent or flattened.
Easy to get wrong
Circle starts to ruffle or cup
This usually means too many increases were added in a round. Count your stitches at the end of each round and compare against the previous round before moving on.
Losing track of the increase spacing
As the rounds grow, the gap between increases gets larger and easy to lose count of. Place a stitch marker after each increase so you can see the pattern at a glance.
Ears attached unevenly
Because the ears are made separately, they can end up crooked or too far apart if you eyeball placement. Pin both pieces in place with the magic ring closures facing the same direction before stitching them down.
Between the songs
- The appeal here is in the shaping. You start with a simple magic ring and build outward using a classic increase sequence, one single crochet plus an increase repeated around, so the circle grows evenly without buckling or cupping. Watching flat rounds turn into a defined cat silhouette using nothing but stitch counts and spacing is genuinely satisfying. Then there is the separate build of the ears, worked from their own small magic rings and shaped with their own increase pattern before being attached. That two-stage construction, main body first, small components second, gives the whole project a satisfying assembly moment at the end, when the flat pieces suddenly read as a face.
Listener questions
What size hook does this pattern use
The pattern calls for a 3mm crochet hook. Sticking close to that size keeps your stitch gauge consistent with the increase counts given in each round.
Can I use a different yarn than cotton
Cotton is named in the materials because it holds its shape well for a flat coaster and handles regular washing. You can substitute another fiber, but a stiffer, plant-based yarn will give you the sturdiest, flattest result.
Why does my coaster keep curling into a bowl shape
That happens when there are more increases per round than the pattern calls for, which pulls the fabric inward instead of letting it lie flat. Recount your stitches at the end of each round and rip back if the total is off.
Do I make the ears before or after the main body
The main coaster body and the ear components are two separate parts, and either order works since they are made independently. Most crocheters find it easier to finish the larger main piece first, then work the smaller ear rounds while it is still fresh in mind.
How many coasters should I make for a set
The pattern itself does not specify a set size, since each coaster is a single standalone piece. Many people make a small stack in different colors, but that is entirely up to how many you want on hand.
Original pattern: https://crocheteverything.com/super-cute-crochet-spring-kitty-pattern-in-beautiful-colors/
About the Author

Marisol QuinteroWho runs Crochet Obsessed, why a stitch count sits at the end of every round, how a pattern gets written here, and the things this site will never do.
More Patterns
- IntermediateNo. 01

Round crochet coaster with a shell stitch edge
Round crochet coaster pattern with shell edges: a quick seven-round make that dresses up any mug or glass…
- IntermediateNo. 02
Rose Granny Square Tote Crochet Pattern
Rose granny square tote crochet pattern made from 18 dimensional rose squares for a sturdy, romantic everyday bag.
- IntermediateNo. 03
Tropical octopus baby blanket crochet pattern with appliqués
Tropical octopus baby blanket crochet pattern: a cream filet base with coral and turquoise octopus appliqués, leaves, and…